We're in the middle of a heat wave in Chicago. And anyone who knows me knows how much I hate the heat. Hate it hate it hate it. Oh, and did I mention that I HATE IT?
When it's this hot, I can't even think about cooking. Mary and I went to Kamehachi for dinner last night. I used to work right down the street from them, so I would get to go pretty often. I haven't had sushi since I quit my job last October*, and I've been dreaming about it ever since. Now that I'm solvent again it was the first thing I wanted to eat. We started off with (obligatory) edamame, beef with asparagus for Mary and crab shumai for me, all excellent as usual. Then Mary had a spicy shrimp roll, I opted for the tropical roll special, and we shared a spicy scallop roll. It was all delicious, but next time I think I'll skip the big roll and get more nigiri sushi. I missed the tuna, red snapper, and unagi.
Last time Mary and I went to Kamehachi, they had the most excellent creme brulee for dessert, so we decided we would splurge and get some if they had it on the menu again. They didn't, so we were good and had no dessert. It's easier to be good when there's nothing whispering your name.
We stopped at The Spice House on the way to the restaurant. I'll show you my goodies later.
I'm getting ready to head on over to the knit shop so I can spend a cool day knitting. Tomorrow is supposed to be even hotter so I don't expect to be doing much cooking/blogging until Tuesday at the earliest.
I did write a review for Herbs & Spices: The Cook's Reference, by Jill Norman, which should be up on Foodbound in the next couple of days. I'll give you a head's up.
*Ooops, I lied. I just remembered that I went twice for lunch with Lynda to the restaurant near the bookstore, but that was a while ago so I had forgotten. But it's been long enough for me to feel really, really deprived.
Sunday, July 30, 2006
Tuesday, July 25, 2006
At the Farmer's Market
 I forgot to mention that, in addition to all of the other things I've got going on this month, I'm teaching two knitting classes as well. Tonight was the last of the Tuesday classes.
I just got home and I'm beat.
But if you want something to read, my little piece on the Farmer's Market is up on Fitfare. I finally took my camera out into the world and got some pictures. Go check it out.
Monday, July 24, 2006
Am I Blue? You Bet!
Yesterday I mentioned that I bought some blue potatoes at the Farmer's Market. I've been wanting to try them for a while and had a hankering for some potato salad so this seemed like the right time to get me some.
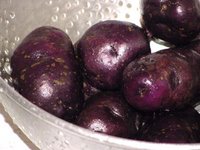 See how shiny and blue they are? They aren't quite as purple as they look here. They do have a little purple in them, but they were distinctly different from the purple potatoes this vendor also had on hand.
These potatoes were on the large size for fingerlings. Since I knew I was making potato salad with them, I purposely chose large ones, and tried to keep the shapes consistent so they would cook evenly.
After scrubbing the potatoes, I put them in a three-quart saucepan full of cold water, brought it up to a boil, then lowered the heat and cooked the potatoes for about 20 minutes. It was almost too long--they were really tender when I tested them.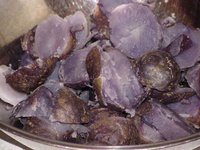
As you can see, they kept their blue color after they were cooked. They sliced up nicely, although they were a little more starchy than I expected. I expected them to be waxy like reds, but they're closer to russets, which makes them less ideal for potato salad. But they held their shape.
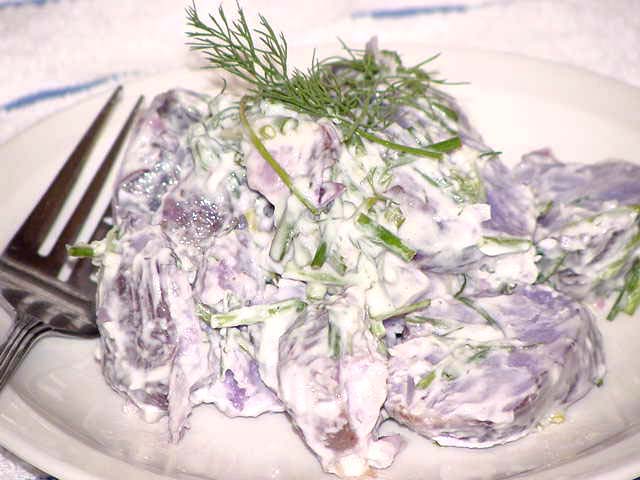
As far as potato salad goes, I have a kick-ass traditional version that I've been making for years. It's one of those everything-but-the-kitchen-sink versions with hard-boiled eggs, celery, onion, dill pickles, green olives, mayonnaise, mustard, garlic powder, salt and coarsely ground pepper. And let me tell you, it's pretty fabulous.
But a few years ago I made aioli from a recipe in Deborah Madison's Vegetarian Cooking for Everyone and it practically made me swoon with it's garlicky goodness. (It's really easy--you just take a cup of mayonnaise, add 4-6 cloves crushed garlic, and salt and lemon juice to taste. Mmmmmmm.)
That same week I had been invited to a barbecue and was trying to decide what I could bring along. I had some new potatoes, but no russet which were my usual potatoes for my kitchen-sink potato salad. I also had some fresh dill on hand for some reason, which was not so usual for me in those days. But I got to thinking and decided to keep it simple, so I threw together a simple salad with the potatoes, the dill, some salt and pepper, and lots of the aioli. I believe I did use hard-boiled eggs that time, but I've since cut those out as well.
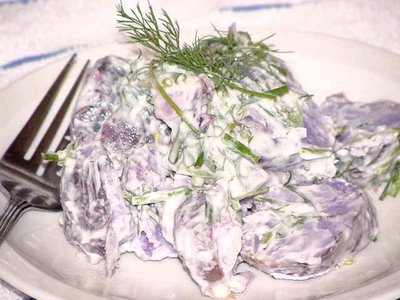
This is the little black dress of potato salads--simple, suave and sophisticated. The addition of chives was the perfect touch.
 See how shiny and blue they are? They aren't quite as purple as they look here. They do have a little purple in them, but they were distinctly different from the purple potatoes this vendor also had on hand.
These potatoes were on the large size for fingerlings. Since I knew I was making potato salad with them, I purposely chose large ones, and tried to keep the shapes consistent so they would cook evenly.
After scrubbing the potatoes, I put them in a three-quart saucepan full of cold water, brought it up to a boil, then lowered the heat and cooked the potatoes for about 20 minutes. It was almost too long--they were really tender when I tested them.

As you can see, they kept their blue color after they were cooked. They sliced up nicely, although they were a little more starchy than I expected. I expected them to be waxy like reds, but they're closer to russets, which makes them less ideal for potato salad. But they held their shape.
As far as potato salad goes, I have a kick-ass traditional version that I've been making for years. It's one of those everything-but-the-kitchen-sink versions with hard-boiled eggs, celery, onion, dill pickles, green olives, mayonnaise, mustard, garlic powder, salt and coarsely ground pepper. And let me tell you, it's pretty fabulous.
But a few years ago I made aioli from a recipe in Deborah Madison's Vegetarian Cooking for Everyone and it practically made me swoon with it's garlicky goodness. (It's really easy--you just take a cup of mayonnaise, add 4-6 cloves crushed garlic, and salt and lemon juice to taste. Mmmmmmm.)
That same week I had been invited to a barbecue and was trying to decide what I could bring along. I had some new potatoes, but no russet which were my usual potatoes for my kitchen-sink potato salad. I also had some fresh dill on hand for some reason, which was not so usual for me in those days. But I got to thinking and decided to keep it simple, so I threw together a simple salad with the potatoes, the dill, some salt and pepper, and lots of the aioli. I believe I did use hard-boiled eggs that time, but I've since cut those out as well.
This is the little black dress of potato salads--simple, suave and sophisticated. The addition of chives was the perfect touch.
Aioli Dill Potato Salad
24-oz. new potatoes
1/2 cup aioli, or more if desired
A handful of fresh chives, chopped (to taste)
A handful of fresh dill sprigs (to taste)
Salt and pepper to taste
Scrub potatoes and place in cold water in 3-quart saucepan. Bring to a boil over high heat; lower heat and simmer, covered, 15-20 minutes, until tender enough to insert fork with no resistance. Be careful not to overcook.
Drain potatoes and let cool. Slice approximately 1/4" thick and place in large bowl. Add herbs, salt and pepper. Add aioli a little at a time until desired consistency is reached.
Let it come to room temperature before serving (but don't let it sit out too long).
Sunday, July 23, 2006
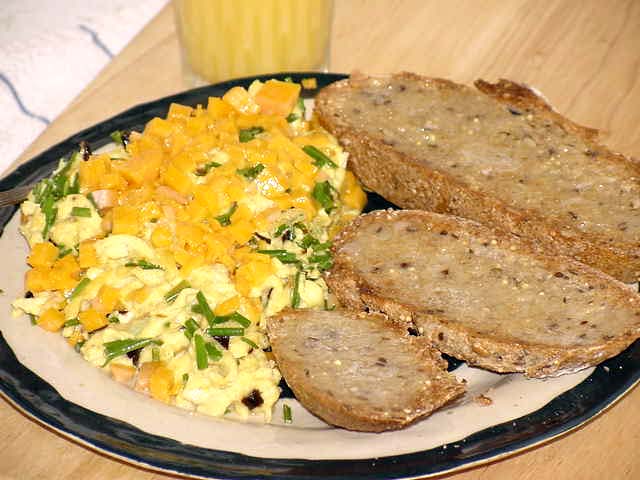
Eggs . . . Cheese . . . Chives . . .
I've been eating crap lately. Having a full-time job again (on top of the other commitments I made before I had the job) has meant two things for my cooking habits: (1) I don't have enough time to plan and prepare my meals, and (2) I now have enough money that I can just buy something if I didn't prepare lunch ahead of time.
Now I'm really lucky--my new office is literally across the street from a huge Dominick's grocery store that has an incredible deli section. That means I can and should be making healthier choices. But one thing I've learned abut myself is that once I start down that slippery slope of convenience eating, it gets too easy to choose the faster, less healthy options.
And for me, that's because when I'm trying to eat less processed foods it's harder to just buy something off the shelf and have it taste good. As much as I have grown to love vegetables, I'm not a fan of buying them out of the produce section and eating them as is. I have to cook them and season them and pretty them up. I also don't really have my own space at work yet, which makes it hard for me to settle in with food and utensils that would help me be able to make healthier choices.
But enough with the excuses. I'm determined to get back on track this coming week. I soaked some black beans overnight and I'm going to cook them up for lunches. I bought lots of fruit for snacking, and I went to the Green Market yesterday morning and got some vegetables that I can cook up fast to eat with pasta for dinner.
But Debi, I can hear you ask me, what does any of this have to do with the scrambled eggs and toast sitting up there on top of this post?
Well, I'll tell you . . .
Ok, you've got me. The two things have nothing to do with each other. But while I was at the Green Market yesterday I stopped at the Brunkow Cheese stand yet again to sample their delicious cheeses. I had already bought another one of those round multi-grain breads I've come to love, but couldn't find the goat cheese people to get some cheese to go with it, so I decided this would be a good time to pay the nice Brunkow people back for all the wonderful samples I've had over the past few months.
And they have incredible cheeses, especially a ten-year-aged cheddar that's out of this world. It was expensive, but I can afford it now, so I splurged and bought a hunk.
 Isn't it lovely? I bought the chives to go with some blue potatoes I also picked up at the market yesterday.
And just like Melanie Griffith in Working Girl talking about how she came up with the idea to merge Trask Industries with a radio station, all morning just beneath the surface my brain was going "eggs . . . cheese . . . chives . . ." and came up with "omelet!"
I don't eat very much cheese, and I try to stay away from eggs because I only like them with cheese and buttered toast, so it's rare that I have all the ingredients on hand for an omelet. When I do, it's hard to resist. So I decided to go for it.
You may notice that, while it does have the vague shape of an omelet, that's really scrambled eggs and chives topped with cheese up there. There's a very good reason for that--I finally had to get rid of the pan I use for omelets, and I had forgotten I don't have it anymore. The pan I ended up using didn't work out, so I ended up scrambling the eggs instead, then added the cheese after the eggs were cooked.
So it may not have looked perfect, but it tasted delicious. I also had some chopped up pasilla peppers left over from the roasted pepper and walnut spread, so I threw those in with the eggs for a nice spicy bite.
So I've started off my week with a lovely Sunday breakfast. I'll be letting you know how the rest of the week goes.
Thursday, July 20, 2006
Where Does the Time Go?
I can't believe it's already Thursday night and I haven't written anything here since Sunday.
And the bad news is I won't be writing anything soon. I have two posts due for Fitfare the next week, along with a cookbook review for Foodbound.
I'm still adjusting to my new work schedule, and while it's getting easier and I'm learning quickly, it will be a while before I truly settle in, and even longer before I get used to getting up so early in the morning.
But mostly, it's been H-O-T around here, and I hate heat.
So all of these things are conspiring against me. I hope to start cooking and posting regularly again next week.
Sunday, July 16, 2006
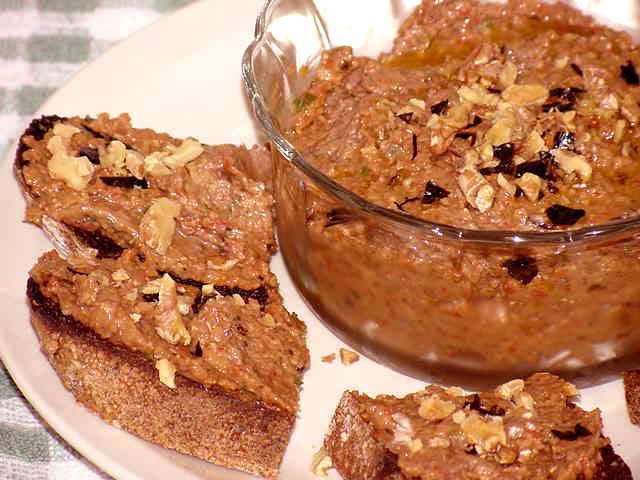
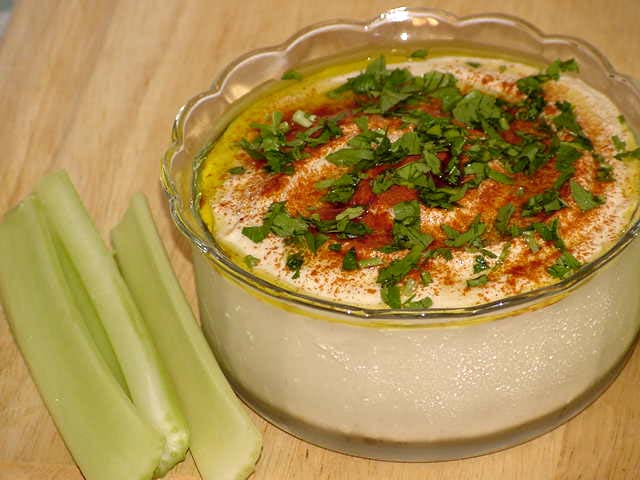
Muhammara
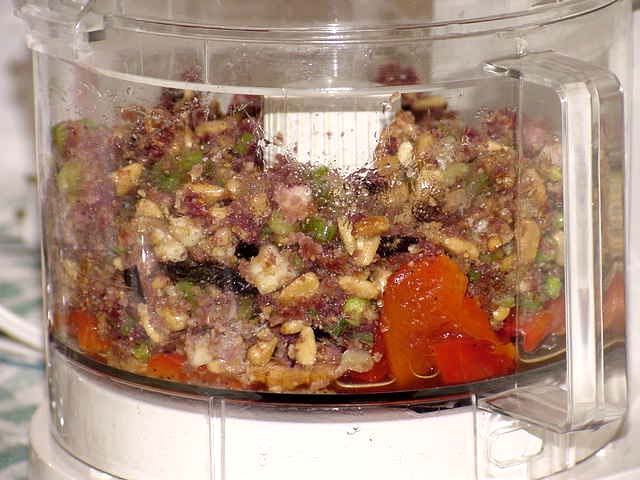 I said I would tell you why I was roasting and peeling red peppers a little while ago. Well, here's the reason.
When I first started hanging out at my local knit shop a few years ago, we would often order hummus from the Middle Eastern restaurant down the street. When we would go to pick it up, the owner would give us free samples of dishes he was working on for his menu.
One of the dishes was a roasted pepper walnut dip, about the same consistency as hummus, that was super spicy. He named the dish Appetizer Aladdin, after his restaurant. I had never seen anything like it before, so I assumed it was some kind of takeoff on harissa, a North African sauce made from peppers and tomatoes. Whatever it was, it was delicious and we ordered it all the time. It was really good with some hummus to temper the heat a little.
After I got those lovely guajillo peppers for my birthday, I looked them up and discovered that they were sometimes used in making harissa, so I thought I might make some. But in looking for recipes, I discovered recipes for a dish called Muhammara, a red pepper and walnut spread that sounded just like the Appetizer Aladdin. One of the recipes I found was in the cookbook I reviewed for Foodbound, called Spice: Flavors of the Eastern Mediterranean, by Ana Sortun. Since I like to try a recipe with any cookbook I review, I decided to make the Muhammara.
 Once the peppers were roasted and peeled, this was easy to make--you just throw everything into the food processor and process until it's the consistency you like. Mine came out pretty thick, I had to thin it out with some hot water. With the bread crumbs, it continued to thicken in the refrigerator and I had to thin it out every time I wanted to use it. I don't think the breadcrumbs are necessary and I will probably leave them out next time, or maybe only use a quarter of a cup.
This makes a nice change from the usual hummus and tabbouleh you see at parties. Bring this to your next outing and it will be the hit of the party. It's equally good on toasted bread or with pita.
I didn't have Aleppo or Urfa chilies, so I used Pasilla and Guajillo. At first it didn't seem very spicy, but the more it sat the hotter it got.
Home Cookin 4.9 Chapter: Appetizers, Spreads and DipsMuhammara (Red Pepper and Walnut Puree
1/4 cup olive oil plus 1 Tbsp for garnish
2 large red bell peppers, roasted and peeled
4 whole scallions, root ends trimmed and finely chopped (reserve 1 Tbsp for garnish)
1 tsp chopped garlic
1/3 cup walnut halves, lightly toasted
1/3 cup pine nuts, lightly toasted, plus 1 Tbsp for garnish
1/2 cup finely ground toasted bread crumbs
1 Tbsp freshly squeezed lemon juice
1 Tbsp pomegranate molasses
1 Tbsp Aleppo chilies plus 1/2 tsp for garnish
1 Tbsp Urfa chilies plus 1/2 tsp for garnish
1 tsp ground cumin
1 Tbsp yogurt
1/4 tsp salt plus more to taste
Remove as many seeds from the red peppers you can and place them in a small mixing bowl. Add the rest of the ingredients (minus garnishes) and place in food processor.
Process ingredients until smooth. Season to taste with salt.
This is best after one day. Garnish and serve with toasted pita or crusty French bread.Makes about 2 cups.
Adapted from Spice: Flavors of the Eastern Mediterranean, by Ana Sortun (ReganBooks, 2006)
Saturday, July 15, 2006
TSIR 4: Salsa Gigante!
 This month I get to kill two posts with one stone. I had already committed to writing a post about salsa on Fitfare, and then Barbara at Tigers and Strawberries announced that the theme for this month's Spice Is Right event is chilies. She asked us to show our favorite recipes using them. Well, as it happens, my favorite, most long-standing use of chilies is the salsa recipe I got from my friend Donna back in Austin over twenty years ago.
When I was growing up in Texas, I was a hopeless hot sauce wimp. I couldn't stand anything that had any heat whatsoever. I didn't even like pepper, but that may have been because my mother didn't like it and never used it. We only had salt in our salt and pepper shakers. I barely dipped my tortilla chips in the salsa they provided at Mexican Restaurants, and I could only eat nachos after taking off the jalapenos. (Except for that one night about the time I graduated from high school in Dallas and found myself with friends at an awful chain Mexican restaurant, where I meticulously and hysterically picked every single jalapeno off of the nachos and popped them into my mouth. But I was stoned then, so that doesn't really count.)
As I got older, I was able to tolerate heat a little better, but still didn't care that much for it. But I was developing some uses for spicy foods. After spending a night with a friend I discovered that there's nothing more heavenly than freshly ground black pepper on top of scrambled eggs. And coarsely ground black pepper really livened up my tuna salad.
And then, as I wrote in my salsa post on Fitfare, one of my co-workers at the library started bringing in his homemade salsa and selling it. It was spicy and fresh and I couldn't get enough of it. I discovered that it was his use of serrano peppers that made it taste so good, and that was when I discovered that chilies have distinctive tastes, and it wasn't the heat of the jalapenos that I had disliked for all those years--it was the taste of the pickled jalapenos that was all I had ever known that was so distasteful to me.
And then, a few years later, the first szechuan style Chinese restaurant opened its doors in Austin, and I tasted yet another kind of chili. Szechuan chilies reminded me of dried serrano peppers--they had the same kind of bright, fresh heat that perked up any dish. Next to tickle my palate was Indian, with it's long slow steady curry heat. And then, I discovered Thai food, with its incredibly hot thai chilies.
Now I love all things spicy, including pickled jalapenos. But as soon as summer's bounty brings fresh, ripe tomatoes, I turn to the heat that changed my life and brought all things chili into my life.
Salsa Picante
1 28-oz. can whole stewed tomatoes
8-10 serrano peppers, chopped fine
1-2 large cloves garlic, chopped
handful of cilantro (to taste)
2 Tbsp olive oil
salt (to taste)
1/2 tsp oregano (or to taste)
2 large tomatoes, chopped fine
4-6 green onions, sliced thin
Drain juice from tomatoes into blender. Add peppers, garlic, cilantro, olive oil and salt. Blend until peppers are just chopped. Pour into large mixing bowl.
Put the tomatoes in the blender with the oregano and JUST chop them. Add them to the mixing bowl. Add the chopped tomatoes and the green onions.
Let stand for a few hours to allow the flavors to mix. This gets better over time.
Thursday, July 13, 2006
If It's Basil, This Must Be Pesto
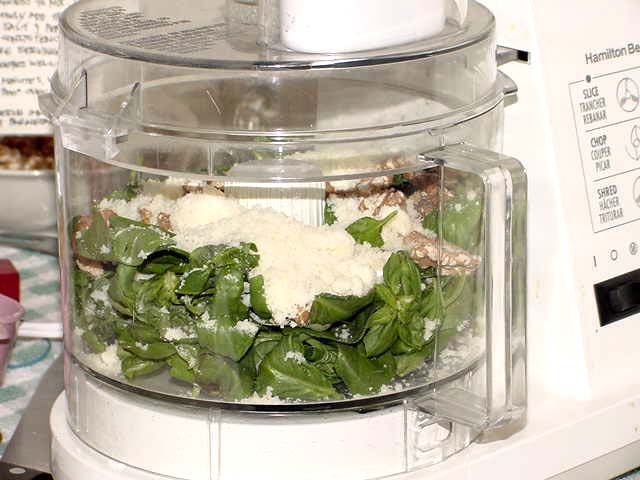 So I had bunches of basil I got at the Green Market this Saturday. At $1.50 a bunch, I had no choice but to buy two huge bundles.
It's pesto time!
My sister turned me onto pesto several years ago, and I've made it a couple of times since then. She, on the other hand, has mastered it and turned it into a fine art. She makes all kinds of pesto using all kinds of clever and creative ingredients. I've been fortunate to sample a few of them and they're all delicious. On one of my recent visits she made the most incredible dish using farfalle and vegetables mixed with the most incredible sun-dried tomato pesto. She's an artisan who puts my feeble efforts every couple of years to shame.
But still, every once in a while, the pesto songbird sings it's sweet tune and I'm inspired to get out the food processor.
 The general way to serve pesto is to cook up a pound of pasta, drain it, and add the pesto while the pasta is hot so the pesto melts into a wonderful sauce. But I'm still playing around with the absorption method of cooking pasta, so I've been cooking up a single portion of pasta and taking it to work with me, with a little bit of pesto in a separate container. I also have some cooked chicken in the fridge, and I've been putting a little bit of that in there too.
It's a nice treat in the middle of the day.
Classic Basil Pesto
My sister gave me this recipe years ago. She has adapted it a millions ways to Sunday since then, but I follow it pretty closely and it's mighty fine just as it is.
2 cups fresh basil leaves*
2 large cloves garlic
1/2 cup freshly grated parmesan cheese
2 Tbsp freshly grated pecorino romano cheese
1/4 cup toasted pine nuts or walnuts
1/2 cup olive oil**
salt and freshly ground pepper.
Combine basil, garlic, cheeses and nuts in food processor or blender. Process to mix. With machine running, slowly add the oil. Season to taste with salt and pepper, and process to desired consistency. Let stand 5 minutes before serving.
Toss with hot pasta and serve immediately.
Makes 1 cup; freezes well.
*Loosely packed. Be sure the leaves are completely dry or your sauce will be runny.
**You can use less, but I wouldn't go lower than 1/4 cup.
Tuesday, July 11, 2006
Get Your Garlic While It's Fresh
Saturday Lynda and I met up at the Green Market. I was thrilled to find that they had fresh garlic. I first got some there a couple of years ago and I wait for it to come into season every year.
This year there was a twist--it had a little cap on it. I've never seen that before. It kind of looked like the onion tops I got there a couple of weeks ago (and I I wrote about here). I asked the guy what to do with it and he said "Cook it up and eat it." D'oh!
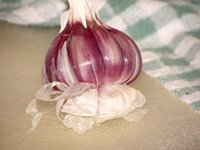 Here's the beautiful fresh garlic bulb. Actually, it could have been fresher--I got it Saturday and didn't cook it until Monday, which was enough time for it to dry out a little.
But just a little. The flavor is so subtle you can cook the whole bulb without it being too strong.
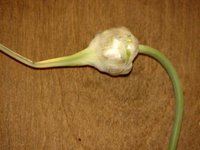 And here's the little garlic cluster at the top. The cloves were teeny tiny and popped apart like a pometranate, except that there are no seeds inside them.
And then I just have to show you the whole thing. Look how tall that puppy is! Lynda said it looked like I had a tail walking home with it sticking out of my bag.
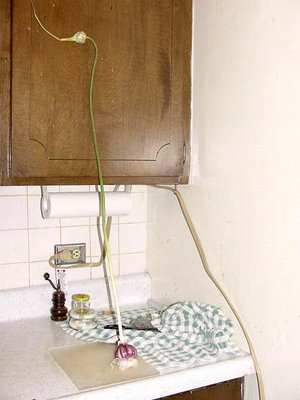 I was going to make a stir-fry with the garlic, some zucchini, and three gorgeous first-of-the-season Japanese eggplants, but I'm having a little bit of a food crisis right now. I have too much food to cook and not enough time in which to cook it right now, thanks to my new job. So last night it was cook it up or throw away the eggplant, and they were too beautiful to waste.
So instead of a stir-fry, I just sauteed the garlic and eggplant together, then braised them in a little bit of chicken stock I had (accidentally!) reduced to a super strong concentrate from my Fourth of July slow-cooker chicken. But the little bit of broth turned out to be a lot, so I added a little corn starch to thicken it up. And then it looked like I might have cooked it a little too long because the eggplant got really soft and mushy looking. It looked so bad I didn't even bother to take a picture.
And then I tasted it, and it was really good. Turns out the chicken stock had some sweetness in it, the eggplant was like silk, and the garlic and garlic clusters were like velvet. I didn't use any other seasonings except for a little salt, so the flavors of the eggplant and garlic really stood out.
I hope they have some more garlic next time I go. It has a short season, though, so it's a little iffy.
Now I have to hurry up and do something with those gorgeous green and golden zucchini. I hope they're good for another day or two.
Monday, July 10, 2006
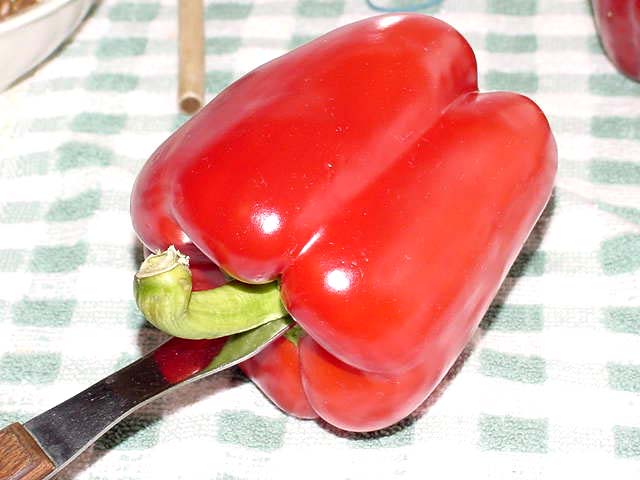
How To Roast a Pepper
If you're like me, there are several techniques that can be scary if you've never done them before. Roasting peppers was one of those techniques. Now that I've done it successfully a few times, I thought you might enjoy a little tutorial.
For obvious reasons, this only works on a gas range. If you have electric, you can simply roast them in the stove, put them in the bowl to steam, and then peel them. But this method seems easier to me, with one less pan to clean and a not-so-warm apartment, especially in the middle of summer.
 1. Skewer a large two-tined fork through the stem of the pepper. Be sure to get it in clean and deep the first time. If you have to pull it out and start over you will have a wobbly pepper, which can be dangerous over an open flame.
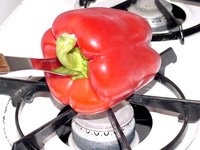 2. Turn the burner on as high as it will go. Place pepper over the high flame. You can't see it, but there's a hoppin' blue flame coming out of that burner. Let the pepper sit over the flame for around ten seconds at a time before repositioning it.
It's ok to let the pepper rest on the burner; in fact, it's preferable. The heat from the flame will keep it sterile and the burner will help you keep it steady.
 3. Continue roasting the pepper over the open flame, turning it steadily every ten seconds or so until the whole thing is well charred all over. Any parts that don't get blackened won't peel well, and that's the main objective here. Don't worry too much about the top of the pepper--it's hard to reach without burning yourself or the fork and it's the part that generally gets removed with the seeds.
Repeat for each pepper you want to roast. I roasted two peppers here.
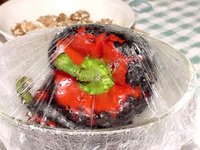 4. Once the peppers are roasted, place them in a glass bowl and cover tightly with plastic wrap. Let them sit for around 15 minutes.
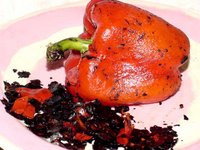 5. Remove peppers and peel off the skin. Don't rinse them--you want some of those blackened bits to stay on the pepper--that's what gives them their flavor.
Once they're peeled, if they're not cooked quite as much as I want, I put them in the microwave for a minute or two, cover them back up, and let them steam for another 5 minutes or so.
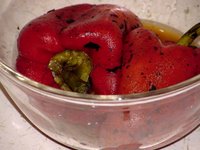 6. And there you have it. Simply remove the seeds and you're ready to go.
And why was I roasting peppers, you ask? Well, I'll tell you . . .
. . . later.
For obvious reasons, this only works on a gas range. If you have electric, you can simply roast them in the stove, put them in the bowl to steam, and then peel them. But this method seems easier to me, with one less pan to clean and a not-so-warm apartment, especially in the middle of summer.
 1. Skewer a large two-tined fork through the stem of the pepper. Be sure to get it in clean and deep the first time. If you have to pull it out and start over you will have a wobbly pepper, which can be dangerous over an open flame.
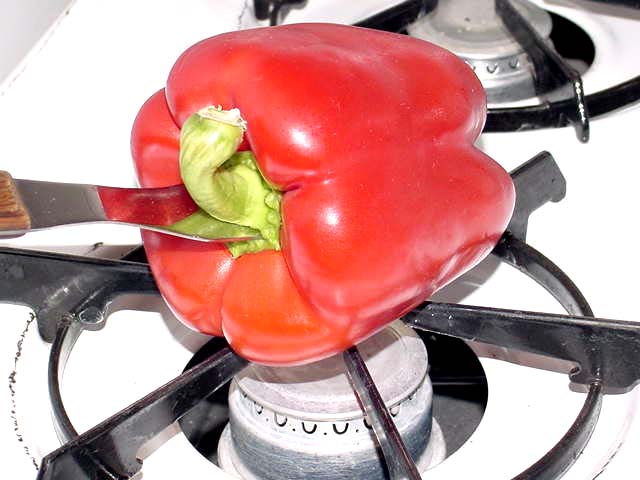 2. Turn the burner on as high as it will go. Place pepper over the high flame. You can't see it, but there's a hoppin' blue flame coming out of that burner. Let the pepper sit over the flame for around ten seconds at a time before repositioning it.
It's ok to let the pepper rest on the burner; in fact, it's preferable. The heat from the flame will keep it sterile and the burner will help you keep it steady.
 3. Continue roasting the pepper over the open flame, turning it steadily every ten seconds or so until the whole thing is well charred all over. Any parts that don't get blackened won't peel well, and that's the main objective here. Don't worry too much about the top of the pepper--it's hard to reach without burning yourself or the fork and it's the part that generally gets removed with the seeds.
Repeat for each pepper you want to roast. I roasted two peppers here.
 4. Once the peppers are roasted, place them in a glass bowl and cover tightly with plastic wrap. Let them sit for around 15 minutes.
 5. Remove peppers and peel off the skin. Don't rinse them--you want some of those blackened bits to stay on the pepper--that's what gives them their flavor.
Once they're peeled, if they're not cooked quite as much as I want, I put them in the microwave for a minute or two, cover them back up, and let them steam for another 5 minutes or so.
 6. And there you have it. Simply remove the seeds and you're ready to go.
And why was I roasting peppers, you ask? Well, I'll tell you . . .
. . . later.
Sunday, July 09, 2006
New Job
Tomorrow I'm starting a new job. I'm pretty excited about it. It's been about eight months since I quit my other job and things were getting a little scary.
It will be interesting to see how my blogging will change. I don't plan to to cut down on my posts. I hope I don't have to.
I'm planning to take lunches to work with me, but not this first week. This week I plan to see how things work, what kind of facilities there are for fixing/heating food, etc.
The really good news is that there's a grocery store literally right across the street from my new office. So no excuses for not making it to the store, right?
Saturday, July 08, 2006
One of Those Days
I know you've had one just like it. I got out the blender so I could make some salsa. I chopped garlic, serrano peppers, and cilantro and threw them into the blender, along with the juice from a can of stewed tomatoes.
I picked up the blender pitcher to put it in the base and noticed a little liquid dripping from the bottom. Hmmm. Some plastic teeth have fallen out of the bottom of the blade (sad results of my earlier attempts to produce a creamier hummus--if only I'd known to skin the chickpeas :sigh:), so I thought maybe it had finally given up the ghost. I tip the pitcher to get a better look at the bottom of the blade.
And dump over half of the peppers, garlic, cilantro, and tomato juice into the sink.
Major bummer. There wasn't enough left to salvage even a small batch, so it's back to the grocery store for more peppers. At least I still have everything else.
And at least I tipped the pitcher while I was standing over the sink. It would have been a much uglier story otherwise.
And as it turns out, the little rubber thingy that goes around the base of the blade was loose. Works just fine now.
And now I know to check it every time I'm going to use the blender.
Friday, July 07, 2006
Tomato Broccoli
 My review of Tomato Broccoli (and the recipe) from the 12 Best Foods Cookbook is up on Fitfare. With three out of twelve recipes tested, I have to say I'm liking the results. It's a quirky little book, but I am finding some different ways to use familiar foods.
The next best food is chocolate. Now that's going to be tough.
Pinto Beans and (no) Brown Rice
 This is what the pinto beans and brown rice I wrote about here usually looks like. I like it better with the tomato in it--it freshens up the taste. The jalapeno I used in this batch had a lot of seeds and is super spicy. I did not make rice this time. Sometimes I just eat the beans by themselves.
That old rule about combining different foods to make complete proteins doesn't mean you have to eat them at the same time. That's an old myth that was debunked a few years ago. If you eat them within the same day you get the same benefit. So I don't worry as much about being sure to always combine grains and protein at every meal. So the oatmeal I have for breakfast almost every morning combines with the beans to make a complete protein.
As for the What's in Your Pantry section, the only thing I did not have on hand was the cilantro I bought. I will be using the rest of that this weekend to make my first batch of salsa for the year.
I forgot to add the What's in Your Pantry section for yesterday's post. For the hummus, I had everything on hand except the lemons I bought Thursday. I'm almost out of tahini, though, so it's going on my list for my next major grocery store trip.
Thursday, July 06, 2006
Forget the Da Vinci Code
 I've cracked the biggest mystery of our times--how to make creamy hummus.
The secret has eluded me for decades. I've tried food processors, blenders, more water and less tahini, less water and more tahini, blended until well after the cows came home, and I could never get it to that smooth creamy consistency you find in restaurants.
I love hummus, and it's really easy to make, except for that little texture problem. It always comes out grainy.
Well, never again. I give you (drumroll please) . . .
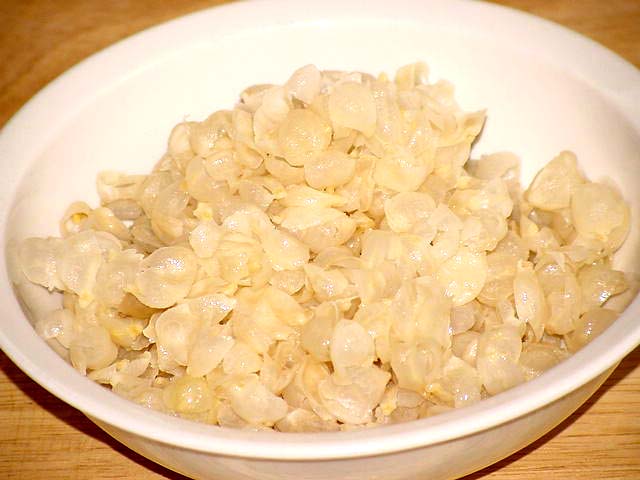 Chickpea skins!
Yes, you read right. Each of those little nuggets is encased in a thick, almost gelatinous skin. I've noticed it ever since I've been cooking them from dried, and even occasionally had a fleeting thought about what would happen if I were to peel them.
And then someone on usenet recommended peeling them for a creamier, smoother dip.
 This is what they look like once they're peeled. They're a little slick, and they take up less room in the bowl.
My friend Bob invited me over to see his new place this past Sunday. It was pretty hot so I wasn't really up to cooking, but I wanted to take something with me. Hummus is quick, easy, and travels well so I thought I'd throw some together.
Now I've already broken one blender in my attempt to get a creamy hummus, and the bigger, better, stronger one that I got to replace it is just about to go as well, so clearly that wasn't the answer. Maybe skinning was the answer. So I got two bowls, sat down at the kitchen table, and spent half an hour squeezing each little bean out of its little skin. It was time-consuming, but not hard.
Then I went back to the kitchen, pulled out my food processor, and followed my usual recipe.
And Bingo! Hit the jackpot bigtime. This is genuine restaurant grade A-1 creamy hummus baby! I also used a little trick I got from Lynda, to drizzle in a little bit of olive oil at the end.
This is primo stuff. It's good with toasted pita, but I like it with celery, too, so I can eat more of the hummus with less of the guilt.
As with guacamole, I'm a bit of a hummus purist. Chickpeas, garlic, lemon juice, tahini, water, salt and pepper. That's basically it. No other spices to compromise the beauty of the bean.
Home Cookin 4.9 Chapter: Appetizers, Spreads and Dips
Hummus bi Tahini
4 Tbsp. Tahini
6 Tbsp. fresh lemon juice
6-8 Tbsp. warm water
1 clove garlic, chopped
14-oz. can chickpeas, drained and rinsed
1/2 tsp. salt
black pepper to taste
1-2 Tbsp olive oil
olive oil (garnish)
chopped fresh parsley (garnish)
Put the tahini, lemon juice, water, and garlic into a blender or a food processor fitted with the metal blade. Cover and process until smooth.
With the machine running, gradually add the chickpeas, salt, and pepper, processing until the mixture is the consistency of a very thick paste. If necessary, stop the machine and scrape down the sides with a spatula. The mixture will thicken when it is refrigerated, so if it seems too thick when you've finished processing it, add up to 8 Tbsp. more water and process again. Add the olive oil in a stream at the very end of the processing. Taste to correct seasonings.
Put hummus into a bowl and refrigerate, covered, to chill. Before serving, drizzle with olive oil and garnish with the chopped parsley. Surround with pita wedges.
To store, refrigerate, covered, for up to 1 week, or freeze for up to 3 months.
Makes 1 pound
adapted from Pita the Great, by Virginia T. Habeeb (Ebury Press, 1986)
Wednesday, July 05, 2006
My Fourth of July Dinner
 My Fourth of July dinner was a beautiful illustration of utilizing what I had on hand to come up with something pretty special, healthy, and delicious.
I did go back to the grocery store for the broccoli. I also bought some tomatoes and some more blueberries (they were on sale $2.00 a pint). Since I scarfed down the corn I had bought before, I also bought some more of that.
I hadn't really planned a special dinner. I bought the broccoli for a test recipe for one of my 12 Best Foods Cookbook posts over on Fitfare, and I was trying to decide what I should make to go with it. Since pretty much the only thing I have in the freezer is chicken, it won by default. I pulled a package of chicken quarters ($0.49/lb.) out and threw it in the fridge to defrost for a couple of days. I still have plenty of carrots on hand, and a big onion I knew would make a nice bed in the crockpot for the chicken. I pretty much used the same recipe I used for the Slow Cooker Drumsticks and Carrots, except that I used quarters instead of drumsticks, I left the bones in the pieces, and I didn't add any parsley (which is too bad, because I have some and it would have been nice to use it up). And since I was going to have the chicken with the corn, I skipped the couscous.
I bought the tomatoes specifically to use with the cucumber I had left over from last week. I had some red wine vinegar in a little jar in the fridge that was left over from something else I had made recently (I can't remember what, now) so I used it to make a marinade for the cucumber and tomato salad. I made that right after I put the chicken in the slow cooker so it would have plenty of time to marinate before it was time to eat.
I don't make cucumber salads very often. When I was younger and we were going to have it at home we would just chop up some tomatoes, cucumbers and onion and dress them with white vinegar and oil and salt (no pepper) right before dinner, so the vegetables didn't have much time to absorb any of the flavors of the marinade.
As a dinner was taking shape in my mind, I decided to take more time with the salad. I peeled and sliced the cucumbers, layered the slices in a colander and sprinkled them with salt, and let it sit for a half hour, then I rinsed them off and squeezed the liquid out of them. I have to admit, it makes a big difference in their texture. They're just as crunchy, but they're firmer and have more character. And there isn't any liquid in them to dilute the marinade.
My only critique is that I used too much salt when I soaked the cucumbers and it didn't all rinse out. Since I tasted one before I made the salad, I knew not to put any more salt into the dressing so it wasn't too salty, but it was borderline. Next time I'll know better.
As I mentioned before, the Tomato Broccoli was a test recipe for a Fitfare post. It's a fresh, new way to prepare what can often be an invisible vegetable. I'm going to take that recipe to Austin with me next time I visit. I used my handy-dandy new microwave method for the corn. It's sweet enough to eat all by itself, although someday I'll put some lime and chili powder on it.
All in all, it was quite a festive little holiday feast I put together.
 And for dessert? Since I had all those cheap blueberries on hand, I made good on my promise and doubled the Blueberry-Polenta Muffin Tops recipe and made muffins.
Yum. That's all I'm sayin'. But it made a lot of muffins--21 to be exact.
Cucumber and Tomato Salad
This dish is best made at least two hours ahead of time.
1 large cucumber, peeled and sliced thin
1/4 red onion, sliced thin
salt for cucumbers
2 large or 3 medium tomatoes, sliced thin
1/4 cup red wine vinegar, or to taste
1/4 cup water, or to taste
2 Tbsp olive oil, or to taste
1 tsp sugar
pepper to taste
Layer the cucumber on a paper towel in a colander and sprinkle with salt. Let it sit for half an hour, then remove the paper towel, rinse the cucumbers, and squeeze them dry. Taste one to determine salt level.
Place cucumbers and onion in a wide shallow dish. Add the red wine vinegar, water, oil, sugar, pepper, and salt if necessary. Mix well, then cover the dish and place in the refrigerator.
Let sit for at least one hour, then add the tomatoes, stirring again to make sure the marinade has covered everything. Let sit at least one hour more.
Bring to room temperature before serving.
Tuesday, July 04, 2006

Monday, July 03, 2006
What's In Your Pantry? 2
 Last week was a success. I used everything I bought, and I didn't have to go to the grocery store for anything else. That won't always be the case. In fact, that may be the first time it's ever happened. Maybe that's because I had this project in mind when I went, so I was more attentive than usual to making my list.
So, flush with the success of that first round, I'm ready to tackle week two.
Here's what I bought:
1 gallon fat-free milk*I wasn't as well prepared this week. I went mainly because I was out of milk, so the other things I bought were either staple replenishment, or things I'm pretty sure I'll need for whatever I decide to make. By the same token, what I decide to make will depend to a certain degree on what I bought. I always buy fruit; what I buy depends on what's in season and on sale. It's pretty much the same with vegetables. I figure I can always use the green beans and zucchini (separately) with pasta.
2 48-oz. bottles canola oil (on sale 2/$4.00)*
3 ears sweet corn
6 bananas
celery
cilantro
green beans
zucchini
cherries
2 lemons
1 onion*
popcorn
orange juice
*these are restocking pantry items--I have no specific use for them, but know I will need them
I went fully expecting that I will have to go again later this week. I budgeted accordingly, and only spent about half what I planned to spend. That way, when I figure out what I want to do later, I can buy the rest of the ingredients I need. I know I'll need broccoli for a Fitfare recipe, but it didn't look so good when I was there; I hope it'll be better tomorrow.
Sunday, July 02, 2006
This Ain't No Stirfry

Since my tofu slimed out on me, I had to figure out what to do with the cabbage and broccoli I had planned to use for that. The broccoli made a most successful transition to the Chile Chicken Pilaf, so I had to figure something out for the cabbage.
Now, I try to eat legumes for at least one meal a day. So far, it's been easy to do because I've been finding so many new ways to cook them that I never get tired of any one bean or recipe. So it kind of surprised me the other day when I realized that I didn't have any beans soaking, thawing, or otherwise waiting to be prepped and consumed. In this case, lentils seemed the thing to do because they don't require any soaking time and they cook relatively quickly.
Great. I had the lentils. What to do with them? I knew I had the cabbage to use up, so I thought it made sense to put them together. I figured I could make a great soup using the cabbage and the lentils.
And I had the perfect base recipe. The Faki (Greek Lentil Soup) I posted about back in November would be perfect with cabbage added in, and I had all of the ingredients already on hand. I didn't feel like making a 4-quart soup, though, so I simply halved the recipe. It came out great.
Because most pre-packaged vegetable stock is stronger than I like and can overpower anything I put it in, I usually dilute it with water or some other liquid. I didn't want to open a whole can of tomato sauce, so I decided to use diced tomatoes instead of the sauce, and use the juice from the tomatoes to dilute the vegetable broth.
The outcome was a delicious soup that is hearty enough for winter, but still has enough lightness that it can work in the warmer months as well.
Lentil and Cabbage SoupFor the What's In Your Pantry section:
1 cup dried brown or green lentils
1 quart vegetable broth
1/2 onion, chopped
2 carrots, diced
2 ribs celery, diced
1/2 celery or napa cabbage, sliced
4 cloves chopped garlic
28-oz. can diced tomatoes
2 Tbsp olive oil
2 tsp crumbled dried oregano
salt and pepper
1/4 c fresh lemon juice
Drain tomatoes and set aside. Add water to the juice make 1 quart. Place lentils in large soup pot with the juice/water mix and the vegetable broth and bring to a boil. Reduce heat and simmer 1 hour, or until tender.
Add onions, carrots, celery, cabbage, garlic, tomatoes, olive oil, oregano and salt and pepper to taste. Cook for 30 mins longer, or until soup is slightly thickened. Just before serving, stir in the lemon juice or vinegar.
Serves 6-8
Loosely adapted from Beans: More than 200 Delicious, Wholesome Recipes from around the World, by Aliza Green (Running Press, 2004)
I already had everything on hand. I count the celery cabbage as on hand even though I bought it this week because I had already used it for the okonomiyaki, which is why I bought it.
Saturday, July 01, 2006
Stupid Banana Tricks
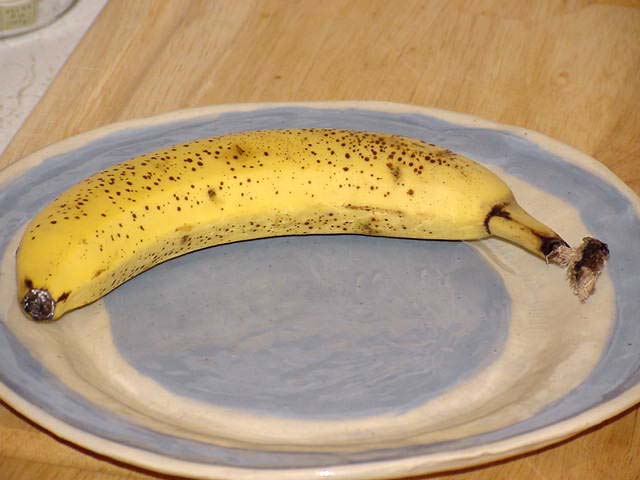 Here's a cheap parlor trick to impress the kiddies. I read about this on usenet the other day and of course I had to try it.
For this trick you will need a banana and a giant safety pin.
Open up the safety pin and bend it back so that it is straight, with the non-sharp side making a handle of sorts. Holding the pin by the handle, stick it into the banana at quarter-inch intervals and sweep it back and forth inside the skin.
 And voila! When you unpeel it, you have a pre-sliced banana just waiting to be put over your cereal or oatmeal.
If you rotate the pin around the banana as you go up, it's less obvious. That looks like a regular banana up there, doesn't it?
Does anyone know of any other fun stupid things to do with food?
And for a not-so-stupid corn trick, I just learned a quick easy way to prepare corn on the cob in the microwave. It's .17 cts apiece at the grocery store so it's time to load up!
I tried this method for the first time tonight and it was really fast and easy. And the corn is super super sweet right now. It was so good that I gobbled up all three ears before I could even think about taking a picture.
Microwave Method for Corn on the Cob
Rinse ears well under cold water. They don't have to be soaked, but should definitely be wet. Put on a plate and cook in the microwave until desired doneness. (I cooked three ears for 3 2-minute intervals). Take them out of the microwave and, under cold running water, peel the husks. The corn silk will come right off with the husks and the ears are still hot enough to dry immediately. The cold water protects your hands while you're peeling the ears.
And that's it.
from rec.food.cooking
Subscribe to:
Posts (Atom)