Showing posts with label BlogEvent. Show all posts

Thursday, April 22, 2010

DIY Condiments #1: Worcestershire Sauce

Sometimes it pays to eavesdrop at the grocery store. Yesterday at Treasure Island as I was heading into the produce department I heard one of the produce ladies tell a customer, "Oh yes, honey, that pineapple is super sweet - I just cut that today and it is fabulous." (Ok, she may not have actually used the word "fabulous," but you get the idea.) They also happened to be on sale so I added one to my basket and chopped it up this morning. I just finished a bowl full of the freshest, sweetest pineapple I have tasted in a long time. Yes, it was fabulous.

Misreall and I have been having the hardest time finding a date that we can get together to sample and compare our Worcestershire sauces. I have been waiting to write about it so I could report on the comparisons, but I have decided to go ahead and post the process, before I forget what I did.

If you have ever thought about making your own Worcestershire sauce, I say go for it. If you haven't ever thought about making your own Worcestershire sauce, I still say GO FOR IT! This is the freshest, most flavorful, spiciest (without heat), magical elixir of flavor I have come across in a long, long time. And it's not hard to make.

It does, however, use a lot of ingredients. To my delight, I already had most of them in my pantry, but I did have to make a special trip for a few of these goodies. I have several varieties of dried peppers, but I did not have chilies de arbol. I also needed anchovies, molasses, green cardamom pods, fresh ginger, and star anise.

Actually, I didn't need the star anise, but that's another story. I was also looking at ketchup recipes, some of which do call for star anise, so I got it in my head that I needed some. Turns out I didn't, but I am now prepared for the ketchup phase of this project. Unfortunately, I didn't realize I didn't need it until after I took this photo, so there the star anise will sit through eternity, hopelessly aware that it does not belong, trying desperately to be as invisible as the jar in which it comes, thinking "please don't look at me. Look at the molasses - yeah! - and the onion - see how beautifully round it is! Just pretend like I'm not here, ok?" What you don't see here is the sugar, which for some reason I forgot to bring out until I needed it. Hmmm, and now that I am looking more closely, I see that I left out the garlic as well.

Ok, so it's not perfect. But you get the idea - lots of ingredients, some everyday, some a little more exotic. But nothing I could not find with relative ease.

Most of the ingredients go right into the pot. Be sure to use a pot with a heavy bottom. I used my go-to 3-quart reinforced bottom saucepan, and it worked just fine.

At this point, it's just a mishmash of ingredients and doesn't look like much. It smells mostly of the vinegar, too, which is not the most pleasant smell in the world.


After it has been simmering for a few minutes, however, the ingredients begin to come together and the most heavenly, sharp-sweet-tart-sour aroma slowly wafts out of the saucepan.

Before long, the smell has taken over your kitchen. It was about this time that I started having these vague thoughts of steak.


I am glad that I had already experimented with caramel sauce not too long ago, so I was not as intimidated as I might have been at the thought of melting the sugar. I am still just a little bit skeptical when I start with that pot of sugar that it is really going to melt.

You also want to use a heavy-bottomed pan to melt the sugar. If it is too thin, it is more likely that you will burn the sugar. It's one of those things that goes from golden brown to burnt beyond recognition quickly.

You can see here that the sugar has started to clump together in places. These lumps get hard and it doesn't look like they are going to melt, but if you are patient and just keep stirring everything around gently, they will. At this point, you will also start to see a little bit of liquid below all that sugar. Those hard lumps will slowly melt into that liquid as you stir it all together.


At this time, you want to be especially vigilant, because this is where it can go from done to burned in a heartbeat.

This is what it should look like when it's ready. The sugar has melted into a pool of amber. You want to remove it from the heat before that amber turns too dark.


Next you pour the sugar into the saucepan where all of the other ingredients are simmering.

The recipe should really come with a warning at this point. That sugar is so hot that it will make the rest of the ingredients start to boil as soon as the liquid sugar hits it. It will bubble up and make a fierce noise, so don't be startled. Just hang on and in a minute or two it will have subsided back into a nice simmer.

By this time, all of the ingredients have come together and the sugar fuses them into one big giant spectacular splendiferous aroma that fills all of your senses. If you are anything like me, you will be craving a steak by this time. Too bad you won't be tasting the sauce for a few weeks.

Here is the sauce fresh out of the saucepan and ready to go into the refrigerator for three weeks.

Another warning that I think should be included in this recipe is that you need a fairly large jar for the sauce with all of the ingredients still in it. I had two false starts before I finally found enough room in my old dill pickle jar. I wish I could remember exactly how big it is, but I do know it's bigger than a quart - maybe one-and-a-half quarts. There's a lot of stuff in there that has to be strained out before you reach the 2 cups, so I recommend you start with the biggest jar you have.

I put the jar all the way in the back of the bottom shelf of the refrigerator and let it stay there for the required three weeks. It was a long three weeks, that I can tell you.

Finally, the three weeks had passed and it was time to strain the sauce and taste it. Even though I hadn't disturbed the jar at all, the seal was hard to break, and for a little while I actually had some concern that I would not be able to get the jar open. But with a little pushing and straining, and tapping the lid against the floor, I finally got the lid released and the jar opened.


Here all of those lovely spices and chilies and mustard seeds and onion and garlic and anchovy and general Worcestershire-y goodness. Oh, and that's the sauce down there in the bottom of the pan. True to the recipe's word, I ended up with about 2 cups worth.

This is a truly marvelous sauce, and it really does not take that long to make at all. And once you buy the ingredients for the first batch, you have most of what you need on hand for the next batch as well, and the one after that. And you will be making more batches, of that I can assure you. It is spicy and fresh and adds a burst of flavor to everything it touches, from soups to stews to sauces, salad dressing, eggs, pimento cheese, you name it.

I used the recipe I found in Saveur Magazine #117. I don't believe I would change a thing. You can find the recipe here. Go make yourself some. You won't be sorry.

Monday, December 15, 2008

Eat Christmas Cookies 2 - Mexican Wine Cookies


I have mentioned Mexican Wine Cookies before, when this was still supposed to be a knitting blog, but I have never posted about them or published the recipe. I make them every Christmas, so when Foodblogga announced her second annual Eat Christmas Cookies event I decided that these are the cookies I would feature.

My father found the recipe in the Dallas Morning News back when I was in high school and suggested we make them together. To this day I do not know why he chose that particular recipe. He was more of a cook than a baker, and neither of my parents drank much alcohol, but I didn't really question it at the time. It usually fell to me to keep my Dad company when he was in the kitchen so I started pulling out the ingredients and the mixing bowl, and we got down to business.

There is a high flour to butter, sugar and liquid ratio in this batter, so you have to have a pretty strong arm to mix it up. You add four cups of flour in two 2-cup batches. The first batch goes well, but the second batch is what takes the muscle. Over the years I have realized that if I am more patient and just continue to work the dough into the flour, it goes much more smoothly.

According to the recipe, you were supposed to mix up the batter, leave it in the refrigerator for at least an hour, and then push it through a cookie press. But the batter was so thick and stiff that it was almost impossible to push it through the press. As I have written before, I thought my father was going to have a heart attack as he pushed and strained to get the batter through. He would grunt and turn red, and finally churn out a cookie, and then we would laugh hysterically while he got his breath and strength back to do the next one.

Why it didn't occur to us to take the dough out of the cookie press and just roll the cookies out, I will never know. It took hours to finish those cookies, Dad muttering "never again" under his breath the whole time.

But they were good. Really good. They look like plain butter cookies but their texture is more like shortbread. The sherry adds a barely perceptible nutty warmth that permeates throughout every mouthful. So I hung onto the recipe, even though I was pretty sure I would never be making them again.

After I left home, I ran across it in my recipe box one year when I was making my holiday baking plans. I knew there was no way it would work with the cookie press, but I didn't see why I couldn't just roll the dough into balls and press them down with a fork, like peanut butter cookies. So I made them that way, and they worked beautifully.

And after I had been making them for a few years, my sister gave me this beautiful set of clay cookie press molds. They were the perfect tool to make the cookies more distinctive, and added a nice festive touch as well.

The cookies don't look like much. Whenever I take them somewhere new, they languish on the table while people are busy devouring the brownies, toll house cookies, gingerbread, and other more traditional Christmas goodies. But once the chocolate and cheesecake is gone and people start to nibble on them, they discover just how good they are. And by the next year, they are asking for them.
Home Cookin Chapter: Cookies

MEXICAN WINE COOKIES
1 cup butter, softened
1 cup sugar
1 egg
1 tsp salt
4 cup sifted flour
1/4 cup sweet sherry

Cream butter with sugar. Add egg and beat until light and fluffy. Blend in salt and 2 c. flour. Stir in sherry.

Add remaining 2 c. flour; mix well. Divide into four pieces and roll into logs. Chill for at least one hour.*
Roll into walnut-size balls and use cookie press or the tines of a fork to flatten out.

Bake 350 deg. for 8-10 mins. Makes 8 dozen cookies.

*Rolls can be kept in the refrigerator for up to a week or frozen for three months. Wrap them individually so you can cook as few or as many as you would like.

Adapted from a recipe found in the Food Section of
The Dallas Morning News.

Exported from Home Cookin 5.6 (www.mountain-software.com)

Sunday, November 30, 2008

Bread Baking Day #14: Colored Breads

breadbakingday #14 - colored breads

After I made those first loaves of whole wheat bread for World Bread Day last month, I have been making it just about every weekend since. My goal was to master the technique completely enough that I didn't have to use the recipe. The side benefit was that I had a seemingly endless supply of home-made bread around the apartment, with enough left over that I was able to give away a couple of loaves.

Once I didn't need the recipe, I figured that would free me up to start experimenting with different types of bread. One of my sisters gave me a french bread baking sheet years ago that I've only used once; I'd like to put it back into circulation. Maybe a little sourdough starter hanging out in the fridge. Challah, anyone?

The other thing I figured I could do once I had mastered the general recipe is participate in Bread Baking Day, a monthly event founded by Zorra at 1x umrühren bitte. This month's event is hosted by Boaz at Grainpower. The theme for Bread Baking Day #14 is colored breads.

Given that I've only been making bread for a little over a month, I was somewhat overwhelmed at this month's theme. Because I am committed to using whole wheat whenever possible, it is quite a challenge to find anything that can have a strong enough visual impact to compete with that thick, rich brown color. But I was determined to try.

I also wanted something that would not only impact the color of the bread, but the taste as well. Something that would form an integral part of the dough, rather than just being there to add color. Pistachios have a distinct flavor, and they are a lovely shade of green. I wasn't sure it was a strong enough shade of green to match the whole wheat brown, but I liked the idea enough to give it a try.

I ran out of time to make it before leaving Chicago for my by-now annual Austin Thanksgiving trip, so I decided I would make it there, which made it even more of a challenge - cooking in someone else's kitchen. Luckily, I have spent enough time at my brother's house to know my way around his kitchen.

I had read a recipe for sesame bread that called for a good amount of sesame meal in the dough, so I figured making pistachio meal would be a good start for this bread. I was going to grind the nuts in a coffee grinder, but my sister-in-law pointed me toward her Magic Bullet blender (WARNING: loud video), which enabled me to process them in fewer batches. Before long I had a lovely pile of chartreuse-green pistachio meal. This picture does not really do it justice. It is much more green and almost glowing in real life.

I added the pistachio meal and some chopped pistachios right after I added the salt and oil. I thought it would replace some of the flour, but I ended up using about the same amount as I would have without it. The dough did look noticeably green, but I did not think it would survive the baking process. I hoped there would be some change, though, especially in the taste.

And it didn't take as much as I had hoped. The bread came out a little brighter than my regular whole wheat bread, but most of the green had cooked out. If anything, one might say that it has a touch of yellow.

Here is the pistachio bread next to a slice of my regular whole wheat. You can definitely see a difference, but it's only noticeable when the two are together. I also let the dough rise twice for the pistachio bread as opposed to the one rising I gave the regular bread. I like my bread more dense, but now that I see the two together I think I will start letting my whole wheat bread rise twice in the future.

All in all, not a bad experience. We could not discern any hint of the pistachio when the bread came out of the oven yesterday, but this morning I toasted up a couple of slices for breakfast and I could definitely taste it. It added a slight sweet nuttiness that went well with my scrambled eggs.

As usual, I learned much from this event. I am most pleased that I was able to take a basic bread recipe, fiddle with it, and still come out with a recognizable product. I no longer live in fear of yeast. I can't wait to find out the theme for next month's bread baking day.
Home Cookin Chapter: My Recipes

PISTACHIO WHOLE WHEAT BREAD

3-1/2 to 4 cups flour, divided
1-1/2 cups lukewarm water
1 package dry active yeast
1/4 cup honey
1-1/2 cups pistachio meal*
1-2 cup chopped pistachios
2 tsp salt
1/4 cup oil, plus oil for greasing
1 egg (optional)
2 Tbsp milk (optional)

*To make pistachio meal, place raw unsalted shelled pistachios in food processor or grinder and process until coarse meal is formed.

Pour yeast into lukewarm water. Add honey. Add 2 cups of flour, 1/2 cup at a time, mixing briskly after each addition. When all of the flour is incorporated, beat batter 100 strokes. Cover with a damp cloth and let rise for one hour in a dark warm place.

Sprinkle salt and oil over mixture and fold in. Add pistachios and pistachio meal, 1/2 cup at a time, and fold in. Add more flour 1/2 cup (1-1/2 to 2 cups) at a time and fold in until it feels like you can't fold in any more. Turn onto countertop and knead, adding more flour as necessary, until dough is not sticky and develops a smooth shine. Form a ball with the dough.

Pour a little oil into the bowl in which you mixed the dough and spread it around. Place the dough, right side down, in the oil and coat it well. Turn it over so the oiled side is now facing up, cover with a damp towel, put in a dark warm place, and let rise another hour, until doubled in size. Punch it down, cover it again, and let it rise another 50 minutes or so.

Punch it down, turn it onto the counter, and form another ball. Let sit for five minutes.

Preheat oven to 350 deg. F. Grease a bread pan. Knead ball of dough for about six turns. Starting at one end, roll it up to form a loaf shape. Put it in the bread pan top side down. Pinch together the seams and push down on the loaf so it conforms to the pan shape. Turn it over so it's right side up and push it down again. Cover with the damp towel and let it rise again for 20-25 minutes.

Cut two diagonal slices on top of the bread so steam can escape. If desired, mix one egg with 2 tablespoons milk and brush it over the top for a shiny surface. If you have any pistachio meal left over you can sprinkle that over the egg wash.

Bake at 350 deg. F. for one hour. Remove from the pans immediately, then let cool at least an hour before cutting into it. For best results, however, leave overnight.

Adapted from The Tassajara Bread Book, by Edward Espe Brown (Shambhala, 1995)

Exported from Home Cookin 5.7 (www.mountain-software.com)

Sunday, October 26, 2008

World Bread Day '08 Roundup

World Bread Day '08 - Roundup

Zorra at Kochtopf posted the World Bread Day '08 Roundup. There were a record number of 245 entries. I haven't even had a chance to look at them all, but now that I'm baking bread on a regular basis I plan to check out all of them, and try more than a few.

If you want to check them out, just click on the logo.

Saturday, October 25, 2008

Cheese and Green Onion Omelette

If this post looks familiar, it's because I posted it back in February. I'm posting it again as part of Sangeeth Raghunathan's blogging event "101 Omelet Recipes."


The past few weeks have been all about rediscovering Sunday breakfast for me in my humble little abode. There's something about getting up, putting on a pot of coffee, and getting out some cooking magazines and recipes to go through that begs for a little indulgence.

First on the list was pancakes. Thanks to my holiday baking I had some leftover buttermilk in the fridge so I whipped up a batch of buttermilk pancakes that came out just the way buttermilk pancakes should - light and fluffy, with the perfect balance of density and sponginess that soaks up the maple syrup without disintegrating.

And then I got on a little bit of a cheese kick. It started with the idea of grilled cheese sandwiches, something I have not had in the longest time. But once I thought about them, I really wanted one, so I bought some nice sharp cheddar cheese and a beautiful loaf of sesame semolina bread (that's the last of it up there with the omelette) and set about making one for myself.

And it was . . . ok. There was nothing wrong with it, but it did not leave me craving another. What it did leave me with was about a half a pound of cheese. In addition to the Manchego, the freshly grated Grana Padano, the Locatelli Romano, which is similar to but has a sharper taste than the slab of Parmigianno Regianno. And then there's the Idiazabal, and the beautiful softTaleggio I bought at Pastoral the last time I was there, which melted beautifully in a nice tasty batch of polenta.

What to do with all of these cheeses? I will have to get creative, that's for sure. I have some ideas, of course. And if they work out, I will share them.

But back to the lovely sharp cheddar cheese and Sunday breakfast. I had some green onions, eggs and cheese. See where I'm going here?

Since my last failed attempt at making an omelet I have purchased a lovely Italian non-stick skillet that is just the right size for making omelettes. Why yes, now that you've asked, that's exactly why I bought it. I bought a small one on impulse at Jewel (yes Jewel, they're actually inexpensive but they work really well) for the purpose of toasting spices and nuts, and I liked it so much I got the next size up.

And may I say it made a beautiful omelette? You can see all that beautiful sharp cheddar and green onions oozing out of the center.

The secret to a successful omelette? Use water instead of milk. You've probably heard it before, but I'll say it here. Milk can make the eggs hard, but a good hard whisking of water in the mix just before you pour it into the pan makes all the difference in the world.

I have some different herb combinations that I will sometimes use with my omelettes, like tarragon, thyme, or Sunny Paris. But most of the time I just use salt and pepper, so the eggs can shine all by themselves.
If you've never made an omelette and are afraid to try, it's actually pretty easy. I can't say my way is authentic, but it looks like an omelette and tastes like an omelette, so it must be an omelette (see: duck).
CHEESE AND GREEN ONION OMELETTE

If you think of it in time, take out two eggs and let them come to room temperature. (This is not critical, but years ago someone told me eggs cook better when you bring them to room temperature. I can't find anything to back this up, but it's a habit by now.)

Wash and trim from 4 to 6 green onions and slice them about 1/4 - 1/8" thick. Grate about 1/4 cup cheese. If you want toast with your omelette, this would be a good time to stick the bread into the toaster.

Crack the eggs into a bowl and add salt and freshly gound black pepper. Melt a pat of butter into your omelette pan and add green onions. Saute until they have just started to caramelize and put them into a bowl.

Add another pat of butter into the pan. Pour a splash of water (not too much or it will be runny) into the egg mixture and whisk vigorously. When the butter in the pan has melted and is foaming, add the egg mixture to the pan in a continuous stream, whisking the whole time. Once the mixture is the the pan, keep whisking, working your way around the pan, so that the parts that are cooking keep mixing with the raw egg. Once it starts to set and the liquid no longer fills in the spaces from the mixing, stop. Run a spatula around the edges of the eggs until it is completely freed from the bottom of the pan. At this point, you can lay the cheese and the green onions just to one side of the middle of the omelette. Fold the side that the mixture is closest to over the cheese and onions. Turn off the heat. Grab the handle of the pan from the bottom and take it to the plate. Slide the unfolded part onto the plate, and then turn the pan over so that the stuffed, folded side falls on top of the unfolded part, which creates the third fold. (If that doesn't make sense, you can fold the third part while it's still in the pan, but there's a chance it will break. It will taste the same though, and you will get better with practice.)
And now, if you'll excuse me, I think I need to go take some eggs out of the fridge.

Thursday, October 16, 2008

World Bread Day: The Zen of Baking Bread


Back in 2006, the International Union of Bakers declared October 16th as World Bread Day, and Zorra of Kochtopf initiated a bread-baking blogger event in honor of the occasion. Having participated in Sugar High Friday 38 that she also hosted last Christmas, I received an invitation to participate in this year's event.

About fifteen years ago I decided it was time to overcome my fear of yeast and bake a loaf of bread. I cleared a day on my calendar. I don't know why I was so nervous. Maybe it was because I knew that yeast is a living thing, and if you kill it too soon your bread will not rise and you will have wasted a hell of a lot of flour.

Of the two recipes I had access to at the time, the one in my old standby The Good Housekeeping Illustrated Cookbook looked the least intimidating. I wanted to make a good, solid whole wheat bread. I had visions of baking all my bread from then on, if it worked out.

Following the recipe I proofed the yeast, added the molasses and more water and mixed in the oil, salt and flour, let it rise, punched it down, let it rise again, punched it down again, formed it into two loaves, and let it rise yet again before I put it in the oven. And an hour or so later I had two real live (well, actually dead since the heat from the oven killed the yeast) loaves of molasses whole wheat bread.

But there were problems. The first one was the molasses. There are certain things that have molasses that I like, but I discovered that whole wheat bread isn't really one of them. It had too distinctive a taste that overshadowed anything else I tried to put on it.

The other problem was that the recipe instructed me to use a hand beater to beat the flour into the liquid. The elasticity of the yeast caused the mixture to grab onto the beater and climb up the stem towards the mixer itself. It made a mess and took me forever because I had to keep stopping to scrape the glop off of the beaters before it infiltrated through the housing. I was proud of my efforts, and encouraged enough to try the recipe in the same book for French bread. It was simpler and involved no beating. It was delicious, but not the bread I wanted to be making.

I had overcome my fear of yeast though. Flush with my success, I took a stab at dinner rolls, and while they were unevenly shaped, they looked and tasted like dinner rolls. I even ventured into the world of noodles, with less success (they tasted ok, but it was impossible to cut them evenly.) But I was pretty sure I would never be making another loaf of regular bread again.

A short time later I was shelving books at the bookstore where I worked and I ran into The Tassajara Bread Book, by Edward Espe Brown, past president of the San Francisco Zen Center. The book was published by Shambala Publications, which specializes in books on Buddhism and "classics of the wisdom traditions." Intrigued, I bought it, took it home with me, and started reading.

And was immediately struck with how simple the author made breadmaking seem. Take flour, water and salt, mix it together and put it in the oven, and you have bread. Add yeast for lightness, honey to sweeten it, oil for moistness and you have the staff of life.

The first thing in the book that made me decide it might be worth trying again was how easy Brown made it seem. I don't know that the phrase is anywhere in there, but the message I got as I read through the first sections was "don't fear the bread." The second was that Brown uses a sponge method; rather than proofing, you mix the yeast, water and half the flour together, let it rise, and then add the salt, oil and the rest of the flour. Third, and the thing that clinched it for me, was the simplicity of the equipment: a bowl, a spoon, and a scraper. No mixers, no proofing, what could be easier?

But what really inspired me was that before the recipes themselves, the book contained a series of detailed instructions, loaded with illustrations, that guided the reader through the complete process. The illustrations are simple line drawings, and the text is informal, both of which gave me the feeling that Brown was in the kitchen with me, talking me through the whole process.

I rolled up my sleeves and tried again. With great success. Two beautiful loaves of honey-wheat goodness, delicious with both butter and peanut butter. My co-workers were impressed with the loaf I brought in and it disappeared pretty quickly. I swore I would never buy another loaf of bread again.

And never baked another loaf after that. What happened? I got busy. A new position at the bookstore that had me working at least seventy hours a week. A temperamental oven with an unpredictable thermostat. Not only was I not baking bread, I wasn't really cooking anything. I picked up lunch from the restaurants around the bookstore; dinners were cereal and milk or delivery. Not my healthiest years.

After I started this knitting blog (heh heh) and watched it morph into a cooking blog, I started thinking about bread again. It had been so long, though, that my old fear of yeast had somehow crept back into my head, so I was content to leave it with the idea that someday, maybe, I would try again.

And then Zorra's email popped into my inbox. What better way to celebrate World Bread Day than by taking out that bowl, wooden spoon, and scraper and picking up where I left off all those years ago? I had all the ingredients on hand except for the yeast, which was easy for me to pick up on my way home from work.

So the Saturday before last I cleared my calendar and decided to spend the day baking bread. I pulled out the Tassajara Bread Book, re-read the instructions a couple of times, and got started.

I am not going to post the recipe here. The detailed instructions are the most important part of this recipe. If you have been thinking about baking bread but are at all intimidated, I cannot recommend this book highly enough.

First, I created the sponge by dissolving the yeast into lukewarm water, then gradually adding the whole wheat flour and then beating it with a wooden spoon a hundred times. Doesn't that just scream zen? I covered it with a damp towel and left it in the oven, warmed only by the pilot light, to rise for 50 minutes.


It rose quite a bit, as you can see. I added salt and oil and gently folded it into the sponge.


I added the rest of the flour, a half a cup at a time, folding it in until the dough pulled away from the bowl and formed a ball. Then I rolled it out onto the countertop, which I had dusted with flour. I sprinkled flour on top of the loaf and kneaded it for about fifteen minutes, gradually adding about another cup of flour before I could knead it without the flour sticking to the counter or to my hands. When it was nice and shiny I put it back into the (now oiled) bowl, covered it, and stuck it back into the unlit oven to rise for another 50 minutes.

And you can see that once again it rose quite a bit. I punched it down and took it out of the bowl. At this point, it should have been allowed to rise again, but according to the book this step can be omitted if you are short on time, but the bread will be a little more dense. I like dense, so I omitted this step even though time was not an issue.


I pre-heated the oven to 350 degrees. Then I smoothed the dough into a ball and cut it in half, formed each half into a ball, and let them sit for five minutes. I took each ball and kneaded it about five times, then rolled it into a loaf and put it in a pre-greased loaf pan. I covered both pans and let them rise again for another 20 minutes.


Just before putting them into the oven I cut slits in the tops and then brushed the tops with an egg-wash. I put them in the oven and set the timer for 50 minutes.


While they were baking, the most wonderful smell started wafting through my apartment. If you've passed by a bread factory then you know what I'm talking about, but it's far more intense when it's coming out of your own oven. I'm sure my neighbors were jealous. I could hardly wait for them to be done. And when they were finally done, I had to wait another hour for them to cool down. What sweet, sweet torture!

When they were finally cool, I cut a couple of slices and slathered them with butter. Ok, I didn't really slather, but I wanted to. It's not the healthiest thing in the world, but it's a moral imperative for my first home-made loaf of bread in fifteen years.
And now I am wondering why I did not keep up with it back then. It is surprisingly easy to do, and most of the time involved is doing whatever you want around the house while waiting for the different rising periods. The actual hands-on time is short. It was such a success that I made more this weekend. It was even less of a hassle since I was that much more familiar with the process.

I have been eating peanut butter sandwiches for breakfast at work lately; it's quick and easy and travels well. They were especially good this week on my homemade bread, especially since I am having trouble finding a decent whole wheat bread that doesn't have a lot of questionable items on the ingredient list. Ingredients for this bread: Water, yeast, honey, flour, oil, salt, and egg.

So thank you Zorra, for hosting this event and inspiring me to jump back into the art of baking bread. I will not let another fifteen years go by before I bake more.

Sunday, January 06, 2008

Iced Holiday Peppermint Cookies

I had planned to write this post while I was in Austin over the holidays so I could enter Eat Christmas Cookies, an event hosted by Food Blogga. But the deadline was December 24th, and after writing the White Chocolate Pudding post for Zorra's event I never wrote another thing for the blog. Too busy having a good time visiting my family, driving to Galveston once for Christmas with my sister-in-law's family, and then again to Houston to take my nephew to the airport for his trip to Paris (Paris! I want to go again!) going to soccer games and practices, breakfasts and dinners with my siblings, and just plain spending as much time with everyone as I could. It was a busy trip and, as usual these days, wore me out. In other words, the perfect trip!

As I have mentioned before, this year has not been so festive. Maybe that's why I decided that I would do more than just think about baking this holiday season and actually do some baking. I needed to generate some cheer of my own, and it wouldn't hurt to spread some of it around a little.

I admit I was perhaps a tad ambitious for my first step back into the Christmas kitchen. I already knew I was going to be making the graham cracker brownies for our second annual knitting class party, but I decided to make another batch to take to work with me. Last year I took some Mexican Wine Cookies in, which the owner of the company liked a lot; I decided this year I would make a batch just for her. One of the great tragedies of my friend Mary's life is her recently developed allergy to all things chocolate. She loves gingerbread and I felt guilty that I had not gotten around to making it last year like I had hoped to do, so I was determined to make her some this year.

And then I found two blogging events that looked interesting, and I decided to add those into the mix - Zorra's Sugar High Friday "The Proof Is in the Pudding," and Foodblogga's ambitious Eat Christmas Cookies. I decided to make Butterscotch Pudding for SHF.

But what cookies should I use for Eat Christmas Cookies? I had already written about the graham cracker brownies, Mexican Wine Cookies and gingerbread, and even though I haven't yet posted recipes for any of them, I wanted to find something new because I am a little on a roll with the improvised baking thing. And, more to the point, I had discovered these cute little Andes Peppermint Crunch baking chips and was just dying to try them out.

I don't know if you were on the receiving end of the Christmas Cookie email that went around this year, but I was lucky enough to get it. Someone went to a lot of trouble posting links to every single cookie recipe from Northpole.com (warning: sound effects) into an email where you just click on the recipe title and it takes you straight to the recipe. I have since bookmarked the site and just go there instead of hunting down the email. They also have cake, pie, candy, and other recipes.

I was looking for a recipe that I could use with the peppermint chips. There was a recipe for Peppermint Cookies that looked suspiciously similar to the Toll House Cookie recipe. Less of a butter-to-flour ratio and mint extract instead of vanilla, and water instead of eggs. I don't know if those differences work better for the peppermint; I do know that the less butter, the less the cookie spreads out.

I added the water a tablespoon at a time and the dough never seemed to get to the right consistency, and then as usually happens I added too much and it was kind of sticky, so I added more flour, so right off the bat I figured I might be in a little trouble. Since I wasn't sure how they were going to come out, I decided to make bigger cookies to get it over with, and used an ice cream scoop to measure out the dough. To my surprise, they came out ok. Not great, but OK.

What they needed was some kind of topping. Luckily, I had another bag of the peppermint chips. The cookies were so big that it seemed reasonable to ice them so I decided to improvise some kind of icing out of the chips. I melted them in the microwave and then stirred in the heavy cream I had leftover from the pudding and - voila! - ganache!

That icing made all the difference. I like the way the cookies held their shape with less butter, but I think next time I will use eggs instead of water. Hmmm, maybe I could use the creme de menthe chips and make them for Easter . . .

So, while I am sorry I missed the deadline for the event, I am very happy that I made these cookies. So far, my baking improvisations have turned out pretty well. Well enough for me to keep trying, at any rate. I am going to go ahead and post the recipe, but I might revise it later if I like it better with the eggs.
Home Cookin Chapter: Cookies
ICED HOLIDAY PEPPERMINT COOKIES
1/2 cup butter
1/4 cup light brown sugar
3/4 cup granulated sugar
1/8 tsp salt
1 tsp vanilla
1/2 tsp mint extract
2-1/2 cups all purpose flour
1/4 tsp baking soda
4 Tbsp water
2 10-oz. bag Andes Peppermint Crunch
Baking Chips
1/2 cup heavy cream

Cream together butter with sugars until light and creamy. Add vanilla and blend in.

In separate bowl mix flour, salt and baking soda. Add to sugar mixture. Stir in water as needed. Add more water if necessary until batter is smooth. Blend in mint extract and one bag of the peppermint baking chips.

Drop large spoonsful (an ice cream scoop will give you a good size) of batter on a cookie sheet - 6 to a sheet. Bake for 15-20 minutes at 350 degrees, until lightly browned. Remove from oven and place on rack. Let cool.

In the microwave using 30 second intervals, melt the other bag of the peppermint baking chips, stirring until smooth. Add the cream and stir until well blended. Spoon over the cookies and let cool.

Makes 2 dozen large cookies.

Adapted from a recipe from the kitchen of Granma Hinckley (Copyright 2007 Northpole.com, LLC)

Exported from Home Cookin 5.5 (www.mountain-software.com)

Sunday, December 23, 2007

Sugar High Friday #38: White Chocolate Pudding with Scotch Butterscotch Sauce

I have been blogging sporadically these days and I don't completely know why. Well, I do know why and it involves badness and sadness and a little pain here and there but I won't bore you with the details.

But life goes on and we have to eat. And the holidays come around and we have to eat sweets. Back in December of last year I participated in Sugar High Friday, a monthly blog event started by Domestic Goddess and hosted by various bloggers across the blogosphere. The theme last year was sugar art and, while I was not particularly artistic, I was creative and brave enough to do something I do not usually do: improvise with a baking recipe. I was actually quite pleased with the resultant Pomegranate Kisses, about which you can read here.

And then I kind of dropped out of blogging events. I did make something for one other SHF event, but the results were underwhelming, and my post has been languishing in draft mode for almost a year now. I suppose it will languish for a while longer before I get around to it.

Now that I have started posting more regularly again, I thought I might drop in on Is My Blog Burning and check out the blog events to see if there were any in which I might want to participate. I'm thinking it might help me stay motivated to post more frequently if I have some challenges and deadlines to meet.

I was quite delighted to see that this month's Sugar High Friday, hosted by Zorra at Kochtopf, is dedicated to pudding. Pudding is one of my all-time favorite desserts, but I rarely have it unless it is on the dessert menu at a restaurant. The ready-made puddings that you can buy at the grocery store are not really what I consider to be pudding. They are really just artificially flavored, artificially thickened sauces that just do not have that thick, rich creamy mouthfeel that a real bona fide made from scratch and thickened with egg yolks pudding provides. That being said, I had never made pudding from scratch before and was slightly hesitant about my ability to do so.

I had, however, pulled a recipe for Rich and Creamy Butterscotch Pudding from the January '07 issue of Food and Wine magazine. I love anything butterscotch. It's another one of those things that, if it's on the menu, I'm going to order it. No matter how double-triple-or quadruple the chocolate, how mocha the mousse, how lava-like the center, nothing comes close to the luscious buttery caramel-ly creamy scotchy richness of butterscotch pudding.

So when I saw that the theme for this month was pudding, I knew I had to give it a try. I was a little nervous because I do not have that much experience with puddings and custards and the like, although I did make my friend Bob a fruit tart for his birthday a few years ago that, while it did not exactly look perfect, did taste the way a fruit tart should taste (thanks to Barefoot Contessa Ina Garten, whose recipe it was). But what are blog events for if not to give us reasons to stretch our reach that little bit further?

So I went to the grocery store fully intending to buy all the ingredients necessary for butterscotch pudding. And had everything I needed until I got to the baking aisle and found only one brand of butterscotch chips available. And that brand was artificially flavored. What to do? I really really really wanted to make butterscotch pudding. I really really really did not want to use artificially flavored butterscotch for a SHF blog event!

The thought did cross my mind that I might try to make some from scratch, but I quickly (and wisely) squelched that thought. Instead, I opted for white chocolate chips and decided to take a stab at making a butterscotch sauce from scratch to go with it. I found a recipe that looked good at Recipezaar.

I was pleased overall with the end result. The white chocolate pudding was incredibly rich and creamy, and the butterscotch sauce was a nice foil, although it was a little strong. It called for light brown sugar and all I had was dark. I did not think it would make that much of a difference but I was wrong. The molasses in the sugar was a little too overpowering for the more subtle butter/scotch combination and I will definitely use light next time I make this.
Home Cookin Chapter: Desserts

Rich and Creamy White Chocolate Pudding

3-1/2 cups plus 1-1/2 Tbsp heavy cream
2 tsp Scotch
1-1/2 tsp dark brown sugar
1 tsp water
1/2 tsp salt
5 large egg yolks
1/2 vanilla bean, seeds scraped
1 cup white chocolate chips (6 oz.)
Scotch Butterscotch Sauce (recipe below)

Fill a medium bowl with ice water. Set a fine mesh sieve in another medium bowl; set the bowl in the ice water bath.

In a small skillet, combine 1-1/2 Tbsp of the cream with the Scotch, brown sugar, water and salt and cook over moderate heat just until the sugar is dissolved. Let cool slightly.

Put the egg yolks in a medium bowl. In a heavy medium saucepan, bring the remaining 3-1/2 cups of cream to a simmer with the vanilla bean and seeds. Remove from the heat. Add the butterscotch chips to the hot cream and let stand until melted, 2 to 3 minutes. Whisk until smooth. Gradually add the hot butterscotch mixture to the egg yolks, whisking constantly.

Return the mixture to the saucepan and cook over low heat, stirring costantly with a heatproof rubber spatula, until thick, about 15 minutes. Do not let it boil. Strain the pudding into the bowl in the ice bath and stir in the Scotch mixture.

Pour the pudding into glasses and refrigerate until thorouthly set, at least 4 hours or overnight. Serve the pudding Scotch Butterscotch Sauce.

Makes 6 servings

Slightly adapted from Food and Wine Magazine, January 2007.

Home Cookin Chapter: Sauces

Scotch Butterscotch Sauce

1 cup light brown sugar, packed
1/3 cup heavy cream
3 Tbsp unsalted butter
2 Tbsp dark corn syrup
2 Tbsp Scotch whiskey
1 tsp vanilla

In a medium saucepan, bring the sugar, cream, butter and corn syrup to a boil over medium heat stirring constantly.

Lower heat and boil gently, stirring often, until sauce thickens and coats the back of a wooden spoon.

Remove from heat and stir in whiskey and vanilla.

Allow to cool slightly before serving. Can be refrigerated up to one week; warm gently before serving.

Recipe #139231. From Short and Sweet: 150 Sophisticated Desserts in No Time at All, by Melanie Barnard. by Chef Kate
© 2007 Recipezaar. All Rights Reserved. http://www.recipezaar.com/

Exported from Home Cookin 5.5 (www.mountain-software.com)

Friday, December 29, 2006

Sugar High Friday #26 - Pomegranate Kisses

Let me start by saying that I'm not by nature a baker. I know how to bake, and I like to bake, and I have several long-time standards and I'm not afraid to try something new, but I've never been one to innovate in the kitchen when it comes to cookies, cakes, or pastries. The potential for disaster, both in taste and in chemical reactions that may result in explosions that leave bits and blobs of batter dripping from every conceivable surface of my kitchen, has long prevented me from mixing and matching in the cake and cookie department.

Which is one of the reasons I have not participated in any online baking events. I just don't usually have that urge to get creative with cookies.

But when I saw the truffle that Danielle of Habeas Brulee made for last month's Sugar High Friday, and that she was hosting this month's event, something started brewing inside me and I decided that it was time for me to overcome my fear of improvisational baking.

I originally thought I would do something with cacao nibs since I've been so obsessed with them lately, but nothing came to mind so I tabled that idea and decided to let it percolate around in my head for a while until I could come up with something.

Then with the holidays coming, I started thinking about what I wanted to bake. There are a couple of recipes that have become sort of traditional over the years. I wrote about Mexican Wine Cookies here. They don't look like much and their flavor is subtle, but when made with good ingredients they are incredibly addictive and impossible to resist.

So when I started thinking about making them this year, I was also trying to think of something creative I could do. I decided to add cocoa to the cookies and everything kind of took off from there.

The first challenge was finding the right amount of cocoa to substitute. This recipe has a high flour-to-butter ratio, so I figured 3-to-1 would be good. The original recipe calls for sweet sherry, which has a nutty flavor that permeates the cookies and is what makes them so addictive, in my opinion, but I didn't think that flavor would go as well with the cocoa. I was going to use Kahlua, but my attention was caught by Godiva Liqueur at the store so I went with that instead.

After I made up the recipe, I divided the dough so I could try different things with it. The first time, I just dotted them with a little decorative sugar and baked them. They were ok (and by that I mean nothing exploded in the oven), but a little bland. There wasn't enough body to the liqueur to add anything to the flavor. They needed something more.

My next experiment involved crushing some Mexican chocolate, brushing the tops of the cookies with liqueur and then spreading the Mexican chocolate on that before baking. It was an improvement, but again too subtle. (Although I think it would work really well if the chocolate was mixed into the dough instead of just being put on top, and plan to try that.)

And then I remembered the Pomegranate Cordials I had seen at Treasure Island down the street. They looked really good and I really wanted to try them but I was trying not to eat too many sweets and I was already being forced to eat the results of my baking experiments so I decided to pass them up. So maybe it was because I really really wanted to eat them that I came up with the idea of putting them on the cookies. Whatever the reason, it was a good one.
I wasn't sure if the cordials would hold their shape in the heat or if they would just melt over them and burn on the bottom of my oven, so I rolled out one little cookie, pressed in a cordial, and baked it all by its lonesome little self. Imagine my pleasure when it held its shape and stayed on top of the cookie. So I baked up the rest.

How were they? I thought they were pretty good, but I wasn't sure if anybody else would think they were. I was going to see Lynda right before I left for Austin for the holidays so I took some to her and she was nice enough to try one right away, and she said it was good. I also brought some to my knitting student Nicole to try and she liked it, so I was feeling pretty good about how they turned out.

I took the rest of them to Austin with me so I could test them on my harshest critics - my family. They said they liked them, and the rest of the cookies disappeared quickly enough, so I guess they were a hit.

I plan to play with this recipe some more. And thanks to Danielle and this event, I think I've finally caught the baking bug.
Pomegranate Kisses

1 cup butter
1 cup sugar
1 egg
1 tsp salt
3-1/3 cups sifted flour
2/3 cup cocoa
1/4 cup Godiva liqueur
Pomegranate Cordials

Cream butter and sugar. Add egg and beat until light and fluffy. Blend in salt and 2 cups flour. Stir in liqueur. Add remaining flour and the cocoa; mix well.

Chill dough at least one hour. Roll dough into walnut-sized balls and place on cookie sheet. Grease the bottom of a 3-inch glass and dip it in decorator sugar, then flatten each cookie. Gently press a cordial into the center of each one.

Bake at 350 degrees for 10-11 minutes.

Makes about 8 dozen cookies.

Wednesday, November 08, 2006

TSIR 8: Wouldn't That Be Good with Cacao Nibs?

The minute I read Danielle's theme for this month's Spice Is Right event I knew what I wanted to do. I've been infatuated with cacao nibs ever since I brought them home with me, as you know from my posts here and here. I spend an embarrassing amount of time thinking about them and dreaming about with which foods they would go best. So far, I haven't thought of anything that wouldn't taste better with a little chocolate. Well, apparently liver wouldn't, but that's another story.

But there was one dish I knew they belonged with before I had ever tasted them. In fact, I mentioned it when I wrote about it. The warm toasty aroma of the Tandoori Masala I made for Barbara's Back to School Spice Is Right event was already suggesting chocolate and coffee to me.

So when Danielle said to use a spice with a dish from a cuisine that doesn't usually use that spice, my choice was obvious. Why not go ahead and add ground toasted cacao nibs to my Tandoori Masala and cook me up some chicken? So off I went to fooddownunder.com (surprise, surprise) and found a recipe for Tandoori style chicken. That recipe listed the spices separately, so I used it as more of a springboard than a recipe and used my lovely Tandoori Masala, to which I added a healthy dose of ground cacao nibs.

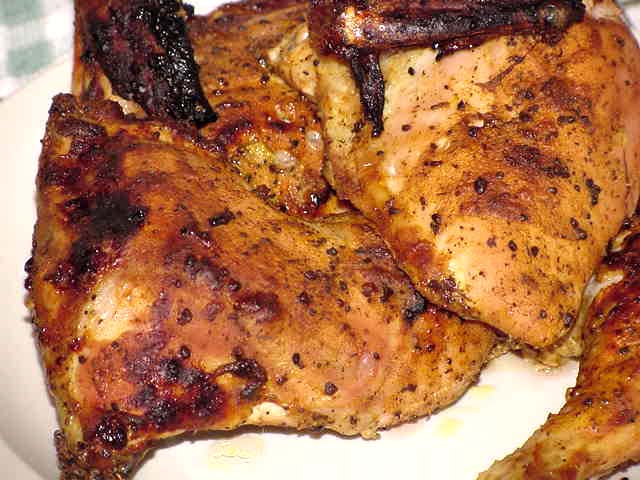
It made such a lovely, delicious chicken. The cacao nibs have a dark, warm toasty flavor that complements the tandoori spices to perfection. I am so glad Danielle chose this theme for this month's event. If she hadn't, it would have just been another great idea I had that I never tried. And that would have been a true shame because it's so good I will be making it again and again.

The chicken is the all natural chicken I've been getting at the Apple Market. I can't say enough good things about it. I've been shopping there often enough now that they recognize me, which is a nice feeling. And it was also really nice to be able to ask them to quarter the chicken for me, rather than my having to deal with it when I got it home.

Yogurt is an amazing tenderizer. This is the third time I've used it as a marinade for chicken, and each time the chicken has come out juicy and incredibly tender. Even though this bird was in the oven for a long time, it came out tender and flavorful and the white meat had not dried out at all, as it sometimes does when it's roasted for a long time. This easy dish comes out with a rich, complex, layered flavor that tastes like it took long hours and hard work to prepare.

Tandoori-Style Chicken with Cucumber Yogurt Sauce

1 cup nonfat yogurt
1 Tbsp Tandoori Masala
1 Tbsp cacao nibs, toasted and ground
3-1/2 lb. chicken, quartered and skinned

CUCUMBER-YOGURT SAUCE
1 cup nonfat yogurt
1 med cucumber, peeled, seeded, grated
1 Tbsp fresh lime juice
1 Tbsp fresh mint leaves, chopped
1/4 tsp salt

GARNISH
Thinly sliced limes
Fresh mint sprigs
Ground toated cacao nibs

The day before you plan to cook the chicken, mix the Tandoori Masala and cacao nibs into the yogurt. Combine chicken and marinade in a bowl or sealable plastic food-storage bag and refrigerate overnight.

To cook, heat oven to 500 deg. F. Place chicken in large roasting pan, brushing with the remaining marinade. Bake 15 minutes. Reduce oven temperature to 350 and continue baking 45 minutes to an hour, or until juices run clear when chicken is pierced with fork.

While chicken is cooking, prepare Cucumber-Yogurt Sauce. In medium-size bowl, combine yogurt, cucumber, lime juice, mint and salt. Transfer sauce to serving bowl, cover, and refrigerate until ready to serve.

Transfer chicken to serving platter. Cover with cucumber-yogurt sauce and garnish with mint sprigs, lime slices, and ground cacao nibs.

Adapted from recipe at fooddownunder.com

Saturday, September 09, 2006

TSIR 6: Back to (Spice) School - Amchoor

The mango originated in South and Southeast Asia. The word evolved from Tamil, the most important Southern Indian language. Manpalam means ripe mango, and mangai refers to an unripe mango. It is believed that the word mango was carried west by Portuguese sailors who found the unripe mangai in harbor markets and brought them home with them. From Brazil, the fruit spread to the West Indies and the Dominican Republic. It reached Jamaica around 1782 and then, early in the Nineteenth Century, made its way to Mexico from the Philippines and the West Indies, and from there made its way to Florida.

My first real experience with a mango (I may have previously encountered an unripe slice or two as a garnish) was around 1978, when I went to Puerto Rico for two weeks. I went to visit a friend who was, in turn, visiting friends. It was an amazing, incredible experience for many reasons, not least of which was when we rented a car so we could drive around the island and explore. It's a small enough island that we were able to drive around the coast from the north side of the island, where we were staying in San Juan, to Ponce in the south, then cut through the middle of the island back to San Juan, in one day. The next day we did the same thing heading east instead of west, so we basically covered the whole island in two days, with plenty of time to stop and see some sights.

Dotted along the coastal roads around the island, in addition to the beautiful red-flame-flowering flamboyan trees for which Puerto Rico is known, we saw many mango trees. Our companions suggested we stop at one and we gathered several of the ripe fruits that had fallen to the ground. We peeled them with our teeth and fingers and ate them out of hand right there on the side of the road. They were the sweetest, juiciest, most flavorful fruit I had ever tasted. We feasted on fresh mango for the rest of our visit, and I have eaten them ever since, waiting for them to come into season and eating as many as I can before they disappear again.

It is not well known, however, that unripe mango gives a remarkable spice much used in Northern India.
The stone removed, the fruit is cut in slices, dried and afterwards ground to a pale gray powder. This powder is used frequently instead of tamarind, the other important sour element in Indian cuisine; mango powder is, however, much weaker than tamarind and has a subtle, resin-like taste. It is mainly used when only a hint of tartness is desired or when the dark brown colour of tamarind is to be avoided. Mango powder is generally more popular with vegetables than with meat, but is frequently found in tikka spice mixtures for barbecued meat.
- from Gernot Katzer's Spice Pages
When I was looking through Jill Norman's Herbs & Spices for something I had never used before for Barbara's next Spice Event at Tigers & Strawberries, my attention was immediately caught when I noticed Amchoor (Hindi), or Amchur (Marathi). As much as I love mangos I couldn't resist the idea of dried mango powder. And when I discovered that it was a key ingredient in tikka spice mixtures, I was sold. Chicken Tikka Masala is one of my favorite Indian dishes. I knew I had to try it.


But where to find it? I knew I wouldn't find it in my neighborhood grocery stores, although Treasure Island carries a broad range of European and imported goods. My usual spice shop didn't have it listed in their catalog or online, so I knew I would have to venture up to Devon Street to look for it in one of the Indian grocery stores there. So last Sunday evening Jessica and I sallied forth to find amchoor and dinner.

Devon Street in Chicago is packed with Indian restaurants and grocers. Early on a Sunday evening there are hundreds of people congregating on the street and in the restaurants. It was a little intimidating because I felt like I stood out as a non-Indian. Jessica has fair red hair that made her stand out even more, and we received more than a few appraising glances from people as we passed them on the street.

I found my spice at the World Fruit Market, the second place we stopped. Jessica actually found it, a large packet labeled Amchur, which I guess must be the Northern Indian word for it. It's in the jar on the right in the picture above. I bought it, along with about eight pounds total of red and yellow lentils (what was I thinking?), and then we looked for a restaurant for some dinner.

We settled on Mysore Woodlands, a Southern Indian vegetarian restaurant. It was bustling, so it seemed like a good choice. I'm not terribly familiar with Southern Indian food, so I didn't recognize much from the menu. They had a combo special that Jessica and I both opted for. What we got were big round trays topped with small silver bowls full of all kinds of strange and wondrous things. The only real problem was we had no idea what anything was. Some of the bowls seemed like sauces and condiments but we couldn't tell which was which. There was one dish that had lemon peels and garlic that was delicious. If anyone knows what that was, please let me know.

The food was good, but the service was so-so. While I would go back, I think I'd rather try some of the other Indian restaurants in the area.

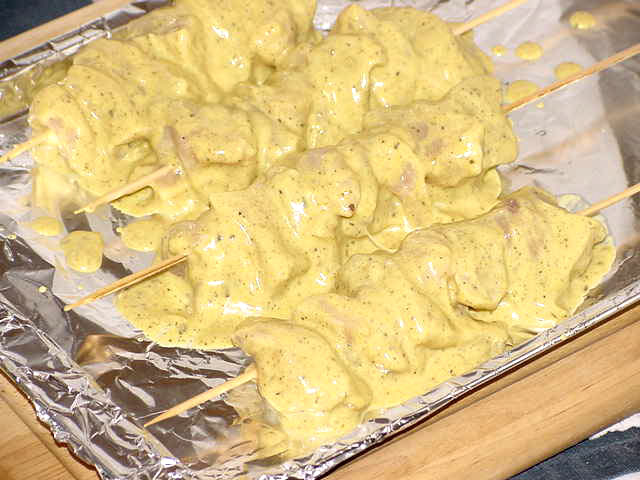
So the next day I roasted up my whole spices and ground them up with other spices and the amchoor into a Tandoori Masala. It smelled fresh and roasty-toasty and I couldn't wait to use it. I added a tablespoon of the masala to a cup of plain yogurt and marinated some cubed chicken in it overnight.


The next day I soaked some bamboo skewers in water for an hour, then I put the chicken cubes on the skewers and broiled them for about ten minutes on each side.

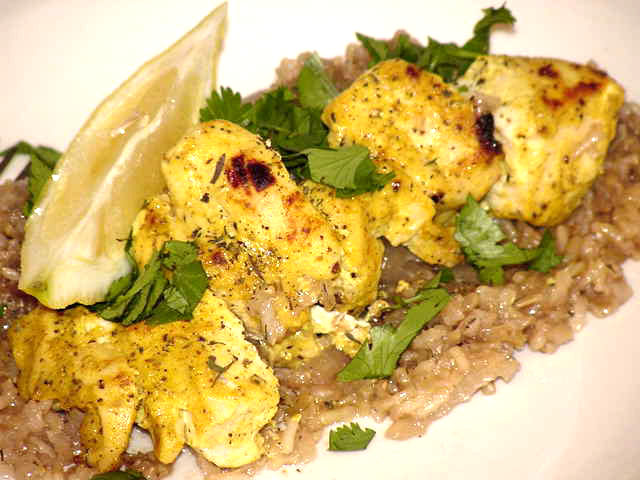
The result was delicious. I cooked brown Basmati rice with chicken stock and added a teaspoon of the amchoor and about half a teaspoon of mace. The rice didn't fluff up as much as I had hoped, but it tasted wonderful, especially with the chicken tikka.
Tandoori Masala

1/2 cinnamon stick
1 Tbsp coriander seeds
2 tsp cumin seeds
6 whole cloves
3 mace blades
2 tsp ground turmeric
2 tsp ground ginger
1 tsp ground chili
1 tsp amchoor
1 tsp black salt
1 tsp sea salt

Crush the cinnamon lightly and dry-roast the whole spices until they darken and start to smoke. Let cool, then grind them. Combine all the spices with the salts.

To use, stir scant 1 cup plain yogurt and combine with 2-3 tsp of the masala.


Chicken Tikka

1-1/4 lb boneless chicken
scant 1 cup plain yogurt
1 Tbsp tandoori masala
2 Tbsp sunflower oil
2 lemons
small handful of cilantro or fresh mint

Cut the chicken into 2-inch cubes. Whisk the yogurt and stir in the masala and the oil. Marinate the chicken in the yogurt for at least 2 hours. When you are ready to cook, heat the oven to 450 degrees F., or heat the broiler or a charcoal grill. Thread the chicken pices onto skewers.

Bake the chicken for about 12 minutes, or broil or grill for about 10 minutes, turning the skewers once. Serve with lemon wedges and chopped cilantro or mint.

Servings: 4

both recipes from
Herbs & Spices: The Cook's Reference, by Jill Norman (DK Publishing, 2002)
Related Posts Plugin for WordPress, Blogger...