As part of my 12-post series over at Fitfare, I had to test a recipe that called for blueberries. I chose Blueberry-Polenta Muffin Tops because I was curious to see what impact the polenta would have on them. They tasted good, but did not hold their shape well.
When I make these again, I will double the recipe and just make regular old muffins with them. You can read the full review here.
Home Cookin 4.9 Chapter: Breads and Muffins
Blueberry-Polenta Muffin Tops
1 large egg
1/3 cup sugar
1/3 cup orange juice
1/2 tsp grated orange zest
1/4 cup canola oil
1/2 cup unbleached all-purpose flour
1/2 cup quick-cooking polenta
1 tsp baking powder
1/8 tsp salt
1-1/4 cups fresh or frozen blueberries, or 3/4 cup dried
Place a rack in the center of the oven. Preheat the oven to 350 deg. F.
Coat an 8-cavity muffin-top pan with cooking spray.
In a mixing bowl, using an electric mixer on medium-high speed, beat the egg with the sugar until thick and pale, 2 minutes. Mix in the juice, zest, and oil. Stir in the flour, polenta, baking powder, and salt. Mix in the blueberries. Spoon the batter into the prepared pan, filling the cavities to the top.
Bake 15 minutes, until a toothpick inserted into the center of a muffin top comes out clean and the tops are rounded and browned around the edges. Cool the muffin tops in the pan for 2 minutes. Unmold and cool on a wire rack. Serve warm or at room temperature. Tops keep for up to 3 days wrapped in foil.
Makes 8 muffin tops.
Per muffin top: 187 calories, 8 g fat, 1 g saturated fat, 3 g protein, 27 g carbohydrates, 2 g fiber
from 12 Best Foods Cookbook, by Dana Jacobi (Rodale, 2005)
What I already had on hand:
egg
sugar
oil
flour
polenta
baking powder
salt
What I bought:
Orange juice
blueberries
 My plans to use the leftover cabbage from the okonomiyaki in a stir fry fell by the wayside after I learned a sad lesson. When you only use half of a slab of tofu, you should put the rest back in water before putting it in the fridge or it will get all slimy on you. It made me sad because I had big plans not only for the cabbage, but also for the broccoli I had bought. Major bummer. And major change in plans. Knowing I needed some kind of protein, I took a package of four drumsticks out of the freezer and put them in the fridge to start thawing.
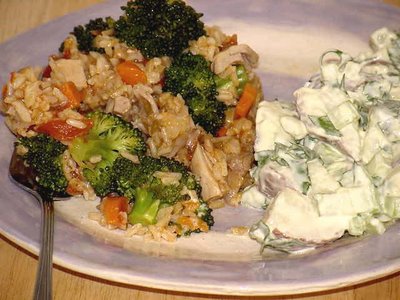
So, what to do with the stir-fry veggies? I had some beautiful heads of broccoli I got on sale. My first thought was to just cook them up with the chicken and pasta using my new absorption method, but my mind kept going back to broccoli and rice. We used to make some godawful-for-you but pretty tasty at the time casseroles where you put chicken, broccoli, and rice in a dish and pour cans of cream of mushroom and/or cream of celery soup over them, add cheese, and bake for an hour. So when I think of chicken and broccoli, rice almost always comes up as the obvous companion.
But I'm not really eating cheese these days and I'm definitely not using processed cans of cream-of-anything, so I tried to think of something that would be a little healthier without sacrificing taste. And as I was thinking of possibilities for combining the ingredients, I was also thinking of what method I was going to use to prepare it. Even though we've been really lucky this summer and it hasn't been too hot, I'd still rather not use my oven. So I started thinking about that old stovetop Spanish rice and pork chop recipe I used to make, and realized it could be adapted pretty easily for what I was trying to do here.
So how did it turn out? Ay caramba! Que deliciosa! I've created a real winner, if I do say so myself. The chiles add a delicate hint of sweetness that is immediately counteracted by the spicy cayenne. All of the flavors go well together without any getting lost. I plan to make this often.
I'm calling it Chile Chicken Pilaf. (That's Aioli Potato Salad sitting on the plate next to the pilaf. You'll be reading more about that later.)
Chile Chicken Pilaf
4 chicken drumsticks
water to cover
2 Tbsp olive oil
pinch of cayenne
2 carrots, chopped
6 cloves garlic, minced
1/2 onion, chopped
1 cup uncooked brown rice, rinsed
4 cups broccoli florets
1 14.5-oz. can diced tomatoes, drained, with juice reserved
1 4-oz. can mild chopped chiles
salt and pepper to taste
Skin drumsticks and place in pan in cold water. Season with salt, pepper, and garlic powder. Bring to a boil, lower heat, cover and simmer for 30 minutes. Separate the meat from the bones and set aside. Combine the stock with the drained tomato juice to make 2 cups' worth. (The rest of the stock can be frozen for later use.)
In a large saucepan heat oil over medium-high heat. Add carrots and saute for 1 minute. Add onions and garlic and saute for 2 minutes. Add rice and saute, stirring constantly, for 2 more minutes. Add tomato/chicken stock, cayenne, salt, and pepper. Bring to a boil, lower heat, cover, and simmer for 40 minutes.
While rice is simmering, cut chicken into bite-size pieces. After the rice has cooked for the 40 minutes, add the chicken. Cover the rice again and simmer for another 25 minutes. Add broccoli florets and more water, if necessary. Simmer for 10 minutes. Turn off heat and let sit for five minutes. Stir everything together and serve.
Serves 4.
For the What's in Your Pantry section:
What I already had on hand:
Chicken drumsticks
olive oil
cayenne
carrots
garlic
onion
brown rice
14.5-oz. can diced tomatoes
salt and pepper
What I bought:
broccoli
Tomorrow: How I used the rest of the cabbage.
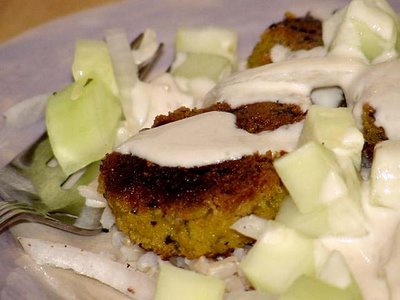 I had some chickpeas in the freezer and some leftover tahini lemon sauce so I decided to try once more with the felafel. I mashed the chickpea mixture with my bean masher instead of using the food processor, and it did make a difference.
It held together better than my first effort did, but it did not taste much like the felafal I am used to getting when I eat it in one of the many restaurants here that offer it. In my memory, that first time I made it years ago it was fabulous, but that might just be because I'd only had it a few times before making it, so I had less against which to compare it.
And while it was better this time, unfortunately, it wasn't better enough. Here in Chicago, felafal is cheap and delicious, so I've decided there is no need for me to ever make it again, unless I move to a city where it is less accessible. It uses an awful lot of oil. I think it might actually be healthier in a restaurant, where it is usually deep fried.
Home Cookin 4.9 Chapter: Beans and Vegetables
Felafel
4 cups cooked chick peas (or 2 15-oz. cans)
2 tsp cumin
1 tsp turmeric
1 tsp salt
1/2 cup finely minced onion, or 6 scallions, minced
1/4 cup packed minced parsley
1/4 cup water
1 Tbsp lemon juice
pinch cayenne
1/3 cup flour
oil for frying
Rinse chickpeas and drain well. Combine all ingredients except flour in food processor or medium-sized bowl and process (or mash) until you have a uniform batter. Add flour and stir until thoroughly combined.
Heat a heavy skillet and add abut 3 tablespoons oil. When it is hot enough to sizzle a bread crumb on contact, drop tablespoonsful of batter into the pan, flattening each slightly. Saute for app. 10 minutes on each side, until golden and crisp. Add small amounts of extra oil to the pan as needed throughout cooking.
Place cooked felafel on a plate lined with paper towels and, if necessary keep warm in a 300 deg. oven until serving time.
Servings: 4
from The Moosewood Cookbook (rev. ed.), by Mollie Katzen (Ten Speed Press, 1992)
For the What's in Your Pantry section:
What I had on hand:
chickpeas
onion
flour
cumin
turmeric
salt
lemon juice
oil
tahini lemon saucebrown rice (to serve with it)
Here's what I had to buy:
cucumber
parsley
I did not buy tomatoes because they didn't look that good
I still have a cucumber left over. I might just buy a tomato and make cucumber tomato salad with it. I can easily find another use for the parsley.
 Thanks to Lynda for tipping me off to this . . .
I know I haven't truly seen everything, but I believe I'm a little closer. The Gateway Grizzlies in Sauget, Illinois apparently promised to create "Baseball's Best Burger" in time for the Frontier League's team opener in May. I don't know if it's the best, but it's certainly one of the most unusual.
This burger is topped with sharp cheddar cheese and two slices of bacon and is served between a bun made of a sliced, inverted Krispy Kreme doughnut.
The $4.50 burger packs a whopping 1,000 calories. But if you want to try it, you have to go to a game. It's not being sold outside the stadium.
(Photo courtesy ESPN)
 Many years ago, when I was living in a small apartment complex in East Austin, I had a downstairs neighbor from Japan who fixed this incredible omeletty-fishy-pancake-y thing for dinner for me and a few of her friends. She served it with this wonderfully tasty sauce that I had never had before that really brought out all of the flavors of the pancake. It was one of the most delicious things I had ever tasted.
But when I asked her what it was, she got a funny look on her face and avoided answering my question directly. She kept saying it was no big deal, just something she threw together. But it was good enough that I really wanted to know, so I wouldn't let it go, which was probably rude of me. She finally said, with obvious embarrassment, that it was something you cook for the family and not something you usually offer guests. With even more embarassment, she confessed that the sauce was a mixture of mayonnaise, ketchup and soy sauce. And she finally told me the name of it, but I just couldn't keep it in my head. All I remembered was that it sounded like "economy" with a couple of syllables after it, and that was the best I could do.
But while I could not for the life of me remember the name of it, I never forgot that wonderful dinner. Any time I found myself at a Japanese restaurant I would search the menu, hoping to find something that sounded even remotely close to what little I remembered of the name, but I never saw anything like it.
And then, in that odd way life has of giving you answers long after you have stopped asking the questions, and in the last place you would expect, I was reading Edward Espe Brown's Tassajara Bread Book to learn how to make bread. After reading his most excellent section on the zen of bread, I read on through the other recipes at the end of the book. Imagine my surprise when I ran into a recipe for something called "Okonomiyaki," which he described as "Japanese pancakes made with vegetables (and meat)." And that quickly, my search ended. Not only did I know what it was called, I now had a recipe!
Okonomiyaki literally means "cook what you like." It is popular in Osaka and Hiroshima, where there are many restaurants that feature it. This is not an authentic Japanese recipe, but it does the job for me. As an added bonus, the mayonnaise I used for the sauce was home-made. The beauty of this pancake is its versatility--you can have it for lunch, dinner, or even breakfast. You can even freeze them.
 Here's what it looks like when you're cooking the first side.
 And after it's been flipped.
Okonomiyaki
1/4 chinese cabbage, chopped fine
1 carrot, grated
1/2 onion, minced
2 stalks celery, minced
1/2 c. cooked meat or fish*
1 c. whole wheat flour
1 c. unbleached all-purpose flour
1 egg, beaten
2 Tbsp brown sugar
1 tsp salt
1 12-oz. can evaporated milk
enough water to make batter
Mix flour, egg, brown sugar, salt, and evaporated milk to form batter. Add water to make pancake consistency. Fold in vegetables.
Pour out enough for 6-8" cakes and cook on griddle or cast-iron skillet over medium-low heat for approximately 8 minutes on each side, or long enough for vegetables to cook. Use 2 spatulas to flip. Check frequently to make sure it's not burning. Add more water to keep batter thin, if necessary.
Serve with Okonomiyaki sauce:
1/2 cup mayonnaise
1 tsp soy sauce
1 Tbsp ketchup
Mix together and spoon over okonomiyaki.
*I use a 6-ounce can of salmon or tuna.
Makes 4-5 pancakes.
Adapted from The Tassajara Bread Book, rev. & updated, by Edward Espe Brown (Shambala, 1986)
Now for the What's in Your Pantry section:
Here's what I already had on hand:
Flour (all-purpose and whole wheat)
6-oz. can of salmon
carrots
onion
eggs
brown sugar
salt
ketchup
soy sauce
canola oil
And here's what I bought:
evaporated milk
celery cabbage
cabbage
I have been using carrots and celery quite a bit, and while I have no trouble using up the celery, sometimes it's hard for me to use up all the carrots. I was looking for something new to make with them when I remembered Okonomiyaki, which I haven't made in years.
I also have 6 ounces of pressed tofu in the fridge for some stir fry, so I knew I would be needing some vegetables for that, so I figured I can use the rest of the cabbage and some of the celery in the stir-fry.
 A friend brought this up the other day and I've been thinking about it ever since. Let's say you're just starting out on your own and aren't used to having to cook for yourself every day. You know how to follow a recipe, but you don't have a lot of experience with meal planning. How do you get started? What staples should you have on hand? What should be in your refrigerator? How do you decide what to eat every day?
There are several cookbooks that provide copious lists of what a well-stocked pantry should have. The problem I have with those lists is this: every time I have purchased staples because I know I should have them on hand, I end up throwing them away months, if not years, later. A staple is a staple because you use it often enough to know that you will use what you have bought soon, even if you don't have a specific use for it at the time you're buying it. And these days, I have a completely different range of what I keep on my shelf than I did five years ago. It's a constantly changing dynamic.
I think staples should grow out of your use of them. So if you're just starting out in the kitchen, the amount of staples you have in your pantry will be light. They will accumulate with every new recipe you try, because you will be buying new ingredients and will rarely use up all of what you buy in one dish. If it's a fresh ingredient, obviously you'll want to use the rest of it up pretty quickly so you will either make the same dish again or find a new recipe that calls for it. If it's something that will last for a while, it goes in your pantry where, if you like it and will find more and more uses for it over time, it will become a staple and you will be sure to always have some on hand.
When my friend first put this idea in my head, I thought it might be interesting for me to come up with my own list of core staples that I think everyone should have in their pantries. But the more I tried to come up what should be on it, the more I realized that there is no such thing as a universal list of staples.
The only way to learn how to stock your pantry and plan and prepare meals is to jump in and do it. You'll make mistakes, but at least most of those mistakes will still be edible. I think the best way to learn is to read a selection of general cookbooks (The Joy of Cooking, The Good Housekeeping Illustrated Cookbook, The Betty Crocker Cookbook, The Fannie Farmer Cookbook). Almost all cookbooks, but especially these, have all the information you need about cooking equipment, staples, cooking terms and definitions, menu planning, etc. Read a couple and pick and choose from each one the things that most fit with the way you like to do things.
And then start looking at recipes and pick one or two new things to cook every week. If you like it, you can put it into rotation and make it regularly (and often, those ingredients will become staple ingredients for you). The more recipes you try, the more familiar you become with techniques and the more you will be able to cook without recipes for those times when you have to use up fresh ingredients that you purchased for a specific purpose.
I thought it might be an interesting experiment to write out what I bought at the grocery store on Thursday night, and then go through the week posting about what I cooked, what items I already had on hand vs. what I bought, what I had a specific plan for, and what was improvised.
So here's what I bought at the store:
onions
garlic
lemons
celery
celery cabbage (similar to napa)
broccoli
flat parsley
cucumbers
blueberries
cantaloupe
bananas
canola oil
evaporated milk
raisins
fresh dill in pot
frozen orange juice
Tomorrow: Okonomiyaki
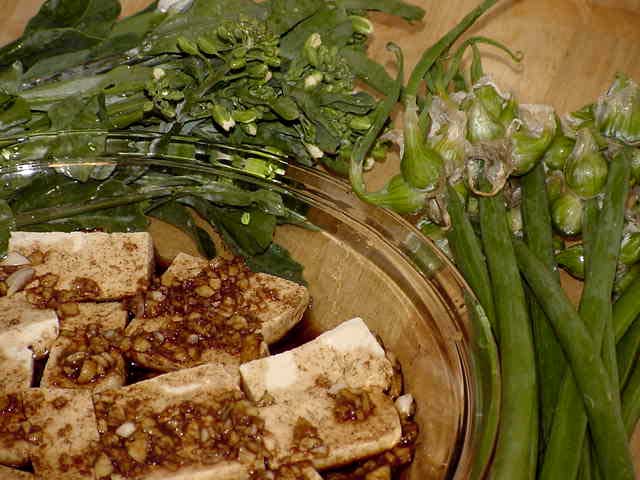
 The two other things I got at the Farmer's Market last Wednesday were Chinese broccoli (on the left) and flowering onion tops. I knew I wanted to make a stir fry so I had my eye out for some good greens.
I have never seen flowering onion tops before, nor had I heard of them. So of course I had to get them. I had heard of Chinese broccoli before, but have never cooked with it.
The onion tops look like the tops of green onions, but they have teeny tiny little onion bulb clusters at the top, I decided to keep the stir-fry simple and just used marinated tofu with the greens.
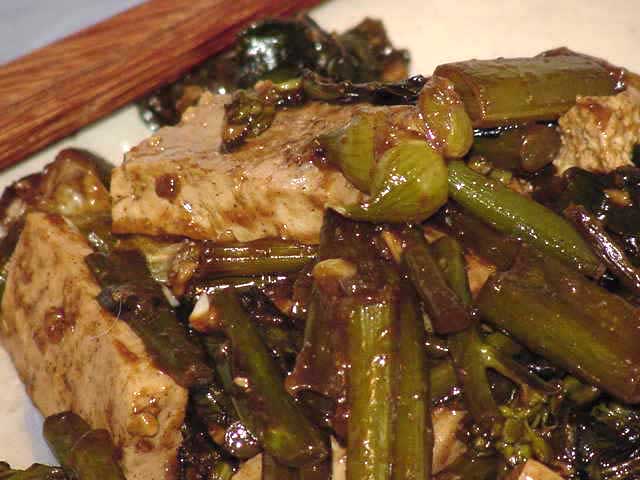
 Because green onions usually cook pretty fast, I decided to put the broccoli into the wok first. I should have paid more attention while I was cutting the onion tops, though. They were thicker than green onions, and the minute I put the broccoli into the wok I realized the onion tops were going to take longer to cook than the broccoli. I threw them in as soon as I realized my mistake, but I knew that I would have to overcook the broccoli if I wanted the onions to soften up. So I compromised, and the onions were a little too fibrous as a result.
But that didn't take too much away from the taste. The onion greens may have been chewy, but the bulb clusters at the top were cooked just fine, and they popped with onion flavor when I bit down on them. Very tasty. You can see one of the cooked clusters at the top of the photo.
I've described my stir-fry method, but I don't think I've provided an actual recipe. This is pretty much the standard marinade and sauce I use every time, but the other ingredients usually change from dish to dish.Tofu Stir-Fry Marinade and Sauce
For tofu marinade:
1/2 lb extra firm tofu, pressed to remove excess liquid and cut into 1 x 1/2" rectangles
2-3 cloves minced garlic
1 Tbsp minced fresh ginger, or 1 tsp ground
1 tsp cumin
3 Tbsp soy sauce
dash of rice wine or rice vinegar
For sauce:
1/4 c. vegetable broth
1/4 c. orange juice
1 Tbsp cold water
1 Tbsp corn starch
1 Tbsp canola or peanut oil
Approximately 1 lb of any combination of vegetables
Directions:
Combine the ingredients for the tofu marinade. Put a spoonful of marinade in the bottom of a flat dish and place tofu rectangles in a single layer. Pour the rest of the marinade over the tofu and set aside.
To make the sauce, combine the broth and orange juice in a bowl. In another small bowl, combine the corn starch and water and stir.
Chop the vegetables you are going to use, making sure that the pieces are all even. Make sure all ingredients, including tofu, are within reach before you start.
Heat the wok, then add the oil. When oil starts smoking, add the vegetable that takes the longest to cook and stir fry for a minute or two, then add the next longest-cooking vegetable and cook for about a minute, then add the next vegetable (I wouldn't use more than 3 or 4 vegetables).
When the last vegetable has been added and sauteed for 1 minute, lower the heat, cover the wok and steam for 7-10 minutes. (This may not be authentic but it works for me--otherwise the vegetables don't cook evenly.) Check after 5 minutes to make sure the vegetables don't overcook.
When vegetables are ready, bring the wok back up to high heat. Drain the tofu marinade into the bowl with the sauce, then add the tofu and the sauce to the wok with the vegetables. Once the sauce is hot and boiling, add the corn starch slurry and stir until it thickens.
Serve immediately.
I'm a little late to the table, but June 19-25th is the Organic Consumers Association National Week of Action to Protest Starbucks for their continued use of dairy products that contain rBGH and their continued lack of use of Fair Trade coffee.
As one of the nation's major dairy purchasers, Starbucks could have a major impact if they were to refuse to accept rBGH dairy products. Dean Foods, Walmart, and Kroger are among the nation's leading dairy providers who are starting to demand rBGH-free product from their farmers, thanks largely to consumer demands. If Starbucks were to join that group, the impact would be immense. The United States is one of the few (if not only) countries that does not ban the use of the bovine growth hormone.
And while Starbucks also gives lip service to using Fair Trade coffee, in reality fair trade only makes up about 3.7% of their total coffee usage.
So when you get your daily dose at Starbucks this week (if that's where you get your daily dose), ask for fair trade. They're obligated to make it for you if they don't already have it brewed (which they usually don't, apparently). And let them know how you feel about rBGH, both in person and online.
 Last Wednesday I met Lynda at the Green Market again. I had a budget of ten dollars and it was really interesting to try to stick to it. We went around looking at everything first. The breads looked particularly good, and there were more cheese vendors. Some had samples so I got to try some rich, creamy butterkase and an incredibly sharp aged cheddar that was unbelievable.
There were also more fruit and vegetables than that first week. The strawberries looked sweet and ripe and juicy. But the freshest thing there were the sugar snap peas, so I snapped up some of those. I love it when they're so sweet and tender that you can eat them shells and all. I got some Chinese broccoli and flowering onion tops as well, but those are for another post.
My obsession with absorption pasta continues. It seemed like a natural accompaniment for the peas, so I figured I'd try to come up with some kind of pasta primavera-type combination. So what spices would be best for maintaining that spring-like freshness? What would give it that light breezy flavor?
And fresh as a breeze the answer popped into my mind: mint. I've been reading quite a few Middle Eastern cookbooks lately and had just finished a section on mint, parsley and dill. I don't cook with it very often, but the minute it occurred to me it felt right. And to give the mint a little depth I decided to combine it with some ground fennel.
The result? It was perfect. It had just the right flavor to enhance the peas, which truly were the highlight of the dish. In fact, as good as it was with the pasta, I think the peas would be delicious just by themselves with a little onion, fennel and mint.
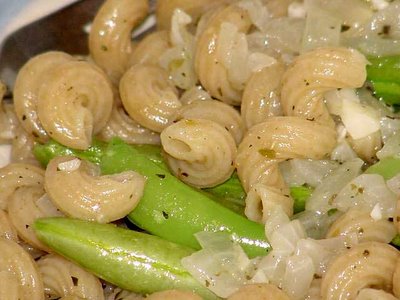
Cavatappi with Sugar Snap Peas
For two servings, this recipe can be doubled and cooked in a 16" skillet.
1 cup whole wheat cavatappi, or other short pasta
1 Tbsp olive oil
1 cup water
3 gloves garlic, minced
half an onion, chopped
1 cup sugar snap peas, trimmed and strung
1/2 tsp ground fennel
1 tsp dried mint
salt and pepper to taste
Heat oil in 10" skillet. Add onion and garlic and cook approximately 2 minutes, until onion is translucent. Add pasta and continue to cook, stirring constantly, for 2 more minutes. Add approximately 3/4 cup of the water, fennel, mint, salt and pepper. Lower heat, cover, and simmer for approximately 7 minutes, stirring occasionally. Add the sugar snap peas, cover, and continue to cook for 3 minutes longer, or until pasta is cooked to desired texture.
Serve immediately.
Serves 1
 Lord I love my stick blender. I don't know what I did without it. Oh yeah, I used my blender or food processor, which were royal pains in the ass to clean.
I overcooked some great northern beans so they were pretty much ruined for baked beans, or anything that left them solid. So what to do with them? These are the ingredients I had on hand that I thought might work:
garlic
onion
canned tomatoes
parsley
I remembered a recipe for Tuscan White Beans that used those ingredients I made a couple of years ago that had shown some promise, but not enough for me to make it again. With some modifications, I figured I could use the same ingredients to make some soup.
Sage and great northerns complement each other nicely. I'm usually not a huge fan of sage, because it can be overpowering and has such a strong connection for me to stuffing. But in small amounts it can beautifully enhance a dish of beans. While not strictly necessary, the fruity olive oil added at the end really boosts the flavor.
Made with less liquid, this would make an awesome spread with crostini. I think that's what I'll do with the other half.
White Bean and Tomato Soup
3 cups cooked great northern beans, with cooking liquid*
2 Tbsp. olive oil
1 Tbsp. fruity olive oil
5-6 cloves minced garlic
1 onion, chopped
1/2 tsp sage leaves
1/4 tsp thyme
salt and pepper to taste
1 14.5-oz. can diced tomatoes
chopped flat parsley for garnish
*If you use organic canned beans, you can probably use the liquid. If you're using a conventional brand, check the ingredients for extra sodium and additives, and if there are any, drain, rinse, and replace with regular water (enough to barely cover the beans).
Place beans and liquid in a 3-quart saucepan and bring up to a simmer. When the beans are heated through and simmering, add the tomatoes, sage, thyme, salt and pepper. Lower heat, cover, and cook for 15-20 minutes.
At the same time, heat a medium-sized skillet and add the 2 tablespoons of olive oil. Add onion and garlic and saute over medium heat for approximately 10 minutes.
Add the onions and garlic to the beans. Take the pan off the heat and, using a stick blender, blend until soup is pureed**. Add the fruity olive oil. Garnish with parsley and serve.
**Or place in blender or food processor in batches and process until smooth.
Makes 4 main or 6 side servings.
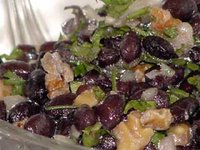 I've started a 12-post series for Fitfare where I'm picking a recipe for each of the twelve foods featured in the 12 Best Foods Cookbook by Dana Jacobi. You can find my review of Black Bean and Walnut Salad here.
 When I learned that the theme of this month's Spice Is Right Challenge on Tigers & Strawberries was to cook with flowers, I was excited because I've never cooked with them before. But then the month got away from me for various reasons and all of a sudden I was under the gun and I had to come up with something pretty damned quick.
I already knew I wanted to find a way to incorporate saffron into my dish. I was lucky enough to get some for my birthday and it's been burning a hole in my pantry ever since. And being the resourceful kind of gal I am, I realized that saffron comes from the crocus sativas flower, so it qualifies for this challenge all by itself. (See how resourceful I can be?)
And seeing as how I like to use this challenge to try to stretch my culinary repertoire, I tried to find a recipe that incorporated something new. Which was a major challenge, given my time constraints. But browsing through recipes that used saffron, I came across this recipe for Baby Red Potatoes with Saffron Mayonnaise. It sounded intriguing, and more to the point fast, but how could I create some adventure out of it?
The answer lies in the mayonnaise. I've never made my own. And I've been wanting to for a long time. And ever since I discovered that you could make it pretty easily with a stick blender I've been jonesing to try it. So I got brave and made myself a batch of olive-oil based mayonnaise.

That's it on the bottom right. You can't tell from the picture, but it has the most lovely glow-in-the-dark green tinge to it. And the stick blender worked like a charm. In fact, it emulsified so quickly that it startled me.
Behind the mayonnaise, in the mortar and pestle, you can just barely see the saffron mixed with crushed garlic. This is right before I put the sauce together to pour over the potatoes.
There were a few problems with this recipe. The garlic clove I used was ginormous and really really strong. Although it didn't seem like it at the time, I used too much salt when I crushed it. Those two tastes unfortunately overpowered the saffron a little. The mayonnaise could have used more lime juice. And I should have looked in the bottom of the bowl with the potatoes before I added the mayonnaise because there was some water down there that thinned out the sauce. I absolutely hate it when that happens.
But all of these things can be fixed for next time. And there will be a next time. This would make a wonderful side dish with lamb or steak.
Whew. Made it just in time!
Home Cookin 4.9 Chapter: Potatoes
Baby Red Potatoes With Saffron Mayonnaise
10 baby red potatoes, halved
1 clove crushed garlic
1/2 tsp saffron
1 Tbsp hot water
1/2 cup mayonnaise
salt and pepper to taste
1 Tbsp chopped flat parsley
parsley sprigs for garnish
Boil potatoes in water until tender. Drain and set aside.
Steep saffron in hot water for 5 minutes. Combine garlic with parsley and mayonnaise, then add the saffron. Add salt and pepper. Add potatoes and mix well. Garnish with parsley sprigs and serve.
Potatoes and mayonnaise can be made ahead, stored in the fridge, and combined when desired.
Servings: 4
from www.fooddownunder.com
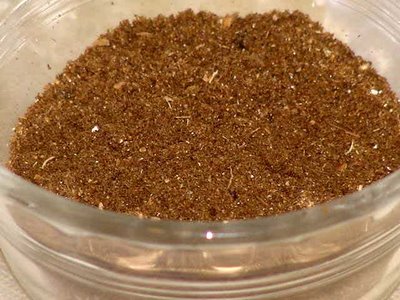 I have reached a new pinnacle of food geekdom.
I had some broccoli that I needed to use, and not much else on hand. What to do? Cook it with brown rice. How to cook it? Hmmmm . . .
How about . . . absorption rice! I remembered a method similar to absorption pasta that I used to use for making Skillet Pork Chops and Spanish Rice--something I haven't made in far too long. You brown the pork chops, remove them from the pan, brown some onions, garlic, and brown rice and then pour the juice from a can of stewed tomatoes (with enough water to bring it up to 2 cups) into the mix, add the pork chops back in and the stewed tomatoes, cover and simmer for about 45 minutes. It was much tastier than the dried shoe leather flaps my mother used to overcook in the oven when she made her version.
So with all this absorption pasta I've been making, the idea was simmering in the back of my mind to try it with rice. So that's what I decided to make, but what flavors should I use? Being in an Indian frame of mind lately, curried rice with broccoli sounded pretty good. So I blanched the broccoli and assembled the rest of my ingredients.
I pulled the sweet curry powder out of the cupboard, and then rummaged through to the back of the shelf for the garam masala that came with one of those how-to-cook-Indian kits I had gotten years ago. I had used it for the red kidney bean curry, but it hadn't seemed particularly pungent and I had meant to replace it. I smelled it again just to be sure, and it had definitely lost its punch. What could I do?
And here's where my geekdom comes in:
Because of all the Indian-style cooking I've been doing lately, I just happened to have most of the individual spices on hand that go into garam masala. So I measured them out, roasted them, ground them, and there I had it--my first ever home made spice mix. It smells heavenly, pungent, and...well...warm (that's what garam masala means, by the way--warm spice mix).
It tasted really good. Unfortunately, I added the broccoli way too soon when I was cooking the rice and it overcooked to that point where you can't really taste it. But the rice was sensational!
Garam Masala (Warm Spice Mix)
You can vary this recipe a bit--experiment with various spices until you find the combination that works for you.
8 cloves
4 tsp cumin seeds
3 green cardamom pods (whole)
2 black cardamom pods (whole)
1 2-inch cinnamon stick
2 tsp coriander seeds
1 tsp black peppercorns
1 bay leaf
pinch of ground nutmeg (optional)
Heat a small skillet on medium. Add all the spices except the nutmeg and dry roast the spices, stirring constantly. After about 5 minutes, the spices will darken and begin to release a unique aroma.
Remove the skillet from the heat, then add the nutmeg. Transfer the spice mix to a bowl and allow to cool for about 5 minutes.
Using a spice grinder, grind the spices to a fine poweder. Store in an airtight jar. The spice mixture will keep for upto 3 months.
Yield: 2 tablespoons
from The Everything Indian Cookbook, by Monica Bhide (Adams, 2004)
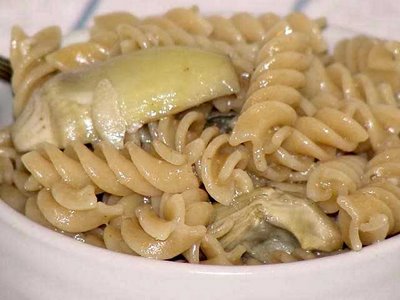 I've become obsessed with this absorption method of cooking. It's so easy now to cook just as much pasta as I want for one dish, without having to boil that big old pot of water. No more reheated leftover pasta, with its bits of soggy here, dry and chewy there. And with this method, the pasta cooks in the same pan with the sauce, so there's much less cleanup.
This is rotini cooked in chicken broth with artichoke hearts and just a pinch of fennel, using the basic method I used here. The fennel and the artichoke go well together. I used the ten-inch skillet this time instead of the larger one, so the pasta was more submerged in the liquid so it cooked more evenly and wasn't quite as al dente as the penne was. And then I used up the rest of the artichoke hearts cooking rigatoni in water. That was good, too, with some of The Spice House's Sunny Spain lemon and pepper mix.
This is a quick, easy meal when you want something fast. If you're using raw vegetables, you add them when you add the pasta and let them cook with the pasta. If the vegetables don't need to be cooked, just add them at the last five minutes to reheat them.
You may remember I wrote a review of the books Darkly Dreaming Dexter and Dearly Devoted Dexter back in September. Actually, you probably won't remember because you probably weren't reading my blog yet, so go read it.
Looks like Showtime will be doing a series based on my favorite serial killer. It will be interesting to see if they can pull it off, because the main thing that made the character believable, and sympathetic, was our access to his internal thought processes. Not sure how they can achieve that without heavy voiceover, which is hard to do well.
Michael C. Hall (David from "Six Feet Under") will be playing the do-gooder doer-in. He's not exactly how I pictured Dexter, but he might be able to pull it off.
Showtime has ordered 12 hour-long episodes of the show. Michael Cuesta (also from "Six Feet Under" and the movie L.I.E.) will be directing. Much as I liked "Six Feet Under," it had an underlying sense of seriousness that could get in the way of the tongue-in-cheek Dexter. And if it doesn't hit the right note, it could be potentially offensive.
I don't know yet if the plot will mirror the books, or if the episodes are just based on the character. It will be interesting either way. I'll be watching.
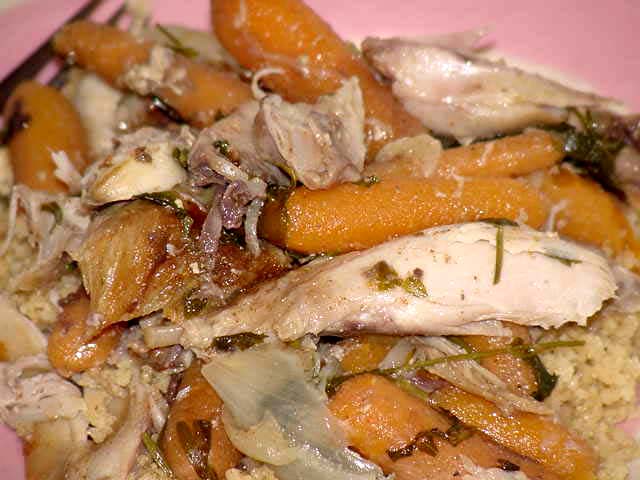
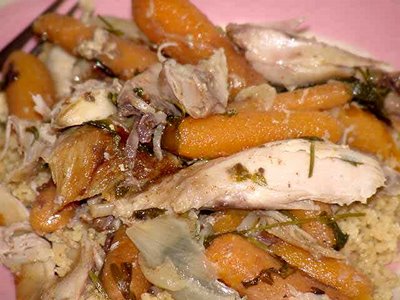 I'm still having fun with the slow cooker. I had some drumsticks that I got for .39 cts./lb. at Treasure Island, and a pound package of mini carrots (also on sale) that needed to be cooked pronto. I'd been reading a lot online about cooking drumsticks in the slow cooker so I thought this would be a good time to test it out.
If you don't like really well-cooked vegetables, the slow cooker probably isn't for you. While I'm all for al dente, crispier fare, soft, almost mushy vegetables are like comfort food to me. Maybe because that's what I grew up with.
This was delicious. The chicken was silky-smooth tender. I used a lot of smoked sweet Spanish paprika and the flavor worked its way through to the bone. Whole wheat couscous made an excellent accompaniment.
The only change I would make for next time is I would add three-fourths of a cup of chicken or vegetable broth at the beginning. By the time it had cooked down in the slow cooker, there was just enough liquid to extract for the couscous. It would have been better if there had been enough liquid to leave in the pot with the chicken and carrots, so it wasn't so dry. (I ended up adding some stock to the chicken afterwards, and that made it perfect.)
Chicken breasts wouldn't work in this recipe--the slow cooker tends to dry them out too much.
Slow Cooker Drumsticks and Carrots
8 Chicken drumsticks, skinned
2 onions, cut into wedges
1-lb. package mini carrots
3/4 c. chicken or vegetable broth
1 Tbsp. smoked Spanish sweet paprika
1 tsp. granulated garlic powder
Salt and Pepper to taste
1/2 c. coarsely chopped parsley
Layer onions and carrots in the bottom of the cooker. Pour in the broth. Season with salt, pepper, and garlic powder. Lay the drumsticks on top of the vegetables and sprinkle the paprika over them, then some more salt, pepper and garlic powder.
Cook in slow cooker for approximately 5-6 hours, or on high 3-4 hours. About an hour before they're done, add the parsley. The chicken should fall off the bone.
Take the chicken out of the pot, take out the bones and separate the meat into bite-size pieces, then place back in the cooker with the vegetables.
Using the stock for liquid, prepare whole wheat couscous according to the package directions. Serve the chicken and carrots over the couscous.
Makes 4 servings.
This week's surprise link also comes courtesy of Lynda. So go to the sidebar, click on it and do some good. Like she says: "Seems simple enough."
My review of Nikki and David Goldbeck's American Wholefoods Cuisine is up on Fitfare, so go check it out.
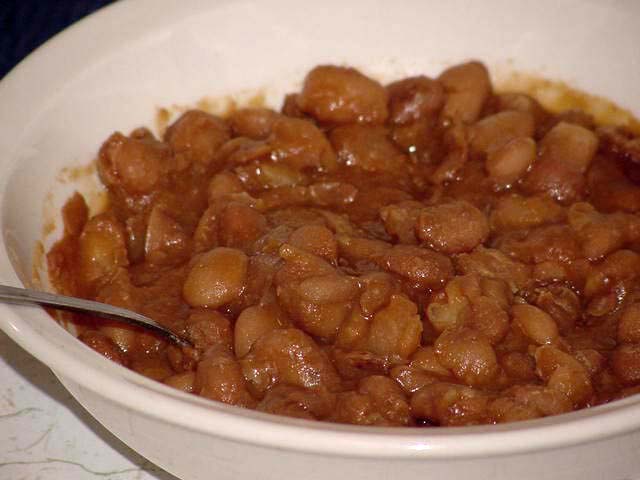
Blogger was down most of the day so I couldn't post anything earlier and I've got a lot of stuff to do tonight, so this will be a short post. I know you must be sick of my beans by now, but I just wanted to show you how the slow-cooker beans came out. These are the beans I had on back when it was too hot to cook. I'm pleased to say they were an unqualified success. In fact, I might just like these a teensy bit better than the oven-baked beans, and these won't heat up the whole house while they're cooking. There was more sauce using this method. I used the same basic ingredients as I did for the baked version, except I used dried onion instead of real and I didn't cook the sauce before mixing it with the beans. I just threw everything into the slow cooker, covered it, turned it on, and forgot about it for a couple of hours. Set on high it cooked pretty fast.
Slow Cooker BBQ Beans
3-4 cups cooked pinto beans, drained (canned is fine, but rinse them)
2 tsp dried onion
8 oz. tomato sauce
1-1/2 Tbsp. molasses
2 Tbsp. brown sugar
1 lemon, cut in half, 1 half juiced, the other half sliced thin
1 Tbsp. Pickapeppa sauce
Salt and pepper to taste
Place all ingredients in slow cooker and mix together. Cook on high for approximately four hours, or low for approximately 6 hours, or until done.
Makes 4 servings.
My review of The Perfectionist is up on Foodbound. Go check it out.
 Last week, Clotilde at Chocolate & Zucchini wrote about Absorption pasta. It fit right into my latest project of finding things to cook that won't heat up my apartment during the dog days of summer. This fits the bill. You basically cook the pasta like risotto--putting it in a skillet with a small amount of liquid and simmering it in the liquid, adding more liquid as necessary until the pasta has reached the desired consistency.
Clotilde's version included zucchini sticks, parmesan flecks, and cacao nibs (something new to track down). It looks so sophisticated sitting in its little bowl--so delicate and exotic. Mine looks like a poor country cousin in comparison but, like most peasant food, was hearty and satisfying.
This dish was a challenge to make. For one thing, I wasn't sure how it would work with whole wheat pasta. But the more I thought about it, I decided it really shouldn't make that much difference--it should absorb the liquid just as easily as regular pasta.
Another thing I like about this dish is that you can cook as little pasta as you like--enough for one serving. Of course, you can cook just one serving's worth of pasta the traditional way as well, but that has always seemed like such a waste of time, water, and effort. This takes about as much time to make as boiling pasta (if you take the time it takes to bring the water to a boil into account), but it doesn't feel like it's taking as much time because you're not spending so much of it looking at that big pot of water, waiting for the boil.
On Friday I mentioned that one of my plans for this blog is to experiment with finding healthier ways to make old favorites without sacrificing flavor. Another goal I have is to be more flexible and creative with my cooking. Rather than following recipes all the time, and shopping accordingly, I plan to shop more based on what's freshest and cheapest, and then put meals together based on what's in my refrigerator or pantry at any given moment.
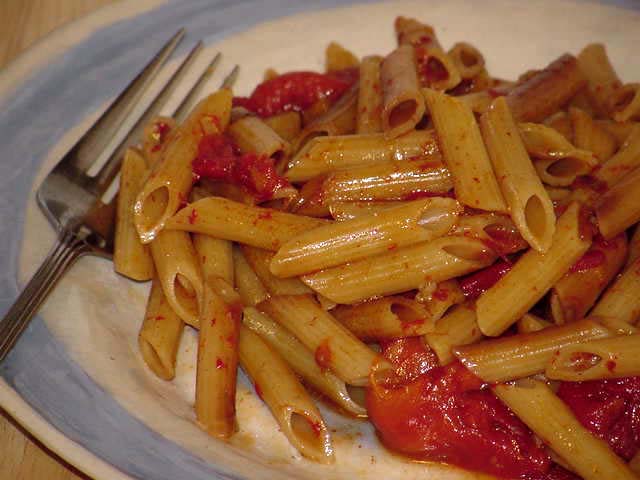
This new way of cooking pasta seemed like the perfect opportunity to implement my plan to cook with what I have on hand. There were some Trader Joe's frozen roasted red and yellow peppers that had been in my freezer forever, for which I did not as yet have a specific use in mind. I wanted a change from my usual tomato-based pasta sauce. The minute I thought of pasta and roasted peppers together, I knew it would be a good combination. A handful of crushed red pepper gave it a nice Arrabiata zest. And I had cooked up some chicken a few weeks ago so I have several jars of stock on hand in the freezer.
It was quite good for a first effort. Unfortunately, I scorched the pasta, so it absorbed the liquid unevenly. But it cooked just fine, and was super silky and flavorful as a result of this method of cooking.
In other news, I see that I've had a visitor from Hong Kong who came through Mary's blog. Yamilett is that you? We're missing you and thinking about you lots!
Absorption Penne with Roasted Red Peppers Arrabiata
2 Tbsp. olive oil
3-4 cloves garlic, roughly chopped
2 c. whole wheat penne pasta
1-1/2 c. chicken stock, vegetable broth, or water
1/2 to 1 c. water, as needed
Roasted red, yellow, and/or orange peppers, or any combination thereof, frozen or jarred or fresh
1/2 tsp. crushed red pepper
salt and pepper to taste
Heat oil in large skillet. Add garlic and cook for approximately one minute. Add pasta and cook for two minutes. Add the 1-1/2 cups of stock (careful, it will splatter) or enough to just cover pasta. Lower heat, cover and simmer for approximately 20 minutes, stirring occasionally. Around 15 mintues into the cooking, add the roasted peppers, salt, pepper, and crushed red pepper. Taste pasta for doneness. If the water is absorbed before the pasta is done, add more as necessary.
Adjust the seasonings and transfer the contents to plates. Enjoy.
Makes 2 large or 3 small servings.
OK, I've been thinking about what it is I'm trying to accomplish with this blog and I'm beginning to get an inkling of where I'm going.
I love to cook. I've always loved to cook. And I'm a decent cook, overall. I know how to follow a recipe, and I have a few signature dishes. I've moved beyond the canned cream of mushroom soup casseroles of my young adulthood. These days I get my fruits and vegetables mostly from the produce section of the grocery store, or the farmers' market, and not out of cans, although I do still use some frozen. I use mostly whole wheat grains and pasta, and avoid products with high fructose corn syrup and trans fats. In fact, I pretty much avoid all processed foods.
And I know healthy foods have a bad rap. And I will also admit that there's a good reason for that. But I'm here to tell you that it's possible to eat healthy foods without having to give up good taste, if you keep an open mind and are willing to experiment until you get it right.
Or, you can let me experiment until I get it right, and then you can take advantage of my efforts. As I've been trying to eat more healthy foods, I've come to realize something important. Healthy eating doesn't mean having to give up all the foods you love. Healthy eating means more often choosing the healthier versions of your favorite foods. So yes, I've pretty much given up butter, russet potatoes, sugar, white bread, white rice, and meats high in saturated fats, to name a few. But in their place I've discovered olive, canola and other nut and seed oils, red, gold and purple potatoes, honey, brown rice, whole wheat breads and pastas, and chicken and fish.
Will I never see butter, pastries, and sausage again? Hell, no! I love all of that too much. But I only have them on special occasions, something along the lines of the 80/20 deal, where you eat healthy (or diet, or whatever) 80% of the time, and have whatever you want 20% of the time.
Does this mean my blog will now be all healthy, all the time? Of course not. But this is a major component of my cooking these days, so it should be a major part of my blogging.
And if you don't want to play along, you can always resubstitute the less healthy ingredients
There's another componenent to what I want to do here, but this post is already pretty long. I'll save that for later.
There's a new surprise link on the sidebar, courtesy of Lynda.
It's been said that one of school's primary functions is to teach socialization skills to the next generation. This takes that idea to a completely new level.
 As part of my 12-post series over at Fitfare, I had to test a recipe that called for blueberries. I chose Blueberry-Polenta Muffin Tops because I was curious to see what impact the polenta would have on them. They tasted good, but did not hold their shape well.