For all of you Gary Shteyngart fans (Russian Debutante's Handbook, Absurdistan), here's a teaser for his newly-released Super Sad True Love Story:
Bonus: appearances by Jeffrey Eugenides, Jay McInerney, James Franco.
Special super duper bonus for me: appearance by Mary Gaitskill!
Thursday, July 29, 2010
Baking Class: Streusel Cake
 For anyone out there who knows me, it should come as no surprise that I have not been doing much in the kitchen while it's so hot and humid here in the Windy City. Much as I love to cook, I love my comfort more. You won't see me sweating over a hot stove unless I can cool off the minute I walk away from it.
Our summers are usually mild enough, though, that I can get some good cooking and baking days in and around the heat. But this summer it feels like it slammed up into the 90s early in June and hasn't looked back. Even my friends who love summer are complaining. And if they're complaining, you can imagine my comments on the subject.
I am managing to do some cooking, but it's sporadic and minimal stove top, with lots of salads and raw vegetables. I finally found a brand of peanut butter that isn't too terrible (but it's no Valencia Peanut Butter) and I'm :gasp: buying bread, but I am managing to survive without resorting to take-out or delivery. (Not that I'm not taking advantage of that option, but only twice so far, which I think is pretty good.) I have even started a post about things to make when it's too hot to cook, but I don't even feel like writing in this heat.
I am jonesing to get back into the kitchen. Last weekend it almost felt cool enough to make pasta. I am dreaming about pizza dough and biscuits. I have a bunch of beautiful red onions a friend gave me from her CSA basket while she is out of town and I so want to make an onion tart!
But that will have to wait. This heat can't last forever, can it?
In the meantime, I will share with you the last thing I did bake before it got so hot. I believe my earliest cake memory is this streusel cake that my mother made often when I was young. I believe it was my grandmother's recipe. I have nothing but a vague memory to back that up, but I'm pretty sure I'm right, especially since there's no chocolate in it so I don't think my mother would have made this without having already been exposed to it. She would make it to offer to friends when they could come over for a visit over a cup of coffee.
I remember I really liked it when I was young. The cake itself was nothing special, but ooh that streusel topping! Sweet and nutty, with a hint cinnamon to warm it up, it was just as good with milk as I'm sure it was with coffee.
I've only made it a few times myself, and it had been a while since the last time I had made it. I was struck by how similar the cake batter is to biscuits, now that I've been making those on a regular bases (or had been making them, before this godawful heat). Take out the sugar and vanilla, and you have the makings of biscuit dough. I don't know why that tickles me, but it does.
But you will not feel like you're eating biscuits when you take a bite of this cake. It is sturdy, which makes it the perfect companion for a nice cup of hot coffee or glass of cold milk, either of which literally make the streusel topping melt in your mouth.
Home Cookin Chapter: Cakes and PiesSTREUSEL CAKE
1-1/2 cups flour
1 cup sugar
2 tsp baking powder
1/2 tsp salt
1/4 cup cold butter, cut into 1/2-inch cubes
2 eggs, lightly beaten
1/2 cup milk
1 tsp vanilla
Streusel mixture:
2 Tbsp melted butter, cooled but still liquid
2 Tbsp flour
1 cup brown sugar
1 Tbsp cinnamon
1/2 cup pecans or walnuts
Preheat the oven to 350 deg. F. Grease a 9 by 13-inch rectangular cake pan.
Sift flour, sugar, baking powder, and salt into a medium-sized mixing bowl. Cut the butter into the dry mixture with a pastry cutter, two knives, or your fingers.
Add the eggs, milk, and vanilla to the dry ingredients. Stir just enough to mix. Pour into greased pan.
Combine all of the ingredients for the streusel mixture in a small bowl. Sprinkle evenly over the cake mixture.
Bake at 350 deg. F for 20-25 minutes, until toothpick or knife inserted into the center of the cake comes out clean.
Exported from Home Cookin 6.46 (www.mountain-software.com)
Monday, July 26, 2010
Italian Sausage and Escarole Soup
 I have always thought of soups as taking a long time to make. Big pots of liquid and vegetables simmering on the stove top for hours, or in the slow cooker all day on a chilly Autumn day. For summer, I tend to think of gazpacho, which requires no cooking whatsoever.
So it has been with no small pleasure that I have discovered that it can be just as quick to make a satisfying, delicious soup in the dog days of summer as it can be on the coldest winter day without heating up the house.
I feel a little silly that I did not discover this sooner. It started with the Coconut Chicken Soup I improvised when my friend gave me some Asian ingredients and I had to find something to do with them. It took less than half an hour to make and was light but satisfying at the same time.
I originally bought the escarole because it was on sale and I've never used it before. I rinsed it and spun it dry, intending to use it in a salad with the red butter lettuce I also bought. But when I tasted a little bit of it, I found that it was thicker and slightly more tough than I had thought it would be. I thought I would enjoy it more if it were cooked, and immediately thought of Italian sausage and escarole soup.
I was also going to use a can of white beans in the soup, because I know that is a common ingredient, but they were mushy and some of them looked a little off color when I opened it up, so I left them out. It was delicious without them, but next time I'll probably add them.
This takes about half an hour to make, and comes out rich and flavorful. With a tossed salad and a crusty loaf of bread, it makes the perfect summer dinner.
Home Cookin Chapter: My RecipesITALIAN SAUSAGE AND ESCAROLE SOUP
Makes 6 servings
1 tsp olive oil
1 lb Italian sausage, mild or hot depending on preference, casing removed
1/2 medium onions, chopped
3 cloves garlic, chopped
1 tsp fennel seeds
3 cups chicken or vegetable broth
1/2 cup tomato puree
1 Tbsp tomato paste
Salt and freshly ground pepper to taste
1/2 cup ditalini, or other short pasta
1 bunch escarole, washed and roughly chopped
Heat oil over medium heat in heavy saucepan. Add sausage and cook until sausage is browned. Drain all but abut 2 tablespoons of the fat. Add onions, garlic and fennel seeds and saute until onions are translucent.
Add all of the liquids. Bring to a boil, cover, and lower heat to a simmer. Cook for 20 minutes.
Raise heat and bring the mixture back to a boil. Add the ditalini an dstir. Lower heat to a simmer and cook for about 10 minutes, until pasta is al dente. Add escarole and cook until the greens are wilted, about 5 minutes more.
Add salt and freshly ground pepper to taste.
Exported from Home Cookin 6.46 (www.mountain-software.com)
Thursday, July 22, 2010
The Gourmet Class Is Alive and Well in America
This post originally ran in 2006 on Foodbound, a now-defunct site that was part of the Well Fed Network.
 I came of cooking age at the height of the convenience casserole era. Almost every recipe my friends and I made involved opening up cans of creamed soup and vegetables, pouring them over meat, spreading processed parmesan cheese over the top, and baking for 45 minutes in a 350-degree oven. Occasionally, I would stumble into the new Whole Foods store that had just opened in downtown Austin, but mostly to marvel at all the odd foods and wonder what people did with them.
It wasn’t long, though, before I started buying something here and there and trying it out. I had been through one bout of vegetarianism in the early ’70s thanks to my sister, who first brought whole wheat bread into our house, then granola and, still later yet, yogurt. But those early experiences were more along the line of diets than lifestyles, and did not last long. In the early ’80s, shopping at Whole Foods, however, I started to see the benefits and joys of using fresh whole foods in my cooking, and have slowly evolved over the years into the snobby gourmet foodie I am today, along with countless other Americans.
But I never really thought about how we got here, until I read David Kamp’s The United States of Arugula: How We Became a Gourmet Nation, coming out this month from Broadway Books. Kamp, a writer and editor for Vanity Fair and GQ and self-professed foodie, details the development of the gourmet movement in the United States and how the rise of fresh, organic, healthy, and exotic food movements have changed how we view the food we eat.
In a light, conversational tone, Kamp tells the story of how the big three - James Beard, Craig Claibourne, and Julia Child - each became instruments of major change in the American culinary world, Beard with his passionate commitment to the idea of an American cuisine as expressed in his best selling cookbooks, Claiborne, who raised food journalism to an entirely new level, and Child, who showed us that the intimidating art of French cooking could be learned by anyone. He then continues with the story of those who prospered in the wake of Beard, Claiborne and Child. Often in their own words and the words of those who know them, we get the story of Alice Waters and Jeremiah Tower of Berkeley’s Chez Panisse and the growth of the fresh and local movement that sparked the emergence of Community Service Agriculture (CSA) farms and farmers’ markets across the country, Wolfgang Puck in L.A. and the rise of the celebrity chef, Dean & Deluca, Zabar, E.A.T. and The Silver Palate in New York, who raised our perceptions of Italian food from pizza and macaroni to extra virgin olive oil, balsamic vinegar, and parmigiano reggiano, and introduced us to the concept of artisanal and specialty foods.
While reading this book, I was struck with moments of humorous recognition of some of the food fads of the last couple of decades to which I have succumbed - fondue, quiche, sun-dried tomatoes, free-range chickens and Portobello mushrooms to name a few. But I was also pleased to recognize that mostly, what I have learned has helped me broaden my culinary horizons to embrace the broadest range of foods and cuisines available to me, and to bring them into my life and my kitchen. And thanks largely to the work of the chefs, critics and purveyors Kamp writes about, my reach is virtually unlimited.
The story of how we became a gourmet nation is a fascinating one, and David Kamp tells it with humor, insight, knowledge, and obvious love. While some people, often myself included, bemoan the fact that Americans are eating more processed foods and making poorer eating choices every year, Kamp argues that, on the contrary, today there are more choices than ever before thanks to the influence of the big three and their successors. He definitely has a point.
I thoroughly enjoyed reading this book. If you have any interest in food or cooking, you will too.
The United States of Arugula: How We Became a Gourmet Nation, by David Kamp (Broadway Books, 2006).
Monday, July 19, 2010
Absorption Pasta with Peas and Artichoke Hearts
 Summer is the time for absorption pasta. No huge pot of boiling water on the stove heating up the kitchen. Everything cooks up in one dish, making for less cleanup. It's extremely adaptable; you can use whatever you happen to have available in your pantry.
A recent trip to Trader Joe's left me with a bag of frozen artichoke hearts in my freezer. Fresh peas rounded out the flavor and added a touch more green.
As usual, I used whole wheat pasta. It takes a little longer to cook, but that's the only difference.
Since I started making my own pasta I have felt conflicted about using all-purpose flour instead of whole wheat, but I wanted to get it down with the AP flour before I start experimenting with whole wheat. I also recently read somewhere that pasta, even with all-purpose or semolina flour, is considered a complex carbohydrate because without the yeast the flour is dense and takes longer to break down. I hope that's true, because there some times when whole wheat pasta just doesn't do it for me.
But in this case, it works just fine.
Home Cookin Chapter: My RecipesABSORPTION PASTA WITH PEAS AND ARTICHOKE HEARTS Makes 1 main or 2 side servings
2 Tbsp olive oil
1/2 onion, diced
3 cloves garlic, chopped
1 cup whole wheat short pasta (rotini, cavatappi or penne)
1-1/2 to 2 cups boiling water
1 tsp thyme
1/ tsp oregano
1/2 tsp basil
1/2 cup frozen (or fresh, blanched) artichoke hearts, quartered
1/2 cup fresh or frozen peas
1 Tbsp balsamic vinegar
2 Tbsp heavy cream
Salt and black pepper to taste
1/4 cup chopped fresh parsley, plus additional for garnish
1/4 cup chopped parmesan or pecorino romano cheese, plus additional for garnish
Heat oil in medium-sized saucepan over medium heat. Add onion and cook until transparent, about 5 minutes. Add garlic and pasta and cook for 2 minutes more. Add just enough water to cover the pasta, about 1 cup, then add the thyme, oregano and basil. Lower the heat to a simmer, cover the saucepan and cook for about 15 minutes, checking the water level periodically and adding more if the pan looks too dry.
While the pasta is cooking, combine the artichoke hearts and balsamic vinegar in a small bowl with salt and pepper to taste. Let sit while the pasta is cooking.
When the pasta is al dente and the water has almost evaporated, add the artichoke hearts with the balsamic vinegar and the peas. Raise the heat to medium high and cook, stirring frequently, until the water has turned into a thick sauce, about 1 minute. Lower heat again and add the cream, cheese and parsley. Stir until the sauce has the desired consistency, adding more hot water if necessary.
Season to taste with salt and pepper. Garnish with additional parsley and cheese.
Exported from Home Cookin 6.46 (www.mountain-software.com)
Thursday, July 15, 2010
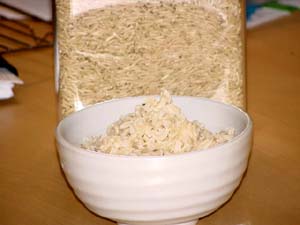
How to Cook Brown Rice
This post originally ran in 2006 on Fitfare, a now-defunct site that was part of the Well Fed Network.
 These are the cooking instructions from the side of a box of brown rice:
Sounds easy, right? But for some reason, people have a lot of trouble cooking brown rice. It comes out either half-raw or too mushy. It burns in the pan, or the water doesn’t cook all the way out.
We all know that brown rice is much healthier than its white counterpart. Only the hull of the grain is removed from brown rice, which leaves most of the nutrients intact. To get white rice, the bran and most of the germ layer is removed, which is where the bulk of the nutrients are. And brown rice is an excellent source of manganese, which helps produce energy from protein and carbohydrates and produces antioxidants to help protect against free radicals that are created by that production of energy. Converting brown rice to white diminishes the nutrients by more than half. But nutrition aside, what also gets thrown out is the rich, nutty flavor that brown rice has compared to its white counterpart, where starch is the overriding flavor.
When I first started eating brown rice it was a challenge for me to make. I knew it was better for me so I made a concerted effort, but it never came out the same, and it was usually on the mushy side. Even when it came out just right, which it did on occasion, I never knew exactly how it had happened so I couldn’t replicate it with any consistency. I knew it could be mastered, because I always had good brown rice at any restaurant that offered it on their menu, which in Austin, even in the early eighties, was quite a few. So I persevered, and was finally able to manage something that was edible, if not perfect.
When I moved to Chicago in the early nineties, I had to make several readjustments to my cooking. My once perfect five-minute soft-boiled egg came out undercooked and runny. Water took longer to boil, cakes took longer to bake, and my already-precarious brown rice took a nose-dive into glutinous mass of inedible gunk.
Which actually turned out to be a good thing. In my attempts to adjust to my new cooking challenges, I was finally able to master the art of cooking brown rice. And here’s what I discovered, taking the above instructions and breaking them down.
This method works with any brown rice, but brown basmati, which is a long grain rice, maintains its shape the best.
Step 1: Measure out 1 cup of brown rice and pour it into a sieve. Rinse well under cold water. Place in a three-quart saucepan that has a close-fitting lid. Add the water. If you want the rice to be more fluffy, use a little less than the 2 cups instructed; I use 1-2/3 cups of water. I don’t use the oil or margarine (if you want, you can add it after the rice is cooked).
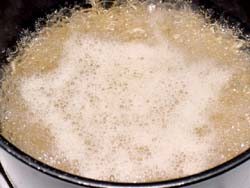
Step 2: Turn the burner on high and bring the rice to a boil. Once it has come to a full, roiling boil, let it continue to boil for at least one more minute before turning down the heat. When you reduce the heat, bring it down as low as it will go without turning off (if you use gas; set it on the lowest simmer if you have an electric stove).

Let the rice boil for at least one full minute
Step 3: Cover with the tight-fitting lid. Set a timer for 40 minutes. Leave the lid on while the rice is cooking.
Step 4: When the timer goes off, take the pan off the heat and let it sit for 5 minutes. After 5 minutes, lift the lid and fluff the rice with a fork or spoon. All of the water should be gone, and your rice should be nice and tender, while keeping enough of its shape for the grains to stay separate.
If you're making Spanish rice, or some other casserole-style dish, saute the rice in oil until it turns translucent, then opaque and starts to pop, then add the liquid. If you're adding rice to soup or a stew, just add it earlier than you would add white rice, allowing for the 40 minutes it needs to cook. And don't forget the close-fitting lid.
And that’s it. Be patient. Your rice might not come out perfectly the first few times. But if you use each attempt as the guideline for what to do differently the next time, pretty soon you’ll be making healthy, delicious, perfect rice every time.
 These are the cooking instructions from the side of a box of brown rice:
1. Combine in a two-quart saucepan:
- 1 cup rice
- 2 cups water
- 1 Tbsp butter (optional)
2. Stir lightly; bring to a roiling boil and reduce heat to simmer (low boil).
3. Cover with a tight-fitting lid and simmer for 35-45 minutes.
4. Salt to taste
Sounds easy, right? But for some reason, people have a lot of trouble cooking brown rice. It comes out either half-raw or too mushy. It burns in the pan, or the water doesn’t cook all the way out.
We all know that brown rice is much healthier than its white counterpart. Only the hull of the grain is removed from brown rice, which leaves most of the nutrients intact. To get white rice, the bran and most of the germ layer is removed, which is where the bulk of the nutrients are. And brown rice is an excellent source of manganese, which helps produce energy from protein and carbohydrates and produces antioxidants to help protect against free radicals that are created by that production of energy. Converting brown rice to white diminishes the nutrients by more than half. But nutrition aside, what also gets thrown out is the rich, nutty flavor that brown rice has compared to its white counterpart, where starch is the overriding flavor.
When I first started eating brown rice it was a challenge for me to make. I knew it was better for me so I made a concerted effort, but it never came out the same, and it was usually on the mushy side. Even when it came out just right, which it did on occasion, I never knew exactly how it had happened so I couldn’t replicate it with any consistency. I knew it could be mastered, because I always had good brown rice at any restaurant that offered it on their menu, which in Austin, even in the early eighties, was quite a few. So I persevered, and was finally able to manage something that was edible, if not perfect.
When I moved to Chicago in the early nineties, I had to make several readjustments to my cooking. My once perfect five-minute soft-boiled egg came out undercooked and runny. Water took longer to boil, cakes took longer to bake, and my already-precarious brown rice took a nose-dive into glutinous mass of inedible gunk.
Which actually turned out to be a good thing. In my attempts to adjust to my new cooking challenges, I was finally able to master the art of cooking brown rice. And here’s what I discovered, taking the above instructions and breaking them down.
This method works with any brown rice, but brown basmati, which is a long grain rice, maintains its shape the best.
Step 1: Measure out 1 cup of brown rice and pour it into a sieve. Rinse well under cold water. Place in a three-quart saucepan that has a close-fitting lid. Add the water. If you want the rice to be more fluffy, use a little less than the 2 cups instructed; I use 1-2/3 cups of water. I don’t use the oil or margarine (if you want, you can add it after the rice is cooked).
Step 2: Turn the burner on high and bring the rice to a boil. Once it has come to a full, roiling boil, let it continue to boil for at least one more minute before turning down the heat. When you reduce the heat, bring it down as low as it will go without turning off (if you use gas; set it on the lowest simmer if you have an electric stove).
Let the rice boil for at least one full minute
Step 3: Cover with the tight-fitting lid. Set a timer for 40 minutes. Leave the lid on while the rice is cooking.
Step 4: When the timer goes off, take the pan off the heat and let it sit for 5 minutes. After 5 minutes, lift the lid and fluff the rice with a fork or spoon. All of the water should be gone, and your rice should be nice and tender, while keeping enough of its shape for the grains to stay separate.
If you're making Spanish rice, or some other casserole-style dish, saute the rice in oil until it turns translucent, then opaque and starts to pop, then add the liquid. If you're adding rice to soup or a stew, just add it earlier than you would add white rice, allowing for the 40 minutes it needs to cook. And don't forget the close-fitting lid.
And that’s it. Be patient. Your rice might not come out perfectly the first few times. But if you use each attempt as the guideline for what to do differently the next time, pretty soon you’ll be making healthy, delicious, perfect rice every time.
Monday, July 12, 2010
Frittata: Also What's for Breakfast
 The other night at the knit shop my friend Nicole and I were talking about cooking. She mentioned that her mother had been on a frittata kick lately, and was cooking them quite often.
I thought this was quite a coincidence because I, too, have been on my own little frittata kick. It started out when a friend told me that she was looking for something for workday morning breakfasts that she could make ahead of time and take into the office with her. She was thinking about frittatas and asked me if I had any recipes. I didn't, so I told her I would start looking.
I didn't have to look far. Having recently acquired a copy of James Beard's American Cookery, I was pretty sure I would find a basic recipe there. I wasn't disappointed.
I was, however, a little disappointed in my first frittata. It was dry, and the eggs were a little tough. It also made a mess of my cast-iron skillet, which apparently isn't seasoned quite as well as I thought it was.
My second attempt went a little better, but still made a mess in my cast-iron skillet. I've been working on that, but in the meantime I decided I needed to use a different skillet. I turned to my non-stick skillet, which worked perfectly, but is just enough smaller that the 8 eggs called for in the recipe are just a little too much for it to set properly. With a little tweaking, I discovered that I could run my silicone spatula around the edges of the frittata as it is cooking and periodically lift up the edge high enough and tilt the pan toward the space and let some of the unset egg on top flow over so it runs along the bottom and has a better chance to set.
 You can see the result of that slight layering here, but I don't think it has any negative effect on the taste or texture. I keep thinking I should get a slightly larger skillet so I can make a smoother frittata, but then I realize that this one really does work just as well and I already have too many kitchen items. If I don't absolutely need it, I try to avoid buying it. Most recently, I have started using 7 eggs instead of the 8 called for in the recipe. I don't miss the extra egg and there's just that much more room in the pan.
Another drawback to using this pan is that I can't put it in the oven, so I have to move it into my cast-iron skillet before I add the cheese and put it under the broiler. But it's not that much of an inconvenience and because it is mostly set, the bottom doesn't stick to the skillet like it did when I cooked the whole thing in it.
Now that summer is here I don't bother with the oven. I slide the frittata onto a plate and then invert it back into the non-stick skillet, throw on the cheese, cover it, and let it cook for another ten minutes or so. The cheese doesn't really brown, but it's an acceptable trade off.
When made properly, a frittata is soft, moist, and full of wonderful eggy goodness. And they do travel well for a workday breakfast that hands-down beats donuts or muffins.
Home Cookin Chapter: My Recipes
BASIC FRITTATA
Serves 6
1/4 cup grapeseed or olive oil
1/2 medium onion, halved and thinly sliced
6 large cloves garlic, roughly chopped
1 lb spinach or other greens, steamed, drained, wrung dry, and chopped
8 eggs
Salt and pepper to taste
1 tsp tarragon, oregano, thyme, or other herb (or 1 Tbsp fresh)
1/4 cup grated Parmesan or other cheese
Heat oil in non-stick or cast-iron skillet over medium-high heat. Add onions and garlic and cook until translucent. Add the greens and cook until warmed through.
Crack the eggs into a large bowl. Season with salt and pepper to taste and then add herbs(s). Whisk thoroughly and pour into the skillet with the onions, garlic and greens. Lower the heat and cook until the eggs are set. If necessary, run a spatula under the mixture after it has started to set and lift up an edge to allow some of the unset egg mixture to flow to the bottom of the pan. You may have to do this more than once.
With an oven-proof skillet: Once the frittata has almost completely
set but has just a little bit of unset egg on top, sprinkle the grated
cheese over it and put it under the broiler for a minute or two, until
the top sets and the cheese has melted and is golden brown. Remove
from oven, take out of the pan, slice and serve.
With a non-stick skillet: Once the frittat has almost completely set, either slide it into an oven-proof dish and continue as instructed above, or slide it onto a plate then invert it back into the non-stick skillet so the top is now on the bottom and the egg can set. Sprinkle the cheese over the top, cover, and cook another minute or two until the cheese melts.
Variations: zucchini matchsticks, peas, sun-dried tomatoes, red bell peppers or mushrooms are just a few of the items that can used in a frittata.
adapted from James Beard's American Cookery, by James Beard (Little, Brown and Company, 1972)
Exported from Home Cookin 6.46 (www.mountain-software.com)
Thursday, July 08, 2010
The Good Housekeeping Illustrated Cookbook: The Basics and Beyond

This post originally appeared on the Foodbound blog on the Wellfed network on April 11, 2006.
The Good Housekeeping Illustrated Cookbook found its way into my house the way many best-loved pets find their way into people’s lives—it was a stray. I was working at the Austin Public Library in Texas at the time. We could order books at a discount through our distributor. Once a year they would sell the books that someone had ordered but not picked up at a significant discount. I saw the GHIC languishing among the other unwanted books and picked it up.
What entranced me right away was the format. The first section of the book, broken up by categories, has over one hundred pages of pictures of every recipe in the book, starting with appetizers and ending with cocktails. After browsing through the book, I knew it had to come home with me.
I was not the most accomplished cook at the time. I knew how to boil an egg, I could bake some, and I made a pretty mean eggplant parmesan. I knew how to make most of the dishes I grew up with, but I didn’t like them very much. There were maybe four or five entrees that I could cook that I actually liked; the rest of the time I just sautéed up some vegetables and threw in an egg for protein, or made sandwiches. But I liked to cook and I wanted to learn more. And more importantly, I wanted to impress my friends with my culinary skills.
The GHIC was the perfect cookbook for me at that time. The color-index at the beginning of the book shows each dish as it should look when prepared, including plating and garnishing ideas. In addition, below each photo is a caption that gives the number of servings and the time it takes to prepare the dish. And since I didn’t have my own repertoire of tried and true recipes for entertaining yet, I would spend hours looking through the pictures to help me put together a menu.

The recipes themselves are clear and straightforward, with simple line drawings to illustrate specific techniques, and there are many helpful hints peppered throughout the book. It covers all the basics, and at the same time makes it easy to attempt something just outside your comfort zone so you can continue to grow as a chef. The recipes were tested several times to make sure they were right. Every recipe I’ve made from this cookbook has come out the way it’s supposed to. There were a few I didn’t like, but none that didn’t work.
There’s a chapter of useful information at the end of the book that includes menu planning (including place setting information), a guide to herbs and spices, a storage guide, a calorie guide, and a glossary of food and cooking terms. At the beginning of each chapter there’s a section that gives basic information for the food covered in that section—handling, preparation, and cooking times.
Originally published in 1980, it was revised in 1989. The main change was an added section on microwave cooking. I’m sure it seemed like the direction we were heading back then, but while it doesn’t take anything away from the book, it really doesn’t add much. Other, more helpful changes are calories per serving and some limited nutritional information for each recipe.
This is not a sexy book. Most of the recipes are standard American fare with the usual classic French, Spanish, Mexican, Asian and Italian dishes represented. If you’re a seasoned cook who’s looking for something new and different, this is probably not the book for you. But if you’ve mastered the basics and are looking for something that will challenge you, inspire you, and take you to the next level, then this cookbook will get you off to a great start. It would also make a great housewarming or shower gift for someone just starting out in the kitchen.
Rating: 8.5
Pro: The recipes are clear, straightforward, easy to follow and always turn out well. The photo index in the front of the book makes it easy to visualize what each dish will look like and tells you how long it will take to prepare. Good basic information provided throughout.
Con: While the techniques presented in the book are timeless, the recipes are a little dated.
(2010): This review refers specifically to the 1980 edition of this book. Later editions have been modified so I can't speak to those, although I would still speak for the general format and presentation of the later edition(s).
Monday, July 05, 2010
Gazpacho: The Perfect Summer Treat
This post originally ran in 2006 on Fitfare, a now-defunct site that was part of the Well Fed Network, which also does not seem to have had much to say recently. I realized that although I have written about gazpacho twice before on this blog, I never actually posted the recipe on this site, so here is the original post, with recipe.
 Summer to me has become synonymous with Gazpacho. Those ripe summer flavors of tomato, cucumber and bell pepper completely epitomize what summer means to me--a dose of fresh, raw crispness in the middle of a sultry day.
Gazpacho is said to have originated in Andalusia, Spain. There are two different theories about where the name came from. According to James Beard award-winning cook author Clifford A. Wright:
When I was in high school my mother discovered Gazpacho and whipped some up for us in the blender. This was around the time that cooking shows like "The French Chef" and "The Galloping Gourmet" were widening our culinary horizons for the first time. It seemed like at least once a week we were hit with something new--Ratatouille, Curried Chicken, Fondue. And Gazpacho.
I don't know where she got the recipe, but we were skeptical about the whole idea of cold soup. And what she served us were mugs filled with finely chopped tomatoes, cucumbers and bell peppers. I don't remember any other flavorings, and I don't remember being all that impressed with it. I was so unimpressed, as a matter of fact, that I decided I didn't care for it and never tried it again.
Until a few years ago when my friend and co-worker brought me a taste from a batch she made from The Ex-Boyfriend Cookbook, by Thisbe Nissen and Erin Ergenbright. It was what I later found out a good Gazpacho is supposed to be: a perfect blend of all ingredients, with none standing out above the other. I immediately made her give me the recipe and it has become my staple summer dish.
While most recipes call for some form of bread or breadcrumbs, I like the light fresh flavor of this recipe. You can use any kind of tomatoes, cucumbers or bell peppers (each adds its own particular flavor), red or white onions, and red wine or sherry vinegar. Although I should warn you, once I tried the sherry vinegar, I haven't looked back.
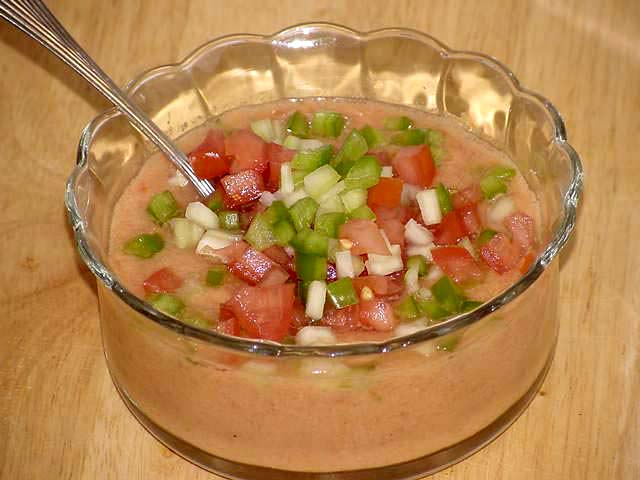 Summer to me has become synonymous with Gazpacho. Those ripe summer flavors of tomato, cucumber and bell pepper completely epitomize what summer means to me--a dose of fresh, raw crispness in the middle of a sultry day.
Gazpacho is said to have originated in Andalusia, Spain. There are two different theories about where the name came from. According to James Beard award-winning cook author Clifford A. Wright:
The origin of the word gazpacho is uncertain, but etymologists believe it might be derived from the Mozarab word caspa, meaning "residue" or "fragments," an allusion to the small pieces of bread and vegetables in a gazpacho soup. On the other hand, it may be a pre-Roman Iberian word modified by the Arabic . . .The original gazpacho was bread, water and olive oil pounded together in a large bowl out in the fields by the farm laborers, who would make it their lunch. Over the years it has developed into the tomato, cucumber and bell pepper blended soup we know today.
José Briz, who wrote a book on gazpacho, also suggests that the word derives from the Hebrew gazaz, meaning to break into pieces, referring to the bread base.
When I was in high school my mother discovered Gazpacho and whipped some up for us in the blender. This was around the time that cooking shows like "The French Chef" and "The Galloping Gourmet" were widening our culinary horizons for the first time. It seemed like at least once a week we were hit with something new--Ratatouille, Curried Chicken, Fondue. And Gazpacho.
I don't know where she got the recipe, but we were skeptical about the whole idea of cold soup. And what she served us were mugs filled with finely chopped tomatoes, cucumbers and bell peppers. I don't remember any other flavorings, and I don't remember being all that impressed with it. I was so unimpressed, as a matter of fact, that I decided I didn't care for it and never tried it again.
Until a few years ago when my friend and co-worker brought me a taste from a batch she made from The Ex-Boyfriend Cookbook, by Thisbe Nissen and Erin Ergenbright. It was what I later found out a good Gazpacho is supposed to be: a perfect blend of all ingredients, with none standing out above the other. I immediately made her give me the recipe and it has become my staple summer dish.
While most recipes call for some form of bread or breadcrumbs, I like the light fresh flavor of this recipe. You can use any kind of tomatoes, cucumbers or bell peppers (each adds its own particular flavor), red or white onions, and red wine or sherry vinegar. Although I should warn you, once I tried the sherry vinegar, I haven't looked back.
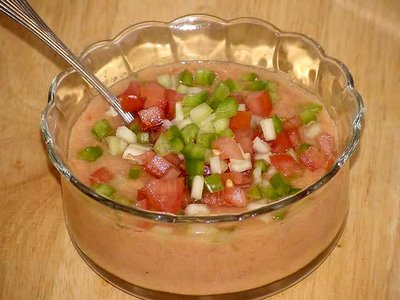
GAZPACHO
Place in blender* (reserving any combination of chopped tomato, cucumber, bell pepper and onion for garnish):
3-4 cloves garlic, roughly chopped
1 cucumber, chopped
1/2 green pepper, chopped
1/2 small onion, chopped
4 tomatoes, chopped
2 Tbsp olive oil
3 Tbsp red wine vinegar
1/2 cup ice water
salt and pepper to taste
Blend until desired consistency.
*Having acquired my Cuisinart stick blender since writing this post, I now just throw all of the ingredients into a large jar and give it a whirl with that. Makes it much easier.
Adapted from The Ex-Boyfriend Cookbook, by Thisbe Nissen and Erin Ergenbright (HarperCollins 2002)
Friday, July 02, 2010

Thursday, July 01, 2010
Strawberry Banana Yogurt
 I have been buying strawberries at the Green Market like they are going out of style. Actually, they're probably going out of season so it's good to get them while I can.
My favorite use for them? Cutting them up, letting them macerate in a little bit of sugar, and adding them with a sliced banana to plain yogurt. It take a quick minute to prep the strawberries before I head into my morning shower, and then slice the banana and add the yogurt about half an hour later and either eat it right away if I have time before I leave for work, or put it into a container and take it to work with me.
Either way, it's sweet and delicious. Much better than any of those "fruit on the bottom" or "fruit mixed in" versions. My brand of yogurt? Stoneyfield Farms, of course. Of course, you can use the low-fat or fat-free versions as well, but ever since reading this post by Usha at Veg Inspirations I have been using whole dairy products. It kind of falls into that whole "whole foods" thing, you know?
And when strawberries are out of season? Blueberries are also delicious, with or without the banana. And when there just isn't any fresh fruit that fits the bill, a mixture of dried fruit and nuts can be quite tasty as well.
Subscribe to:
Posts (Atom)