Thursday, October 30, 2008

Roasted Pumpkin Seeds

I got it in my head this fall that I wanted to cook a pumpkin. I wasn't sure exactly how I wanted to cook it, other than knowing I did not want to make a pie or soup. I let the thought percolate for a couple of weeks to see what might come together. Then Jessica at the knit shop said she used to make pumpkin with pork, and that got me going. But more on that later.

This weekend I went down to the green market and bought myself a pumpkin. It was a cute little thing, maybe three times the size of an acorn squash, not too heavy. I did not want to overdo it. I was telling my sister about it over the phone. The seeds came up, and I was about to say how I would probably not go to the trouble to save and roast them when she said "Of course you'll roast the seeds."

When I still lived at home and my dad would prep the Halloween pumpkin for carving, he would always roast the seeds. My sister and I loved them, and looked forward to Halloween as much for the pepitas as for the candy, I think.

Because my pumpkin was so small, I didn't think there would be that many seeds in it. But when I popped it open, I discovered that there were actually quite a few. They were small, but there were enough to make roasting a viable option. So I decided to give it a try.

And guess what I got? Roasted pumpkin seeds. And they tasted just as good as I remembered. I don't know how often I will be cooking pumpkins, but I can tell you that whenever I do I will be roasting the seeds.

Happy Halloween!
ROASTED PUMPKIN SEEDS

I used this method for seeds from a smaller "pie" pumpkin. You might need to cook the seeds longer with a larger one.

Preheat the oven to 300 deg. F.

Cut the top off of the pumpkin and lift it off. Scoop out the seeds and place them in a shallow dish. Remove as much of the pulp from them as possible and pat dry. Toss with the oil, chili powder, and salt. Place in a single layer on a cookie sheet and roast them for about 40 minutes, stirring occasionally, until golden brown.

Monday, October 27, 2008

Couscous with Peppers, Bok Choy and Tomato

Yesterday was the last day that the Green Market will be held outside. Through the rest of the year it can be found at the Peggy Notebaert Nature Museum.

I was also pleased to notice on their website that they are planning to stay open all year round. I'm not completely sure what that means; one of the vendors told me they were not planning to be there after December, but I'm glad they're talking about staying open. It's always such a disappointment to me come January that I have to wait five whole months before I can so easily find local fare.

My ambitions are still often much bigger than my schedule allows, though, and I don't always cook everything I have bought quickly enough and I have to scramble to come up with some quick alternatives to my more labor-intensive plans for some of the things I buy.

The baby bok choy I used here actually came from Treasure Island, and after they had been sitting in the fridge for close to a week I realized I needed to do something with them, the sooner the better.
I found these Trinidad peppers at the green market a couple of weeks ago. They looked a little like habaneros to me, and apparently they are from the same family, but they have just the tiniest hint of heat, more of a tingle, really, and a lovely fruity flavor. I took them home even though I didn't have any idea how I was going to prepare them.

And then I got some more fresh-from-my-friend's-garden sweet banana peppers and I knew a bok-choy and trinidad and banana pepper dish was just around the corner.

It was a work night and I didn't want to spend a lot of time in the kitchen, so I decided to do an all-in-one dish. At first I was going to use pasta to recreate my Spicy Pasta with Peppers, but it was on the warm side and I really didn't feel like heating up all that water and then having to deal with the pot afterwards. Couscous would cook up quickly and there would be no big old pot of hot water to deal with either. Adding grape tomatoes seemed like the perfect finishing touch.

This would make a wonderful side dish to just about any entree. I took it to work and topped it with grated cheese. I got lots of positive comments on this one.

Home Cookin Chapter: My Recipes
COUSCOUS WITH BABY BOK CHOY AND SWEET PEPPERS

1 cup whole wheat couscous
3 cups chicken or vegetable broth

2 Tbsp canola oil
1 small onion, chopped
3 cloves garlic, minced
6-8 sweet banana peppers, cored, seeded, and chopped into 1-inch pieces
1 pint trinidad peppers, cored, seeded and halved.
4-6 baby bok choy, chopped into 1-inch pieces, leaves and stems separated
1 tsp thyme
1/2 tsp oregano
1/4 tsp basil
salt and pepper to taste
1 cup chicken or vegetable broth
1 pint grape tomatoes

Created 10/04/08

Cook couscous according to package directions, using broth instead of water.

At the same time, heat canola oil in large skillet over medium high heat. Add onions and garlic and cook until translucent, three to five minutes. Add both peppers, bok choy stems, thyme oregano, basil and salt and pepper and cook for another five to seven minutes, until all the vegetables are translucent.


Add broth, bok choy leaves and grape tomatoes. Cook until tomatoes are heated through and liquid has reduced a little, about five minutes.


Add couscous and cook about five minutes more so the flavors can combine and the couscous absorb more of the liquid.

Excellent as a side dish, or with grated cheese for a light lunch.

Exported from Home Cookin 5.6 (www.mountain-software.com)

Sunday, October 26, 2008

World Bread Day '08 Roundup

World Bread Day '08 - Roundup

Zorra at Kochtopf posted the World Bread Day '08 Roundup. There were a record number of 245 entries. I haven't even had a chance to look at them all, but now that I'm baking bread on a regular basis I plan to check out all of them, and try more than a few.

If you want to check them out, just click on the logo.

Saturday, October 25, 2008

Cheese and Green Onion Omelette

If this post looks familiar, it's because I posted it back in February. I'm posting it again as part of Sangeeth Raghunathan's blogging event "101 Omelet Recipes."


The past few weeks have been all about rediscovering Sunday breakfast for me in my humble little abode. There's something about getting up, putting on a pot of coffee, and getting out some cooking magazines and recipes to go through that begs for a little indulgence.

First on the list was pancakes. Thanks to my holiday baking I had some leftover buttermilk in the fridge so I whipped up a batch of buttermilk pancakes that came out just the way buttermilk pancakes should - light and fluffy, with the perfect balance of density and sponginess that soaks up the maple syrup without disintegrating.

And then I got on a little bit of a cheese kick. It started with the idea of grilled cheese sandwiches, something I have not had in the longest time. But once I thought about them, I really wanted one, so I bought some nice sharp cheddar cheese and a beautiful loaf of sesame semolina bread (that's the last of it up there with the omelette) and set about making one for myself.

And it was . . . ok. There was nothing wrong with it, but it did not leave me craving another. What it did leave me with was about a half a pound of cheese. In addition to the Manchego, the freshly grated Grana Padano, the Locatelli Romano, which is similar to but has a sharper taste than the slab of Parmigianno Regianno. And then there's the Idiazabal, and the beautiful softTaleggio I bought at Pastoral the last time I was there, which melted beautifully in a nice tasty batch of polenta.

What to do with all of these cheeses? I will have to get creative, that's for sure. I have some ideas, of course. And if they work out, I will share them.

But back to the lovely sharp cheddar cheese and Sunday breakfast. I had some green onions, eggs and cheese. See where I'm going here?

Since my last failed attempt at making an omelet I have purchased a lovely Italian non-stick skillet that is just the right size for making omelettes. Why yes, now that you've asked, that's exactly why I bought it. I bought a small one on impulse at Jewel (yes Jewel, they're actually inexpensive but they work really well) for the purpose of toasting spices and nuts, and I liked it so much I got the next size up.

And may I say it made a beautiful omelette? You can see all that beautiful sharp cheddar and green onions oozing out of the center.

The secret to a successful omelette? Use water instead of milk. You've probably heard it before, but I'll say it here. Milk can make the eggs hard, but a good hard whisking of water in the mix just before you pour it into the pan makes all the difference in the world.

I have some different herb combinations that I will sometimes use with my omelettes, like tarragon, thyme, or Sunny Paris. But most of the time I just use salt and pepper, so the eggs can shine all by themselves.
If you've never made an omelette and are afraid to try, it's actually pretty easy. I can't say my way is authentic, but it looks like an omelette and tastes like an omelette, so it must be an omelette (see: duck).
CHEESE AND GREEN ONION OMELETTE

If you think of it in time, take out two eggs and let them come to room temperature. (This is not critical, but years ago someone told me eggs cook better when you bring them to room temperature. I can't find anything to back this up, but it's a habit by now.)

Wash and trim from 4 to 6 green onions and slice them about 1/4 - 1/8" thick. Grate about 1/4 cup cheese. If you want toast with your omelette, this would be a good time to stick the bread into the toaster.

Crack the eggs into a bowl and add salt and freshly gound black pepper. Melt a pat of butter into your omelette pan and add green onions. Saute until they have just started to caramelize and put them into a bowl.

Add another pat of butter into the pan. Pour a splash of water (not too much or it will be runny) into the egg mixture and whisk vigorously. When the butter in the pan has melted and is foaming, add the egg mixture to the pan in a continuous stream, whisking the whole time. Once the mixture is the the pan, keep whisking, working your way around the pan, so that the parts that are cooking keep mixing with the raw egg. Once it starts to set and the liquid no longer fills in the spaces from the mixing, stop. Run a spatula around the edges of the eggs until it is completely freed from the bottom of the pan. At this point, you can lay the cheese and the green onions just to one side of the middle of the omelette. Fold the side that the mixture is closest to over the cheese and onions. Turn off the heat. Grab the handle of the pan from the bottom and take it to the plate. Slide the unfolded part onto the plate, and then turn the pan over so that the stuffed, folded side falls on top of the unfolded part, which creates the third fold. (If that doesn't make sense, you can fold the third part while it's still in the pan, but there's a chance it will break. It will taste the same though, and you will get better with practice.)
And now, if you'll excuse me, I think I need to go take some eggs out of the fridge.

Thursday, October 23, 2008

Beet Radish Salad

In addition to beets, radishes are particularly lovely this year, and I've been using them much more than I usually do. I used to just slice them and put them in tossed salads with lettuce, tomato, and cucumber. I never much cared for them growing up. They're related to mustard and have a similar bite, to which I was particularly sensitive when I was younger. I could eat the occasional one I encountered in the salad, but I would have been just as happy if they'd been left out.

My taste buds toughened up over time, and I discovered that in addition to the heat, radishes had a flavor that I found pleasant, and I started putting them in my salads because I liked their presence, rather than just because it was a habit from childhood. The green market also introduced me to other types, like the milder french breakfast, which was the first time I used the radish as one of the main ingredients instead of an accent.

While I was experimenting with the beets and trying to find what other vegetables would complement them, I thought radishes might brighten up the more earthy taste. I was right. This was delicious served over a bed of the baby green lettuce I also found at the market.

I used both red and orange beets here. Obviously, any combination will do.
Home Cookin Chapter: My Recipes

BEET AND RADISH SALAD

2 bunches of baby beets, trimmed, boiled for about 20-30 minutes, peeled and chopped.
(Detailed instructions can be found here.)
1 bunch radishes, sliced
2 stalks of celery, sliced
1/4 cup red onion, thinly sliced
1 tsp fresh thyme, chopped
1/4 cup toasted pine nuts
Baby green-leaved lettuce

Combine first six ingredients and toss in blood orange vinaigrette. Serve over baby lettuce leaves.

BLOOD ORANGE VINAIGRETTE:


2 Tbsp white wine vinegar
juice from 1 blood orange
1 Tbsp dijon mustard
1/4 cup vegetable oil
1/4 cup olive oil
1 clove garlic, mashed (with salt)

Combine vinegar, blood orange juice and mustard in a medium-sized bowl. Whisk ingredients together, then slowly add the vegetable and olive oils, whisking steadily the whole time. Add the garlic (and salt and pepper to taste if you like). Taste, and adjust with more olive oil or vinegar if needed. Let stand at least half an hour before serving.

Exported from Home Cookin 5.6 (www.mountain-software.com)

Monday, October 20, 2008

Baby Cabbage with Beef Casserole

Fall is finally here (yes, I'm one of those), and as I think about the cold days to come, I think of all the hearty dishes it was too hot to cook and eat during the warm summer months. I am still finding my way down to the green market.

The season has definitely changed down at the market. The tomatoes, corn and peaches have been replaced with apples, pears, and pumpkins, and zucchini and summer squash have made way for acorn, butternut, and a host of other, less familiar, winter squashes.

And then there's the cabbage. When I was a child, there were two choices when it came to cabbage: cole slaw or boiled. I loved cole slaw, especially because it usually came with salami sandwiches, fried chicken, or barbecue. Boiled cabbage was to be avoided at all costs. Pale, mushy, and odoriferous, we didn't even have the corned beef to go with it. My mother was not one to go heavy with the seasoning, and it was bland at the same time that it had that awful cabbage-y smeill (you know what I mean.)

As I got older, I developed more of a taste for cooked cabbage, especially in soups and with corned beef. Cole slaw was still the preferred use, but every once in a while I would enjoy a wedge of boiled cabbage with the pot roast my mother served for dinner.

Later, I started hearing about this thing called stuffed cabbage. But it wasn't until I moved to Chicago and went to the Red Apple that I had the chance to try it. And loved it. And flirted with the thought of making it. I even looked at some recipes, but never got around to it. It seemed like a lot of work, so it stayed on my "maybe one day" list.

Until I saw the most beautiful baby cabbages at the green market. They were about three times the size of brussels sprouts and so cute I just had to take them home with me. I wasn't sure what I was going to do with them but I was pretty sure I could come up with something.

One I got home I started thinking. I had some ground beef in the freezer, and once I thought of that I thought of stuffed cabbage, which was not a viable option given the size of these babies. But once I went down that road, I knew those were the flavors I wanted, so why not just put the cabbages into the meat and rice mixture, rather than the other way around?

Thus was born my Baby Cabbage and Beef Casserole. It's thick and hearty and the perfect dinner on a chilly Autumn night.

Here's my technique. The recipe follows.

First, trimmed the bottoms of the cabbages, but did not core the. I cut them into quarters, then dropped them into a pot of boiling salted water. I turned off the heat and let them sit for 5 minutes, then drained them and placed them into a bowl of ice water so they would stop cooking and stay green.

I browned the meat in a tablespoon of oil over high heat, then added onions, garlic, celery salt, salt, and pepper. I let it continue browning until the onions were translucent. Then I added the rice and cooked until it was heated through.

I opened a can of chunky tomato sauce and poured a little into the bottom of a greased baking dish. I spooned in the beef and rice mixture, and then laid the blanched cabbage on top of the mixture. (I had meant to pour half of the tomato sauce over the rice before I laid the cabbage on but I forgot. It didn't affect the taste that much, but it would have worked as a binder for the beef and rice, so I will remember to do it that way next time.)

I poured the rest of the tomato sauce on top, and sprinkled dill over that. I baked it in a 350 deg. F. oven for about 30 minutes, until the tomato sauce had browned and the casserole was bubbling.

The flavors were delicious, but it would have been a more cohesive dish if I had remembered to layer the tomato sauce between the beef and rice mixture and the cabbage.
Home Cookin Chapter: My Recipes

BABY CABBAGE AND BEEF CASSEROLE
Serves 6

6 baby cabbages, trimmed but not cored, quartered
1 Tbsp canola oil
1 lb. ground chuck
1 large onion, chopped
4 cloves garlic, minced
1/4 tsp celery salt
salt and pepper to taste
1 24.5-oz. can chunky tomato sauce
1 tsp dill
3 cups cooked brown rice

Fill large stock pot with water and set over high heat. Bring to a boil; when water is boiling salt liberally. Add quartered cabbage. Cover and turn off heat. Let sit for 5 minutes. Drain and immediately place in ice water to keep it from cooking any longer.

In a large skillet, heat oil over medium high heat. Add beef and cook until browned, about 5-10 minutes. Add onion, garlic, celery salt, salt and pepper and cook until onions are translucent, about 5 minutes more.

Add cooked brown rice and mix well. Continue to cook until heated through.

Preheat oven to 350 deg. F. Pour beef and rice mixture into the bottom of a 13 x 9-inch greased baking dish. Pour half of the tomato sauce over the beef and rice. Layer the cabbage quarters over the tomato sauce, and then pour the rest of the tomato sauce over the top. Sprinkle with the dill.

Bake for 30-45 minutes, until the top is browned and bubbly.

October 2008

Exported from Home Cookin 5.6 (www.mountain-software.com)

Thursday, October 16, 2008

World Bread Day: The Zen of Baking Bread


Back in 2006, the International Union of Bakers declared October 16th as World Bread Day, and Zorra of Kochtopf initiated a bread-baking blogger event in honor of the occasion. Having participated in Sugar High Friday 38 that she also hosted last Christmas, I received an invitation to participate in this year's event.

About fifteen years ago I decided it was time to overcome my fear of yeast and bake a loaf of bread. I cleared a day on my calendar. I don't know why I was so nervous. Maybe it was because I knew that yeast is a living thing, and if you kill it too soon your bread will not rise and you will have wasted a hell of a lot of flour.

Of the two recipes I had access to at the time, the one in my old standby The Good Housekeeping Illustrated Cookbook looked the least intimidating. I wanted to make a good, solid whole wheat bread. I had visions of baking all my bread from then on, if it worked out.

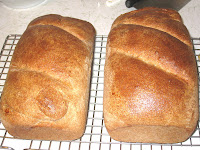
Following the recipe I proofed the yeast, added the molasses and more water and mixed in the oil, salt and flour, let it rise, punched it down, let it rise again, punched it down again, formed it into two loaves, and let it rise yet again before I put it in the oven. And an hour or so later I had two real live (well, actually dead since the heat from the oven killed the yeast) loaves of molasses whole wheat bread.

But there were problems. The first one was the molasses. There are certain things that have molasses that I like, but I discovered that whole wheat bread isn't really one of them. It had too distinctive a taste that overshadowed anything else I tried to put on it.

The other problem was that the recipe instructed me to use a hand beater to beat the flour into the liquid. The elasticity of the yeast caused the mixture to grab onto the beater and climb up the stem towards the mixer itself. It made a mess and took me forever because I had to keep stopping to scrape the glop off of the beaters before it infiltrated through the housing. I was proud of my efforts, and encouraged enough to try the recipe in the same book for French bread. It was simpler and involved no beating. It was delicious, but not the bread I wanted to be making.

I had overcome my fear of yeast though. Flush with my success, I took a stab at dinner rolls, and while they were unevenly shaped, they looked and tasted like dinner rolls. I even ventured into the world of noodles, with less success (they tasted ok, but it was impossible to cut them evenly.) But I was pretty sure I would never be making another loaf of regular bread again.

A short time later I was shelving books at the bookstore where I worked and I ran into The Tassajara Bread Book, by Edward Espe Brown, past president of the San Francisco Zen Center. The book was published by Shambala Publications, which specializes in books on Buddhism and "classics of the wisdom traditions." Intrigued, I bought it, took it home with me, and started reading.

And was immediately struck with how simple the author made breadmaking seem. Take flour, water and salt, mix it together and put it in the oven, and you have bread. Add yeast for lightness, honey to sweeten it, oil for moistness and you have the staff of life.

The first thing in the book that made me decide it might be worth trying again was how easy Brown made it seem. I don't know that the phrase is anywhere in there, but the message I got as I read through the first sections was "don't fear the bread." The second was that Brown uses a sponge method; rather than proofing, you mix the yeast, water and half the flour together, let it rise, and then add the salt, oil and the rest of the flour. Third, and the thing that clinched it for me, was the simplicity of the equipment: a bowl, a spoon, and a scraper. No mixers, no proofing, what could be easier?

But what really inspired me was that before the recipes themselves, the book contained a series of detailed instructions, loaded with illustrations, that guided the reader through the complete process. The illustrations are simple line drawings, and the text is informal, both of which gave me the feeling that Brown was in the kitchen with me, talking me through the whole process.

I rolled up my sleeves and tried again. With great success. Two beautiful loaves of honey-wheat goodness, delicious with both butter and peanut butter. My co-workers were impressed with the loaf I brought in and it disappeared pretty quickly. I swore I would never buy another loaf of bread again.

And never baked another loaf after that. What happened? I got busy. A new position at the bookstore that had me working at least seventy hours a week. A temperamental oven with an unpredictable thermostat. Not only was I not baking bread, I wasn't really cooking anything. I picked up lunch from the restaurants around the bookstore; dinners were cereal and milk or delivery. Not my healthiest years.

After I started this knitting blog (heh heh) and watched it morph into a cooking blog, I started thinking about bread again. It had been so long, though, that my old fear of yeast had somehow crept back into my head, so I was content to leave it with the idea that someday, maybe, I would try again.

And then Zorra's email popped into my inbox. What better way to celebrate World Bread Day than by taking out that bowl, wooden spoon, and scraper and picking up where I left off all those years ago? I had all the ingredients on hand except for the yeast, which was easy for me to pick up on my way home from work.

So the Saturday before last I cleared my calendar and decided to spend the day baking bread. I pulled out the Tassajara Bread Book, re-read the instructions a couple of times, and got started.

I am not going to post the recipe here. The detailed instructions are the most important part of this recipe. If you have been thinking about baking bread but are at all intimidated, I cannot recommend this book highly enough.

First, I created the sponge by dissolving the yeast into lukewarm water, then gradually adding the whole wheat flour and then beating it with a wooden spoon a hundred times. Doesn't that just scream zen? I covered it with a damp towel and left it in the oven, warmed only by the pilot light, to rise for 50 minutes.


It rose quite a bit, as you can see. I added salt and oil and gently folded it into the sponge.


I added the rest of the flour, a half a cup at a time, folding it in until the dough pulled away from the bowl and formed a ball. Then I rolled it out onto the countertop, which I had dusted with flour. I sprinkled flour on top of the loaf and kneaded it for about fifteen minutes, gradually adding about another cup of flour before I could knead it without the flour sticking to the counter or to my hands. When it was nice and shiny I put it back into the (now oiled) bowl, covered it, and stuck it back into the unlit oven to rise for another 50 minutes.

And you can see that once again it rose quite a bit. I punched it down and took it out of the bowl. At this point, it should have been allowed to rise again, but according to the book this step can be omitted if you are short on time, but the bread will be a little more dense. I like dense, so I omitted this step even though time was not an issue.


I pre-heated the oven to 350 degrees. Then I smoothed the dough into a ball and cut it in half, formed each half into a ball, and let them sit for five minutes. I took each ball and kneaded it about five times, then rolled it into a loaf and put it in a pre-greased loaf pan. I covered both pans and let them rise again for another 20 minutes.


Just before putting them into the oven I cut slits in the tops and then brushed the tops with an egg-wash. I put them in the oven and set the timer for 50 minutes.


While they were baking, the most wonderful smell started wafting through my apartment. If you've passed by a bread factory then you know what I'm talking about, but it's far more intense when it's coming out of your own oven. I'm sure my neighbors were jealous. I could hardly wait for them to be done. And when they were finally done, I had to wait another hour for them to cool down. What sweet, sweet torture!

When they were finally cool, I cut a couple of slices and slathered them with butter. Ok, I didn't really slather, but I wanted to. It's not the healthiest thing in the world, but it's a moral imperative for my first home-made loaf of bread in fifteen years.
And now I am wondering why I did not keep up with it back then. It is surprisingly easy to do, and most of the time involved is doing whatever you want around the house while waiting for the different rising periods. The actual hands-on time is short. It was such a success that I made more this weekend. It was even less of a hassle since I was that much more familiar with the process.

I have been eating peanut butter sandwiches for breakfast at work lately; it's quick and easy and travels well. They were especially good this week on my homemade bread, especially since I am having trouble finding a decent whole wheat bread that doesn't have a lot of questionable items on the ingredient list. Ingredients for this bread: Water, yeast, honey, flour, oil, salt, and egg.

So thank you Zorra, for hosting this event and inspiring me to jump back into the art of baking bread. I will not let another fifteen years go by before I bake more.

Monday, October 13, 2008

S-S-S-Suffering Succotash!

Like any other red-blooded American child, I abhorred beans with a passion. And lima beans were particularly nasty given their size. If one bean was bad, one lima bean was three times as bad. Luckily, we did not have them often, and rarely by themselves. They usually came in the package of frozen mixed vegetables my mother would serve on the occasional unfortunate night. I don't remember what she would usually make as the main dish; all I remember is sitting at the table, staring down at my plate, hoping against all hope that the offending legumes would roll off the table and out the door like that errant meatball of song.

Over the years, I had some experiences that changed some of my feelings towards beans. The first one I can think of was the first time my mother doctored up a can of Van Camp's Pork and Beans with ketchup, Worcestershire sauce, dried minced onions, and brown sugar and served it with our hot dogs. Yum! It's no wonder I loved it - with all that sugar you could hardly tell the beans were even in there. Which might explain why I had no trouble eating those beans any time they were placed before me, and would even go back for seconds.

My next experience was at my best friend's house when I was around nine or ten. Her mother was getting ready to cook green beans for dinner. She asked me if I liked them, and I had to say that no, in fact, I didn't. "Have you ever had fresh?" she asked. I admitted that no, I hadn't. "I bet you'll like these," she said. And I did. And oddly enough, even the canned and frozen ones I had previously hated became more palatable.

And then , when I was in high school, my father started making huge batches of turkey soup using the carcasses from Thanksgiving and Christmas turkeys every year. He threw pretty much everything but the kitchen sink into the pot, including lima beans. And I was surprised to discover that I enjoyed the occasional bean that found its way onto my spoon. I wasn't ready to eat them in mass quantities, but I no longer hated them.

And then I ran into these fresh lima beans at the green market this Saturday. I have never seen them before, and I just couldn't resist buying them and bringing them home with me.

But what to do with them? As much as I have come to enjoy them, I really wasn't up to just cooking them up and eating them by themselves.

I still have a couple of bags of frozen corn fresh off some ears Mary brought me from Michigan last month, so I thought I might tackle succotash, the idea of which has fascinated me ever since Sylvester first uttered his trademark phrase. Since I couldn't think of anything else to do with it, I went online and looked through some cookbooks to see what I could find.

I was happy to discover that some recipes use tomato, like the one I opted to use that I found here. I tweaked it a bit, and got to work.

All I have to say is "Wow." Who knew lima beans and corn could taste so good together.

The original recipe called for about half a cup of butter. I'm sure it would be sinfully delicious that way, and I may try it some day, but it was pretty darn tasty cooked in oil, and much healthier too.
Home Cookin Chapter: Beans and Vegetables

SUCCOTASH
serves 6

2 Tbsp canola oil
2 cups fresh lima beans
1/2 teaspoon salt
1 14.5-oz. can diced tomatoes
1 tsp sugar
4 ears fresh corn kernels, cut from the cob

Heat oil in a large saucepan over medium heat. Stir in lima beans and cook about 10 minutes more.

Add tomatoes and sugar and cook another 10-20 minutes more, until lima beans are tender and tomatoes have thickened.

Add corn and cook ten minutes more.

Loosely adapted from recipe submittd by Michele O'Sullivan on allrecipes.com
ALL RIGHTS RESERVED © 2008 Allrecipes.com


Exported from Home Cookin 5.6 (www.mountain-software.com)

Thursday, October 09, 2008

Spicy Pasta with Peppers

Here's what I did with the sweet peppers and jalapeno that came from my friend's garden before I put them in an omelette. It was mighty tasty, and mighty hot.

The prep was simple. Put a pot of water on the stove to boil. Minced some garlic, chopped some onions, seeded and sliced the sweet peppers, and minced the jalapeno (left the seeds in. I always leave the seeds in. What's the point otherwise?).

Heated some olive oil in a skillet. Added the onions and garlic, let it sweat. Added the jalapenos and let it sweat a little more. Added the sweet peppers, then salt and pepper to taste and cooked until everything was nice and translucent. Added about three-fourths of a cup of vegetable broth, brought it to a simmer, and then cooked 15-20 minutes to reduce. Cooked spaghetti two minutes less than package directed. Drained, then dumped in the skillet with the garlic, onions and peppers. Let cook two minutes more.

Plated. Topped with grated romano cheese. More diablo than Arrabiata, but you get the idea.

Monday, October 06, 2008

How To Make an Omelette

As I mentioned earlier this summer, I have been making quite a few omelettes these days. Indeed, I may actually have made more omelettes this summer alone than in all of my previous years in the kitchen.

Which is a good thing, because it has given me a chance to perfect them. Or, at least, to improve upon them considerably.

Like the green onion and cheese omelette that I wrote about here. I was proud of this one. It was one of my early attempts and it came out beautifully. I think that may have been what started it all. That, and all of the new cheeses and fresh herbs I was bringing home.

Like this omelette I made with the fresh oregano I bought for the Olive and Walnut Pate recipe I got from Lynda and took to a knitting class get-together (it was a big hit too, Lynda). Oregano is not a herb I usually have in my kitchen so I was at a little bit of a loss as to what to do with the rest of it. And then Sunday came around and the answer seemed obvious. It paired very nicely with a nice double Gloucester (leftover from a batch of pimento cheese) and a little bit of yellow onion.


For this one, I caramelized a couple of shallots and some green onions I had on hand, both needing to be used pretty quickly. I still had some double Gloucester left for this one. As you can see, it didn't hold up completely, but it tasted just as good.

I think I fell into the "If this much filling is good, then more will be better" trap.


And stayed in that trap for this one. Here, I had some beautiful sweet peppers and a red jalapeno that both came from a friend's garden, and an overabundance of fresh corn. I don't usually make my omelettes spicy, but I had the jalapeno on hand and some queso fresco I used to make corn pudding so the idea just kind of came together in my head.

If I had been lucky enough to have some cilantro on hand, this would have been a kickass omelette. Without, it was still delicious.

A lot of people are afraid of omelettes, I think because they are presented as a temperamental dish that takes years of practice to perfect. That has not been my experience, but even if it does take years to perfect, the practice runs are usually just as tasty as the final, perfect omelette (which I have not managed, by the way).

I wrote about my technique for omelettes back in February, but I thought it might be helpful to have some pictures to illustrate the process, so I'm going to repeat it here.

You may notice that the omelette at the top of the page, which is the one I made with these step-by-step pictures, is a little darker and crustier than the other ones. That is because I kept stopping to take pictures. I knew the risk I was running but decided to let it happen so I could get the pictures. And except for being a little crisper on the edges, it was like eating the burnt edges of a good mac 'n cheese; in a word, delicious.

If you've always wanted to make an omelette but have been afraid to try it, you really should go ahead and jump in. The worst that can happen is you will end up with some really tasty scrambled eggs.
The first thing you do is take two eggs out of the refrigerator so they can come to room temperature. As I've said before, I don't have any documentation for why you should do this, but it does seem to make a softer omelette. Maybe the eggs don't have to cook as long if they don't have to warm up.

Once you have decided what you are going to put into your omelette, you should think about whether you want to cook it with the eggs or add it as a filling. A good rule of thumb is: the bigger the item, the better to add it to the filling.

I diced a green pepper and sauteed it in my omelette pan in a little butter, then put it in this bowl for later.


In the same pan, without adding any butter, I added some finely diced green onions and let them cook until they were slightly caramelized.

I did not take a picture of this, but in the meantime I cracked my two eggs into a bowl, added salt and pepper and a splash of cold water (about a tablespoon but I did not measure, just took the pitcher and poured from it for less than a second). Because I was going to add some kalamata olives, I decided to throw in a little oregano and marjoram to give it a more Mediterranean twist.

Once the onions were ready, I threw another pat of butter into the skillet and let it melt. I took a whisk and beat the eggs briskly and thouroughly. Continuing to whisk them, I poured them into the pan in a steady stream.


Once the eggs were in the pan I whisked the eggs in very small circles in the center of the pan, moving out to the edges. As soon as the eggs were too dry to replace the egg I was displacing, I stopped. You want the eggs to set in one big piece.


Once the eggs have started to set, but while they are still wet, you want to add your other ingredients. In this case, I added grated cheese, the green peppers, and some chopped kalamata olives. You want to put them a little closer to the middle than I did, because after you let it sit for just a quick minute more you want to take a spatula and fold one third of the omelette over the filling.

You do not want to let the egg set completely - remember that it will continue cooking once it is on the plate, so to make sure it stays nice and soft and creamy inside finish it up about a minute or two before you think it's ready.

Using the spatula as a guide, I slid the unfolded part onto a plate, flipping the rest of the omelette over the fold as I did so. One of the reasons the omelette above didn't fold as neatly as it should was because I didn't put the ingredients in the middle; the other is because I put too many ingredients in the center.

Even with all of its faults, though, it made for a spectacularly delicious breakfast.

Thursday, October 02, 2008

Chimichurri with Skirt Steak


I have been reading about chimichurri for a couple of years now. Native to Argentina but enjoyed throughout South and parts of Central America, it is used both as a sauce for grilled meats and as a marinade. The main ingredients are parsley, cilantro, salt, garlic, oil and vinegar. Other ingredients are added to the taste of the individual preparing it; there are apparently as many recipes out there as there are chefs who make it.

I have had a skirt steak biding its time in the freezer for a few months now. I am happy to say that I am finally making real progress on using up everything that's in there. I haven't bought any meat for weeks, and I am determined to use up all of my frozen meat before I buy any more. I think I am down to a pound of ground beef, two halves of a ham bone, and another skirt steak. I think that's all. Considering what all I did have in there, that's pretty amazing.

While the skirt steak was defrosting in the refrigerator, I thought about how I wanted to prepare it. It's a flavorful cut of meat that doesn't really need a lot of seasoning and, while related to flank steak, is less lean and doesn't really need the marinade to tenderize it. I remembered watching Ingrid Hoffman make a skirt steak that she served with chimichurri, and she made a point of saying that she didn't season the meat with anything more than salt and pepper; serving the sauce with it provided more than enough flavor. So I decided that's what I would do.

After the steak was defrosted I rinsed it off and patted it dry. Instead of putting it under the broiler, I decided to cook it in my cast-iron skillet on the stove. I turned the heat on high, poured a little bit of canola oil into the pan and let it get just to the verge of smoking hot, seasoned the steaks with salt and pepper, and gently lowered them seasoned-side down into the pan. I didn't touch them while they cooked for three minutes on the first side. Then I seasoned the top sides and gently turned them over and let them cook on that side, untouched, for another three minutes.

When they were done cooking, I put them on a plate and let them rest while I threw together the chimichurri. When everything was ready, I sliced the meat as thin as I could against the grain.

If the chimichurri in this picture looks lighter than that on the steak in the photo above, that's due to the inconsistency of my camera. What's on the steak is closer to the actual color. It came out dark green and very flavorful. I used sherry vinegar, which I have come to prefer over regular red wine vinegar. The parsley is fresh and bright, and the garlic actually tones down the acidity of the vinegar. It really is all you need to make the skirt steak delicious. I'm also thinking it would be really good with potatoes.

Like I said above, I found many recipes online for this sauce, in addition to one I found in a South American cookbook. Much like I did with the za'atar, I used all of them as a springboard and came up with my own version. I don't know that I will do much, if anything, different the next time I make it.

Instead of messing up the blender, I put all of the ingredients in a jar and blended them up with my super-duper hand blender that I am always talking about how much I love. You do have one by now, don't you?
CHIMICHURRI

2 bunches of fresh chopped parsley
1 large handful of fresh chopped cilantro
3-4 cloves garlic, roughly chopped
1 tsp oregano
1/2 tsp thyme
salt and pepper to taste
1/4 tsp red pepper flakes
1/2 cup red wine or sherry vinegar
1/4 cup olive oil
pinch sugar

Place all ingredients into a blender. Puree until well blended. Or, put everything into a large jar and use the hand blender.

Related Posts Plugin for WordPress, Blogger...